Full Editing Workflow For Portrait Photography | Portrait Retouching | Affinity Photo Tutorial
In this tutorial I go through my full portrait editing & portrait retouching workflow using Affinity Photo, so that you can see all the steps I make to create beautiful portrait images.
I have made several portrait image editing videos before explaining various aspects of my retouching workflow, but in this extended episode I go all the way from importing a RAW file to the Develop Persona right through to saving & exporting a beautifully finished portrait photograph.
For this portrait editing walkthrough I'm using an image that I took of the wonderful Freya on a 1970's inspired wedding shoot where I was actually the videographer for the day, however I took this natural light portrait photograph in between scenes. A huge thank you to Freya for allowing me to use this image of her & please click on the link below & head over to Instagram to give her a follow.
You can find Freya here: www.instagram.com/freyacoombs
Below you can see the normal steps I follow to create my portrait images in Affinity Photo:
1. Develop Persona (Develop the RAW File)
2. Duplicate the background layer
3. Inpainting any distractions
4. Skin clean up
5. Frequency Separation
6. Balancing skin colour (in frequency separation)
7. Dodging & Burning (in frequency separation)
8. Tone Map (tone map persona)
9. RGB Curves adjustment (colour editing)
10. Colour balance adjustment (colour editing)
11. Gradient map (colour editing)
12. HSL adjustment (colour editing)
13. Selective colour adjustment (colour editing)
14. B&W contrast adjustment (contrast editing)
15. Curves contrast layer (contrast editing)
16. Levels adjustment (contrast editing)
17. Live clarity layer (details editing)
18. High pass filter (details editing)
19. Vignette (details editing)
On average a portrait image such as this takes me between 60-90 minutes to complete from start to finish, using the portrait retouching techniques listed above. I have developed this way of working over a number of years & I have adopted different techniques & styles during that time, which has eventually led me to this editing workflow.
You can find my latest portrait editing tutorial here: https://youtu.be/_NY_5f8Hhv4
You can find my latest videography tutorial here: https://youtu.be/uLDd6cORY_A
You can find my latest film here:
https://youtu.be/26eVxhRkp0Y
#affinityphoto #retouching #portraitphotography
If you enjoyed the film make sure to give it a like and consider subscribing to the channel & why not head over to instagram where you can keep up to date with what I get unto daily. You can find the link below.
You can find Freya here: www.instagram.com/freyacoombs
___________________________________________________________________________
You can find out more information on my work and my packages at my website here-
Visit my website -
www.lukebatchelorproductions.com
Follow me on Facebook -
www.facebook.com/lukebatchelorproductionsltd
Follow me on instagram -
www.instagram.com/lukebatchelorproductions
___________________________________________________________________________
Видео Full Editing Workflow For Portrait Photography | Portrait Retouching | Affinity Photo Tutorial канала Luke Batchelor Productions
Показать
Комментарии отсутствуют
Информация о видео
24 февраля 2021 г. 18:00:25
00:38:39
Другие видео канала
 Selective Colour In Your Portrait Images | Portrait Retouching | Affinity Photo Tutorial |
 Taking Full Control of Your Black & White Images | Affinity Photo Tutorial | Portrait Photography
 Compositing Techniques in Affinity Photo with James Ritson
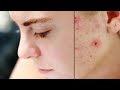 The Power of Frequency Separation with Affinity Photo + Free Project
 Affinity Photo Tutorial For Beginners - Top 10 Things Beginners Want To Know
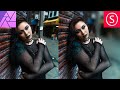 Depth of Field Effect- Amazing Trick - Affinity Photo Tutorial
 How to Edit RAW Photos in Affinity Photo | Develop Persona for Beginners
 3 Tools For Color Grading In Affinity Photo - Beginner Tutorial
 Editing a Photo Using The New TK7 Go Module In Photoshop
 Lightroom Tutorial BASICS | Photo Editing Masterclass
 Photography Masterclass | Portrait Retouching for Photographers
 Colour grading for dramatic portraiture in Affinity Photo with Ivan Weiss
 How to: Adjust Contrast WITHOUT Saturation - Affinity Photo Tutorial
 Capture One 21 Live | Advancing your Landscape Edits
 How To Add Neon Glow Effects To Your Portrait Images | Portrait Retouching | Affinity Photo Tutorial
 Easily Retouch Skin Like a Professional! Affinity Photo Tutorial
 Affinity Photo: Deform Filter - How to use it / Tutorial
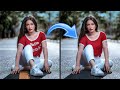 How to Remove ANYTHING in Affinity Photo!
 New Frequency Separation Detail Stacking Method in Affinity Photo v1.10+
 How I Edit and Retouch Fashion Portraits - Photoshop Tutorial