Screen burned Gameboy Pocket restoration and repair
In this episode I will restore the Gameboy Pocket retro console. This unit is missing the glass screen on top of the actual LCD screen and also the battery cover. I managed to find an original cover. I will show you how to fix a screen burn and do a general cleanup on the Gameboy. I don't do electronical work every week but I promise there will be also this type of videos every once in a while. Check out the link bellow to support this channel. I get a small fee every time you buy from amazon after clicking my links, even if you end up buying something else.
---------------------------------------------------------------------
Check out my new Instagram: https://www.instagram.com/odd.tinkering/
Support me on Patreon: https://www.patreon.com/oddtinkering
Get My T-shirts from: https://teespring.com/stores/odd-tinkering-2
Tools and materials for this project:
Screw driver set: https://amzn.to/2F3n6kO
Replacement glass: https://amzn.to/2Hr3oRb
Polarizing filter: https://amzn.to/2KSz7Nd
Replacement rubber pad for buttons: https://amzn.to/2KS9Dzr
Isopropyl alcohol: https://amzn.to/324gED7
Service number sticker: https://ebay.to/2MyIfIR
Other stuff you might need:
Reproduction shell for gameboy pocket: https://amzn.to/2LbuFbl
Battery door with the sticker: https://amzn.to/2KSPAAQ
Other sticker for the shell: https://amzn.to/2Hr54Kt
The Watch: https://amzn.to/2NpDMJJ
---------------------------------------------------------------------
SUBSCRIBE ▶▶▶ https://www.youtube.com/channel/UCf_s...
---------------------------------------------------------------------
Restoration playlist▶ https://www.youtube.com/playlist?list=PLVIxIjRNxFv5VRUXt66VzBxOys1GpmBp4
---------------------------------------------------------------------
To open the shell I needed my electronics screw driver set that has the Y-shaped tri-wing screwdriver The shell is closed with that that sort of screws so no one would go tinkering about on the inside. On the inside the screws were normal Phillips heads (cross shape). Board had different looking screws than the metal piece that was attached to the shell so its not easy to mix them up even though I only used one tray.
I took also the metal parts out from the shell because I washed it with water but I only show this in my extended Patreon version of the video. I wanted too keep the youtube version much shorter but without cutting out any of the important parts.
The board looked fine and I rubber the whatever small corrosion I found off with Isopropyl alcohol. I recommend using electronic grade alcohol like the one I've linked above.
The issue with the screen is called screen burn and it is caused by UV-light. The polarizing filter on the screen is damaged. There is another filter behind the screen which can also get damaged but in this case the damage was luckily not so extensive. Sometimes the filter comes off nicely but in my case I know it was going to leave a lot of adhesive residues because of the crystalline look it had. This is not extremely bad but will mean that getting the adhesive off will be much more work. If you are lucky it might only take 10 minutes but for me it took around 1h 45min.
When placing the new polarizer it is very important to keep the adhesive on the polarizer clean and also to keep the screen clean because any residue of the old adhesive will leave a nasty looking bubble and if you touch the polarizers glue with your fingers you might end up with sort of foggy looking areas on the screen.
I used a piece of tape to help me with aiming the polarizer on it's place. If the polarizer is slightly off it wont matter as the edger will be hidden pretty well. More important part is to make sure you have no bubbles. I had some because it's actually really hard to do this when filming... But luckily I was able to remove them.
Thanks for checking out my video once again! If you liked it please subscribe, like and share it with your friends.I don't post these electronic repairs every week, but there will be more so stay tuned!
Видео Screen burned Gameboy Pocket restoration and repair канала Odd Tinkering
---------------------------------------------------------------------
Check out my new Instagram: https://www.instagram.com/odd.tinkering/
Support me on Patreon: https://www.patreon.com/oddtinkering
Get My T-shirts from: https://teespring.com/stores/odd-tinkering-2
Tools and materials for this project:
Screw driver set: https://amzn.to/2F3n6kO
Replacement glass: https://amzn.to/2Hr3oRb
Polarizing filter: https://amzn.to/2KSz7Nd
Replacement rubber pad for buttons: https://amzn.to/2KS9Dzr
Isopropyl alcohol: https://amzn.to/324gED7
Service number sticker: https://ebay.to/2MyIfIR
Other stuff you might need:
Reproduction shell for gameboy pocket: https://amzn.to/2LbuFbl
Battery door with the sticker: https://amzn.to/2KSPAAQ
Other sticker for the shell: https://amzn.to/2Hr54Kt
The Watch: https://amzn.to/2NpDMJJ
---------------------------------------------------------------------
SUBSCRIBE ▶▶▶ https://www.youtube.com/channel/UCf_s...
---------------------------------------------------------------------
Restoration playlist▶ https://www.youtube.com/playlist?list=PLVIxIjRNxFv5VRUXt66VzBxOys1GpmBp4
---------------------------------------------------------------------
To open the shell I needed my electronics screw driver set that has the Y-shaped tri-wing screwdriver The shell is closed with that that sort of screws so no one would go tinkering about on the inside. On the inside the screws were normal Phillips heads (cross shape). Board had different looking screws than the metal piece that was attached to the shell so its not easy to mix them up even though I only used one tray.
I took also the metal parts out from the shell because I washed it with water but I only show this in my extended Patreon version of the video. I wanted too keep the youtube version much shorter but without cutting out any of the important parts.
The board looked fine and I rubber the whatever small corrosion I found off with Isopropyl alcohol. I recommend using electronic grade alcohol like the one I've linked above.
The issue with the screen is called screen burn and it is caused by UV-light. The polarizing filter on the screen is damaged. There is another filter behind the screen which can also get damaged but in this case the damage was luckily not so extensive. Sometimes the filter comes off nicely but in my case I know it was going to leave a lot of adhesive residues because of the crystalline look it had. This is not extremely bad but will mean that getting the adhesive off will be much more work. If you are lucky it might only take 10 minutes but for me it took around 1h 45min.
When placing the new polarizer it is very important to keep the adhesive on the polarizer clean and also to keep the screen clean because any residue of the old adhesive will leave a nasty looking bubble and if you touch the polarizers glue with your fingers you might end up with sort of foggy looking areas on the screen.
I used a piece of tape to help me with aiming the polarizer on it's place. If the polarizer is slightly off it wont matter as the edger will be hidden pretty well. More important part is to make sure you have no bubbles. I had some because it's actually really hard to do this when filming... But luckily I was able to remove them.
Thanks for checking out my video once again! If you liked it please subscribe, like and share it with your friends.I don't post these electronic repairs every week, but there will be more so stay tuned!
Видео Screen burned Gameboy Pocket restoration and repair канала Odd Tinkering
Показать
Комментарии отсутствуют
Информация о видео
Другие видео канала
 I Restored and Upgraded This $2 Junk Original Gameboy - Console Restoration & Repair
 Rare Pistol Lighter Restoration - IMCO 6900
 I Restored $5 Destroyed iPhone 4S Back to Brand New - Phone Restoration & Repair
 Restoring Broken GoPro Hero 3+ a Subscriber Sent Me - Action Camera Restoration
 Restoring Lamp From Abandoned Bunker for My Home
 Restoration & Repair of Xbox 360 with Red Ring of Death
 I Restored This $5 Ebay Junk Gameboy Advance. It Used to be Blue – Retro Console Repair
 LCD REPAIR !!
 Yellowed Xbox 360 Controller Restoration - Gaming Console Repair
 Restoring Old Rusty Table Fan with Laser Cleaning
 Broken & Yellowed Nintendo GameCube Controller Restoration - Retro Console Repair
 WWII Flashlight with Rust Holes - Restoration
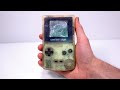 I Restored This 2$ Ebay Junk Game Boy Color - Retro Console Restoration & Repair
 Junk GameCube Restoration - Nintendo Console Repair
 I Restored This Yellowed Keyboard for My Home Office - Retro Tech Restoration
 I Restored And Repaired This Antique Ship Compass
 Restoration of Extremely Yellow Broken Sega Saturn
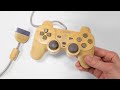 I restored extremely yellowed Dualshock controller for my PSone - Playstation restoration
 Restoring Worlds Smallest Lighter - Vintage Lighter Restoration & Repair
 I Restored This Destroyed Gameboy Advance SP - Retro Nintendo Console Restoration