A step-by-step guide to clearing a paper jam in your HP DeskJet printer
HP Printer setup support presents Fix a Paper Jam _ HP DeskJet 2700, DeskJet Plus 4100 series printers _ HP
If your HP DeskJet 2700 or DeskJet Plus 4100 series printer is showing a paper jam error, don't panic. This is a common problem that can usually be fixed quite easily. Follow the steps below and you'll have your printer up and running again in no time.
Clear jammed paper from underneath the printer
Remove jammed paper from underneath the printer.
• Press the Cancel button on the printer to automatically clear the paper jam.
If the error persists, continue with these steps.
• Press the power button to turn off the printer, and then disconnect the power cord and any other cables from the rear of the printer.
WARNING: To avoid risk of injuries or electric shock, you must disconnect the power cord before reaching inside the printer.
• Lower the paper input tray back into the printer, close the output tray extender, and then push the output paper tray into the printer.
• Turn the printer to access the underside (base).
CAUTION: Before turning the printer, hold the scanner lid and the paper input tray closed with your hands.
• Pull the tabs on either side of the cleanout door to open it.
• Remove any jammed paper found inside the printer.
• Use a flashlight to check for and remove any torn pieces of jammed paper inside the cleanout area.
• Gently close the cleanout door by pushing the door towards the printer until both the latches snap into place.
• Turn the printer over to its normal position.
• Reconnect the power cord and any other cables, and then turn on the printer.
Clear jammed paper from the printer
Paper jams can occur in multiple areas of the printer. If you cannot find the paper jam in one area, continue to the next area until the jam is located.
Clear jammed paper from the input tray
Remove any jammed paper that is accessible from the input tray area.
• Remove any loose paper from the input tray.
• Gently remove any jammed paper and bits of torn paper from the input tray. To avoid tearing any whole sheets of paper, pull the paper with both hands.
• Make sure there are no foreign objects in the paper path, and then reload the input tray with new paper.
CAUTION: Do not remove the input tray shield. The input tray shield prevents foreign debris from falling into the paper path and causing paper jams.
• Press the Resume button on the printer control panel to continue the print job.
Clear jammed paper from the output tray
Remove any jammed paper that is accessible from the output tray area.
• Gently remove any jammed paper and bits of torn paper from the output tray. To avoid tearing any whole sheets of paper, pull the paper with both hands.
• Use a flashlight to check for and remove any additional bits of torn paper or debris.
• Press the Resume button on the printer control panel to continue the print job.
Clear jammed paper from the ink cartridge access area
Remove any jammed paper from the ink cartridge access area.
• Open the ink cartridge access door, and then wait for the carriage to move to the center of the printer.
• Press the power button to turn off the printer, and then disconnect the power cord and any other cables from the rear of the printer.
• Gently remove any jammed paper inside the printer. To avoid tearing any whole sheets of paper, pull the paper with both hands.
• Use a flashlight to thoroughly check for and remove torn pieces of paper and debris that remain inside the printer. If the carriage is in the center, slide it to the right to remove anything blocking the carriage path.
• Close the ink cartridge access door.
• Reconnect the power cord and any other cables, and then turn on the printer.
Clear jammed paper from the document feeder (DeskJet Plus 4100 models only)
Remove any jammed paper from the automatic document feeder (ADF).
• Lift the document feeder cover.
• Gently remove any jammed paper from the rollers. To avoid tearing any whole sheets of paper, pull the paper with both hands.
CAUTION: If the paper tears when removing it, check the rollers and wheels for any torn pieces of paper. If you do not remove all torn paper, more jams are likely to occur.
• Lower the document feeder cover until it snaps into place.
Use an automated tool to clean the paper rollers
Clean the printer's paper rollers with an automated tool.
• Turn on the printer.
• Remove any paper from the input tray.
• Press and hold the Power button, press the Cancel button three times, press the Start Color Copy button seven times, and then release the Power button.
The printer makes noise for approximately one minute while cleaning the paper rollers.
Видео A step-by-step guide to clearing a paper jam in your HP DeskJet printer канала Hp Printer Solution Expert
hp printer drivers printer setup HP Paper Jam HP DeskJet 2700 DeskJet Plus 4100 Hewlett Packard clear a paper jam in an HP DeskJet printer how to connect hp wireless printer install hp wireless printer printer how to install hp printer how to install hp wireless printer printer hp wireless printer printer wireless setup troubleshooting tutorial howto diy electronics printer how to support help learn reset HP printer
Комментарии отсутствуют
Информация о видео
30 сентября 2024 г. 8:55:34
00:04:00
Другие видео канала
 Fixing Print and Scan Problems with HP's Print and Scan Doctor
 Troubleshooting Quickly: HP Printer Scanning Issues for Mac Users
 How to update your Mac OS X to use the HP printer driver
 Step by step guide to Installing an HP Printer Using a USB Connection and Basic Driver
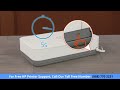 How to set up a wireless HP printer using HP Easy Start in Windows
 How to print from your Android phone using HP's Wi-Fi Direct feature
 How to Find Your Printer Name or Number | HP Printer Setup
 How To easily Reset your HP Printer| HP Printer Setup
 How to update Enterprise LaserJet firmware using the embedded web server | HP Printer Setup
 Faxing documents quickly and easily with HP printers
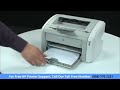 How to fix paper pick-up issues with HP LaserJet 1020 printer in Windows 10
 Fixing Print and Scan Problems with HP's Print and Scan Doctor
 Why You Should Install an HP Printer with the Windows Print Driver
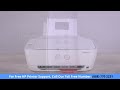 Scanning Made Easy: How to Scan with an HP Chromebook
 How to fix a paper jam in your HP OfficeJet Pro 6900 printer
 Step by step guide to Updating your HP LaserJet Pro M300 or M400 Printer's Firmware | HP Printer
 How to connect and install an HP LaserJet Pro 2-line LCD Printer with a WPS Router
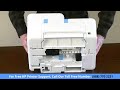 Step by step guide to Unpacking the HP DeskJet 2700 and DeskJet Plus 4100 Printer Series
 Getting the Most Out of Restore Setup Mode on HP Tango and Tango X
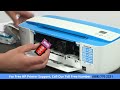 Installing Ink in the HP DeskJet 3700 Printer Series | HP Printer Setup