How to Sew a Bound Seam | Sewing Machine
Top Rated Products for Every Sewing Project:
Singer Beginners Sewing Kit: http://amzn.to/1VwUwIN
Gingher Dressmaker's Shears: http://amzn.to/1VwW2L3
One-Yard Wonders: 101 Sewing Projects: http://amzn.to/1Q98Dkz
Dritz Deluxe Seam Ripper: http://amzn.to/1N3d2Wd
Clover Leather Coin Thimble: http://amzn.to/1Ks5IEV
Watch more How to Use a Sewing Machine videos: http://www.howcast.com/videos/512584-How-to-Sew-a-Bound-Seam-Sewing-Machine
I'm Jennifer from Workroom Social, and today I'm going to show you how to make a bound seam.
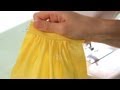
We have prepared our seam with our seam allowance, and the first thing you want to do when you're making a bound seam is just kind of finger press your seam allowance open a little. You want these seam allowances to lay a little flatter. It makes it a little easier to work with.
Then you want to take some bias strips or bias binding, which you can make at home or you can buy premade at a store. Any quilting, notions shop should have it. The bound seam is also sometimes called Hong Kong Finish if you've ever heard of that.
The first thing you want to do is to take your seam allowance that you've finger pressed open and take your bias strip and just lay it right on top of one side with the raw edges matching. Then we're going to sew a narrow seam allowance on this to attach the binding to the seam allowance. Now I'm just going to go in and do it, but if you're uncomfortable for any reason doing it this way, you can always go in and pin your binding to the seam allowance before you start to hold everything together.
It's really important before you start sewing to make sure that all of your fabric is pushed to the left. You don't want to accidentally sew through your good part of your fabric somehow, so just make sure that that's off to the side.
Then we're going to do a narrow seam allowance; I'm just going to use the edge of my presser foot as my guide. You're just going to do a straight stitch all the way down to attach the binding to the seam allowance. Then when you get to the bottom, now, I didn't premeasure my strip, which is fine, especially if you buy premade strips at the store, they'll come in two or three or four-yard bundles, so you can just sew what you need and then when you get to the bottom, just cut off the excess.
Now you're going to want to take this to the iron to press this seam down. You can't finger press this because this strip, the blue, is sewn on the bias, which makes it stretchy and kind of bouncy. It won't lie flat just with finger pressing alone, because we're not going with the way the fibers are woven, we're going on the diagonal. So we're going to take this to the iron and press it flat before we do anything else.
So we've attached our binding to one side of our seam allowance, and now we need to press this flat. I'm just going to take my garment, my fabric, and move it over to the side and lay the seam allowance down flat, then take my iron and press the binding away from our garment. Notice we're just doing this on the one side. This seam allowance will be done on its own, so don't worry about that.
Now what we want to do is fold the binding over and stitch it again. But before we do that, let's trim this seam allowance down. We don't need all that bulk. So we'll just cut our narrow seam in half, leaving about an eighth of an inch on this seam allowance.
Then we are going to fold this under to stitch it in place. You can take some pins and just pin the binding under. When you're pinning this I like to pin right here in the seam, or close to the seam, and then flip it over on the other side to make sure that you are catching that binding on the back side.
Okay, so now we're ready to take this back to the sewing machine. Okay, so we have our binding all pinned into place, and we're going to take it to the sewing machine. You just want to put just the seam allowance; we're keeping our garment off to the left. You're going to take the seam allowance and put it under the presser foot. Before you start, I like to use the hand wheel to kind of lower the needle a little bit to see where it's going to fall. You really want it to fall right in this seam or even a little to the left of it to catch this backside. So I lower my needle, I see where it's going to land, and I like that, and now I'm ready to start stitching.
Then once you get near the end here, just kind of make sure that the binding is staying tucked under and it's not coming out, because it's stretchy, so it has a tendency to want to move around. Then you can pull this out, and we have our bound seam.
Looking from the wrong side of the fabric, the seam on the right is bound and the seam on the left is not finished yet. Then you can see on the back side what this looks like.
Then onc
Видео How to Sew a Bound Seam | Sewing Machine канала Howcast
Singer Beginners Sewing Kit: http://amzn.to/1VwUwIN
Gingher Dressmaker's Shears: http://amzn.to/1VwW2L3
One-Yard Wonders: 101 Sewing Projects: http://amzn.to/1Q98Dkz
Dritz Deluxe Seam Ripper: http://amzn.to/1N3d2Wd
Clover Leather Coin Thimble: http://amzn.to/1Ks5IEV
Watch more How to Use a Sewing Machine videos: http://www.howcast.com/videos/512584-How-to-Sew-a-Bound-Seam-Sewing-Machine
I'm Jennifer from Workroom Social, and today I'm going to show you how to make a bound seam.
We have prepared our seam with our seam allowance, and the first thing you want to do when you're making a bound seam is just kind of finger press your seam allowance open a little. You want these seam allowances to lay a little flatter. It makes it a little easier to work with.
Then you want to take some bias strips or bias binding, which you can make at home or you can buy premade at a store. Any quilting, notions shop should have it. The bound seam is also sometimes called Hong Kong Finish if you've ever heard of that.
The first thing you want to do is to take your seam allowance that you've finger pressed open and take your bias strip and just lay it right on top of one side with the raw edges matching. Then we're going to sew a narrow seam allowance on this to attach the binding to the seam allowance. Now I'm just going to go in and do it, but if you're uncomfortable for any reason doing it this way, you can always go in and pin your binding to the seam allowance before you start to hold everything together.
It's really important before you start sewing to make sure that all of your fabric is pushed to the left. You don't want to accidentally sew through your good part of your fabric somehow, so just make sure that that's off to the side.
Then we're going to do a narrow seam allowance; I'm just going to use the edge of my presser foot as my guide. You're just going to do a straight stitch all the way down to attach the binding to the seam allowance. Then when you get to the bottom, now, I didn't premeasure my strip, which is fine, especially if you buy premade strips at the store, they'll come in two or three or four-yard bundles, so you can just sew what you need and then when you get to the bottom, just cut off the excess.
Now you're going to want to take this to the iron to press this seam down. You can't finger press this because this strip, the blue, is sewn on the bias, which makes it stretchy and kind of bouncy. It won't lie flat just with finger pressing alone, because we're not going with the way the fibers are woven, we're going on the diagonal. So we're going to take this to the iron and press it flat before we do anything else.
So we've attached our binding to one side of our seam allowance, and now we need to press this flat. I'm just going to take my garment, my fabric, and move it over to the side and lay the seam allowance down flat, then take my iron and press the binding away from our garment. Notice we're just doing this on the one side. This seam allowance will be done on its own, so don't worry about that.
Now what we want to do is fold the binding over and stitch it again. But before we do that, let's trim this seam allowance down. We don't need all that bulk. So we'll just cut our narrow seam in half, leaving about an eighth of an inch on this seam allowance.
Then we are going to fold this under to stitch it in place. You can take some pins and just pin the binding under. When you're pinning this I like to pin right here in the seam, or close to the seam, and then flip it over on the other side to make sure that you are catching that binding on the back side.
Okay, so now we're ready to take this back to the sewing machine. Okay, so we have our binding all pinned into place, and we're going to take it to the sewing machine. You just want to put just the seam allowance; we're keeping our garment off to the left. You're going to take the seam allowance and put it under the presser foot. Before you start, I like to use the hand wheel to kind of lower the needle a little bit to see where it's going to fall. You really want it to fall right in this seam or even a little to the left of it to catch this backside. So I lower my needle, I see where it's going to land, and I like that, and now I'm ready to start stitching.
Then once you get near the end here, just kind of make sure that the binding is staying tucked under and it's not coming out, because it's stretchy, so it has a tendency to want to move around. Then you can pull this out, and we have our bound seam.
Looking from the wrong side of the fabric, the seam on the right is bound and the seam on the left is not finished yet. Then you can see on the back side what this looks like.
Then onc
Видео How to Sew a Bound Seam | Sewing Machine канала Howcast
Показать
Комментарии отсутствуют
Информация о видео
Другие видео канала
 How to Gather Fabric | Sewing Machine
 Learn to Sew: Finishing Seams
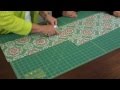 Terry Griffin Shares Her Invisible Seam Technique | Riley Blake Designs
 Kay Whitt: how to finish necklines & armhole edges with bias trim on It’s Sew Easy (1213-1)
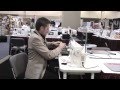 How To Sew Posh Seam Finishes Lesson with Ron Collins
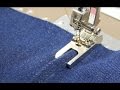 Tutorial: how to sew lapped and flat-felled seams with the BERNINA lap seam foot no. 70 and 71
 Introduction to different types of seams
 How to Make Bias Tape - Sew Only 2 Seams!
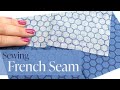 How To: Sew a French Seam
 How to sew a Welt Seam
 Sewing Seam Construction - The Three Popular Seams for Canvas
 Pillow Cases with Hidden Seams
 How To Finish Seams
 How to Use a Blind Hem Foot Attachment | Sewing Machine
 How to Sew a Princess Seam
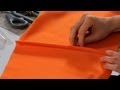 How to Sew a French Seam | Sewing Machine
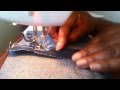 Professional seams without a serge machine
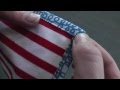 Mitered corners with bias tape
 Basic Stitches - How to sew a Flat Felled Seam
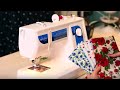 Learn How To Sew, Easy Sewing Class For Beginners!