Installing Radiant Heat Between Joists. Retrofit radiant heat into your home or for new construction
This video walks you through installing radiant heat between the floor joists, how to staple it up using aluminum heat emission plates, and how to install the reflective barrier and insulation. We also show you how to connect to a Radiantec radiant tubing manifold and how to do the pressure test.
The staple-up radiant floor installation method is very popular because as long as you can see the joists from below, you can install radiant heat. This method works well for new construction and retrofits. In fact, it works so well that it has almost entirely replaced the thin suspended slab applications.
While the slab application is pretty forgiving, it is our opinion that a staple up installation needs to be done exactly right for it to work properly. The following methods MUST be followed to have and effective and efficient staple-up installation:
1) Install Aluminum Heat Emission Fins. These are also called heat transfer plates or aluminum fins. A study conducted by Kansas State University some years ago showed that systems using heat transfer plates vs. systems that do not are able to transfer twice as many btu’s. The significance is that you can typically lower the water temperature and reduce cycle times which can lower your operational cost.
Radiantec also conducted our own plate study experiments and you can find the results here. The most cost effective solution is to install the thin heat transfer plates in continuous coverage. We did find that the thicker, extruded aluminum plates transferred about 6% more heat but at more than double the cost.
Ideally, the heat transfer plates should be spaced continuously but they don’t have to be. Our general rule of thumb is to space the aluminum plates continuously in carpeted rooms, bathrooms, and high heat loss areas such as great rooms. Space them about every 8″ or so in all other areas.
2) Install An Aluminum Reflective Barrier. About 1-2″ below the radiant tubing and plates, you should install an aluminum reflective barrier. This is nothing more than a craft paper with an aluminum facing. It has fibers that run through it so it doesn’t rip or tear but it can be cut with a pair of scissors. The reflective barrier comes on a roll that is 50″ wide and must be cut so that it can fit between the joists. We have an installation video that shows how to do this. The purpose of the reflective barrier installation is to reflect the radiant heat waves back up towards the sub-floor. We are also trying to create a small dead air pocket that further helps to equalize the heat transfer. Some will argue that the reflective barrier isn’t necessary and that it will become covered up with dust and lose its effectiveness over the years. We still feel it’s an important piece and since it’s relatively inexpensive, it should be installed. Insulation is usually put in after this (see next step) so if you can find a foil faced insulation with high enough R-value, you can forgo this product.
3) Install Insulation. Many people ask us if it’s necessary to also install insulation below the radiant tubing, heat transfer plates, and reflective barrier. If you can only do this once because the ceiling will be finished then the answer is absolutely yes. The amount of insulation is dependent on what is above and below. If there is carpeting or a high heat loss area above then you should put in R-19. If not, you can probably get away with R-13 but R-19 is better. The type of insulation doesn’t really matter all that much. If there is an unheated basement below then you should use R-19. Most people don’t mind if they lose a little bit of heat downward in this scenario. If the heat loss downward is entirely wasted to a crawl space, for example, then your insulation method should be extensive. You should try to get in a minimum of R-30. Some will insulate between the joists with fiberglass and then seal the entire underside with rigid foam. If the ceiling will not be finished, some will wait and see how the system performs and then add the insulation after if necessary. What can happen if you don’t insulate? Since radiant heat will go in all directions, the heat will just as easily go downward. The basement will get too warm and you won’t get enough heat into the space above.
Will a radiant system without aluminum plates work? The best answer is “maybe.” If plates are not used then you are relying on air and the few locations where tubing is in contact with the floor to transfer the heat. The problem is, air is an insulator and Pex directly in contact with wood is a poor conductor. In order to make up for this poor heat transfer, the water temperature must be raised significantly. In some cases, as high as 180 degrees F.! Even then, on a cold day, the floor may not put out enough heat to heat the room if the home is older and not energy efficient.
Видео Installing Radiant Heat Between Joists. Retrofit radiant heat into your home or for new construction канала Radiantec
Показать
Комментарии отсутствуют
Информация о видео
Другие видео канала
 DIY Radiant Floor Heat
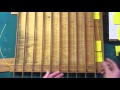 Better way on how to run radiant heat pex under floor warming with transfer plates
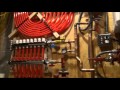 Radiant Heating
 How to Convert Old Radiators into Multi-Zone Hydronic Heat | This Old House
 40X 90 pole barn floor part 2
 ProWarm™ warm water underfloor heating kit installation - Aluminium spreader plate method
 Heating Systems Showdown: Hydronic vs Forced-Air vs Mini-Split
 Install Radiant Heat Under Wood Floor 24 Inches OC
 HOT WATER HEATING: How to Use a Tank-Style Water Heater
 Radiant Heat Transfer Plates for PEX tubing by Everhot
 How to Retrofit Radiant Heat | This Old House
 Radiant Heat Install | Part 2 of 5
 Underfloor heating system installation by Continal Underfloor
 Uponor Minute: Joist Track & PEX-a Tubing Installation for Radiant Heating
 How To Install Radiant Floor Heating System w/ HEAT TRANSFER PLATES
 Radiant heating in a concrete slab. Let us show you how easy it can be to install radiant heat!
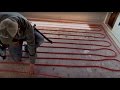 It Poured Inside - Installing Radiant Heat over Wood Subfloor - EP 32 Alaska Dream House Build
 Radiant Floor Heat With A Water Heater
 Radiantec DIY
 Installing your own radiant heat tubing in a concrete slab. (DIY METHOD)