Painting Receiver and Slide Engravings
It’s been a while! My original video for this is by FAR my most viewed video ever! Unlike me, it has NOT aged well! So… I am back for a much-needed update for 2020!
Many have come after me showing how this is done with varied results. After a LOT of feedback, I am going to do the same process for painting the engravings but with different materials to show that it works just as well… The secret sauce is really getting whatever paint you choose to “flow” through the engravings.
I realize this is NOT for everyone!!! For those that do stick around, I am going to walk you through how to make the engravings on your gun or any other engravings for that matter POP!
As you can see, the model paint held up for many years of everyday carry. I can count on one hand how many times I have cleaned the exterior of this particular weapon. Naturally, it gets very dirty and has taken on a brown tint from the dirt and grime. It’s time to make it like new.
------------------------------------------------------------
Steps:
1. Clean the areas around the engravings with the non-acetone. Using acetone will ruin your finish. If you doubt the bottle is non-acetone… buy one that is clearly labeled!
2. Mix about five drops of the non-acetone into the mixing container.
a. Use the lid to transfer the desired amount to avoid pouring too much.
3. Pour in the nail polish.
a. Pour slowly and mix, you can always add more. It’s hard to go the other way. You want a consistency that flows but thick enough that it sticks to the toothpick.
4. Dip your toothpick into the paint mixture and drop in the paint. You’ll know you have the right mixture if the engravings “show through” the paint.
5. Let dry!
6. Finally, put some non-acetone on a paper towel and rub the excess paint. It should not take much pressure. Some smearing will occur… Just move to a new spot on the paper towel!
------------------------------------------------------------
Materials Used:
• Nail polish
• Non-acetone polish remover – Acetone will ruin your finish!!!
• Toothpicks
• Container to mix
• Paper towels
• Rubber gloves – Optional
------------------------------------------------------------
Video Equipment:
Canon Rebel SL3 DSLR
Tonika 11-16mm f2.8 @1080P 60FPS
Premier Pro @ 24FPS - Kodak Killer LUT
------------------------------------------------------------
Audio Credit: Bensound.com
Видео Painting Receiver and Slide Engravings канала Foster Fam Productions
Показать
Комментарии отсутствуют
Информация о видео
25 февраля 2020 г. 10:22:53
00:12:59
Другие видео канала
 DIY: RodBuckle Installation
 Fall Offshore Fishing - Special Day
 Shooting AR-15
 Pistol Grips Alternative
 Ar15 Magpul MOE Handguards
 Good network cabling
 Painting Receiver & Slide Engravings
 How To Install a Fish Finder
 My Tracker Boat Experience: Pro Team 195 TXW TE
 M&P Shield Holster - Crossbreed MiniTuck
 Complete Mossberg 500 Build
 Taurus 65 .357mag
 Savage Mark II .22 lr Trigger Job
 Savage Mark II .22lr Tactical Rail Install
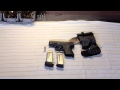 M&P Shield - EDC
 Shotgun Barrel Cut Down and Vent Rib Removal
 Cat5e vs Cat6
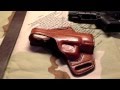 Tagua Holster leather darkening
 Absolute Best Home Network Cabling!
 Falls Lake Bass Fishing - Cinematic Experience