Farmhouse Pillows DIY- Grain Sack and Ticking Stripe Pillow Sewing Tutorial
Farmhouse pillows DIY project for beginners. These grain sack and ticking stripe pillows are simple to make.
Fabric sources:
This post contains affiliate links, which means I make a small commission at no extra cost to you. As an Amazon Associate I earn from qualifying purchases.
Grain Sack Fabric- http://rstyle.me/n/cm6rxwb9jx7
Blue Ticking Stripe- http://bit.ly/2BoeL6V
1/2 " Double Fold Bias Tape- http://amzn.to/2AppFfS
MORE on the blog: http://farmhouseonboone.com/farmhouse-on-boone/diy-grain-sack-and-ticking-stripe-pillows/
Purchase grain sack and ticking stripe pillows: http://farmhouseonboone.com/shop/ticking-stripe-and-grain-sack-pillow-cover-available-in-blue-tan-or-black/
The heavy, industrial, texture of the grain sack, and simple pattern of the ticking stripe, speak to the humble farm lifestyle. The combo of the two is quintessentially “farmhouse.”
There are so many lovely combinations of grain sack fabrics and ticking stripe that you could make many variations. Red ticking and grain sack for Christmastime, tan grain sack, black ticking, different grain sack stripe patterns…so many possibilities!
Cut List:
1- 19″ by 19″ piece ticking stripe fabric
2- 19″ by 13″ pieces ticking stripe fabric
2- 19″ by 19″ pieces grain sack fabric
2- 18″ pieces of 1/2″ double fold bias tape
Make sure the stripes on the grain sack fabric are centered, when you are cutting them out.
For this particular fabric, the stripes are 10″ apart, so I have 3.25″ between the edge of the stripe and the end of the fabric.
So, for this project, you are actually making two separate pillow covers that will fit together over one pillow insert.
We will start first with the ticking. For this we are essentially making a basic envelope style pillow cover, like I also did in this tutorial.
First, take the 19″ side, of one of the 19″ by 13″ pieces, and press it over 1/2″.
Next, press it over another 1/2″, so that the raw edge is hidden inside.
Sew in place with a 3/8″ inch seam.
Repeat with the other 19″ by 13″ piece.
These will be the back pieces for the ticking stripe pillow cover.
Next, line up the unfinished 19″ back piece edges with the 19″ edges of the front square piece, with right sides together.
It is really important that you line the stripes up pretty precisely, because they make such a statement peaking through the grain sack cover.
And you don’t want that statement to b mismatched stripes! LOL
I made it look like I do this by pinning. But, in reality, I’m not a big pinner.
So, you can do whatever makes it easy for you to get the job done.
I, personally, like to take this step slowly. I line up the stripes, and then sew a little ways, and then stop to check that they are still lined up, then sew a little more.
After both the sides are sewn down, overlap the two sides, and then pin the top and bottom seam, being sure that you catch all the layers.
Around the middle there will be three layers overlapping, both back pieces and the front piece.
Sew the top and bottom pieces in place with a 3/8″ seam.
Finish all the edges with a serger, or a zig zag stitch.
Now, it is time to make the grain sack cover.
First, to make the ties, take one of your 18″ pieces of double fold bias tape, and fold one end under. Sew that folded end in place, and then all the way down the open (non-folded) side of the bias tape, like I did in the photo below.
Repeat for the other 18″ piece of bias tape.
Next, place the two grain sack squares on top of each other, with right sides together.
The grain sack fabric that I use is the exact same on both sides, so there isn’t really a right or wrong side.
Sew 3/4 of the way around with a 3/8″ seam, leaving one side open. This will be the side that will have the ties.
Again, it is important to line the stripes up, but this time the stripes will run vertically, as opposed to the ticking stripes, that ran horizontally.
On the side that you left open, find the exact middle and use a disappearing ink fabric marker, or sewing pin, to mark that spot on both the front and the back piece. This is where the ties will go, since you want them centered in the middle of the pillow.
Fold the side that was left open over to the inside of the pillow cover 1/4″, and then fold in again another 1/4″, to hide the raw edge inside. Begin sewing around until you reach the place that you marked as the center. This is where you will sew in the first t
Get the rest of the tutorial here: http://farmhouseonboone.com/farmhouse-on-boone/diy-grain-sack-and-ticking-stripe-pillows/
Acoustic Guitar 1 by Audionautix is licensed under a Creative Commons Attribution license (https://creativecommons.org/licenses/by/4.0/)
Artist: http://audionautix.com/
WANT TO START YOUR OWN BLOG?
Learn how our family supports ourselves full-time on our homestead with our blog and Youtube channel in my FREE blogging success masterclass: https://www.farmhouseonboone.com/masterclass-registration
#sewing #learntosew
Видео Farmhouse Pillows DIY- Grain Sack and Ticking Stripe Pillow Sewing Tutorial канала Farmhouse on Boone
Показать
Комментарии отсутствуют
Информация о видео
Другие видео канала
 How to Make a Basket Liner
 Linen and Ruffle Throw Blanket Sewing Tutorial
 6 Months FULL Farmhouse Tour | Before and After | Farmhouse Restoration
 My FAVORITE summer drink! | WATER KEFIR
 Easiest Homemade Soap Bar Recipe | Melt and Pour Soap Bar | NO SPECIAL EQUIPMENT NEEDED
 Cozy Fall Day + Sew a Cross Back Harvest Apron with me
 6 ANTIQUE FARMHOUSE DIY UPCYLING PROJECTS FOR RESALE
 How to Sew Bias Tape for Beginners - Tock Custom - Brother ST150HDH - How to use a sewing machine
 Tie Top Curtains Sewing Tutorial | DIY POTTERY BARN INSPIRED DECOR
 My Husband Quit his Job | FULL TIME BLOGGERS | Making an Income from Home and Debt Free Living
 Farmhouse Master Bedroom Reveal | COZY BEDROOM DECORATING IDEAS
 Thrift Flips • Painting Techniques • White Wax • Baking Soda • DIY for Resale
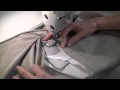 How to sew a pillow with piping and zipper
 How to sew the Ultimate Reusable Grocery Shopping Tote Bag
 Diy fabric basket, fabric basket, how to fabric basket, easy fabric basket, fabric basket tutorial
 Step-by-Step Guide to Spine Repair
 What will happen with our Youtube channel | DAY IN THE LIFE FARMHOUSE ON BOONE
 How to Slipcover a Wingback Chair
 How to Sew a Ruffle | SIMPLE SEWING SERIES LESSON 6