Barbed Wire Fence Repair Tips and Tricks Stretching and Splicing
Live Life DIY is about being self-reliant, self sufficient, and independent. You creating a fun, happy, lifestyle of freedom. Live Life DIY is the life you have always wanted to live, your dream lifestyle.
Part of being self-sufficient and self-reliant on the homestead is fixing and repairing projects. Like fixing a barbed wire fence. We’ve got a whole bunch out back where trees have fallen on it. So let’s get to it.
DIY Projects For Home, Boat, RV, or Camp videos
https://www.youtube.com/watch?v=lIEvDxntGQQ&list=PL8550B123E120BD8B
Let’s get this fencing repair project underway. Here is all of our tools that we will need for our fence project. I will use a come-along to stretch the fence. We will use wire splicing ferrules, a ferrule crimper, and you really need this tool as you cannot crimp them by hand. Two vise-grips to hold the barbed wire fence. And a good old wire cutter.
Make sure to wear gloves when working on projects around the homestead. Especially when working with barbed wire fencing. Here is the T-post and it has 5 strands of barbed wire on it. The top two strands of barbed wire are broken. And they have been laying on the ground for quite a while.
If it’s a clean break and recent, you might be able to stretch the two ends and splice them together. This has been on the ground for a while and it is rusty and corroded in places so we will have to splice in a section of new barbed wire. These are the ferrules. The little crimping tubes you place the wire in. We have a roll of new barbed wire. I slide the ferrules on the old fence. Work in the section of new fence from the spool. I double it up several inches and I like to use two ferrules and double crimp each ferrule.
Place the vise-grips on the two ends of the barbed wire about a foot or so from the end. The put the claws of the come-along on the vise-grips and tighten up the come-along tight and stretching the barbed wire fence. Put on two more ferrules and double crimp them in place. Then loosen the come-along and remove it and the vise-grips from the barbed wire.
Repeat this process for each broken wire you need to repair. The steps are cut the broken end of barbed wire. Splice a section of new wire using two ferrules and double crimping them. Then use the vise-grips to hold the two ends of wire and use the come-along to stretch the barbed wire tight. Place two more ferrules on the stretched ends of wire and double crimp them in place. Carefully loosen the come-along and remove the vise-grips. Attached the repaired barbed wire to the T-post.
So there you have it living self-sufficient and self-reliant on the homestead is project after project. There’s a lot of oak trees around here and wind storms or rain storms break branches off of the trees. This stretches or breaks the barbed wire fence. We prefer to use the splicing ferrules and crimping tool along with the vise-grips and come-along for do it yourself fence repairs.
Living happy fun loving and carefree on your homestead. Live life doing it yourself.
The most excellent way to be supporting Rob and Live Life DIY is to LIKE & FAVORITE & THUMBS UP this video and share it with friends.
Subscribe: https://www.youtube.com/c/LiveLifeDIY?sub_confirmation=1 *** Be part of the Live Life DIY community.
WebSite: http://www.LiveLifeDIY.com
Google+: http://Gplus.to/CaptRobLee
Видео Barbed Wire Fence Repair Tips and Tricks Stretching and Splicing канала Live Life DIY
Показать
Комментарии отсутствуют
Информация о видео
Другие видео канала
 Barbed wire splicing tricks
 How to tighten a loose Barbwire fence without a fence stretcher
 Fixing a Fence Using Only Pliers
 How to Splice Barbed Wire
 Fencing Like you've never seen..tips..tricks and lessons from the pros!
 Pulling Barbed Wire with a Maasdam 2 Ton Come Along and Speeco Wire Gripper
 Texas Fence Fixer and Cats Claw Fasteners Review
 How To Splice Barb Wire with Goldenrod 415
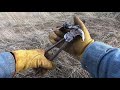 Tightening Barbed Wire with the Texas Fence Fixer
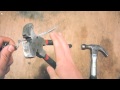 What Are Fencing Pliers?
 Fencing Gadgets; Gripples Vs Crimps Vs Fencing Knots. The Positives and the Negatives
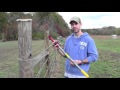 Livestock Fence Bracing and Stretching
 How to Repair Broken Barbed Wire Without Crimps
 Fencing Like A Pro...Knot tying..Pulling wire tight and more!
 The best tool to install barb wire on a ranch or farm
 Barbwire fencing tricks
 Fixing Wire Fencing
 The Pedro Device: Need to Tighten a Fence in 3 Minutes?
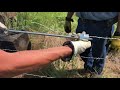 BARBED WIRE MENDER