What is Audio Compression? How to Use a Compressor | LANDR Mix Tips #8
What is audio compression? Audio compression is the process of reducing a signal’s dynamic range. Dynamic range is the difference between the loudest and quietest parts of an audio signal.
You need to reduce the dynamic range of most signals for them to sound natural on a recording. Compressors work by attenuating the loudest parts of your signal and boosting the result. After compression the quieter parts of a signal are more apparent since the dynamic range has been reduced.
To understand compression we have to talk about transients and dynamics.
Transients are the initial high-energy bursts at the beginning of a sound. They give our brains a lot of information about a sound’s quality.
Dynamic signals are a mix of transients and their decay.
Compression should be used to strike a balance so that both the louder and quieter parts of your sound can be heard clearly.
When you’re dialing in a compressor, you need to listen for your signal’s dynamics—not its timbre.
As you adjust your settings, ask yourself:
What parts of my signal are becoming more apparently loud?
What’s happening to my transients and dynamic range?
Is it obvious where the gain reduction is occurring?
Am I making things worse?
The most common settings on a compressor are threshold, ratio, attack and release. I’ll go through each of them and demonstrate how they affect your signal.
The effect of compression can be easier to hear on percussive sources, so for this tutorial I’ll be doing some drum bus compression by compressing a full drum kit on a bus. I’ll start out with best compressor settings for letting you hear the compressor’s effect, then I’ll dial in a more musical setting to bring out the body of the drums and the sustain of the cymbals.
Threshold sets the signal level where the compressor’s gain reduction begins working.
A lower threshold will apply gain reduction to a greater portion of your signal. A higher threshold will affect only the most aggressive peaks, leaving the rest untouched.
Use the threshold control to define which part of your signal you want to reduce.
Example: I'll pull down the compressor’s threshold until I start to hear it acting on the part of the signal I want to control. When I start to hear too much of the signal being compressed, it’s time to back off. I can confirm that I have a healthy amount of gain reduction by looking at the meter.
Ratio determines how much gain reduction your compressor applies when the signal goes above your threshold.
It’s called the ratio because it’s expressed in comparison to the uncompressed signal.
The higher the first number of the ratio, the greater the factor by which the gain is reduced.
Use the ratio to tailor the amount of compression so that it’s effect isn’t obvious or distracting.
Example: I started out with a with a fairly aggressive ratio to demonstrate the effect of the compressor. but I want to control the dynamics without negatively impacting the sound. I’ll decrease the ratio from 6:1 to 4:1
Attack and Release set the timing of the gain reduction.
The attack control determines how fast the compressor reaches its full range of reduction when the signal passes the threshold.
The release sets how quickly the reduction stops after the signal has dropped below the threshold.
These controls are the key to getting musical sounding compression.
Example: In this case, I have percussive material, so I need to be careful with the attack and release. The attack needs to be slow enough so that the compressor doesn’t crush the transients. If we attenuate them too much, the drums will lose their impact.
I’ll slow down the attack because I can hear the gain reduction acting on the transients in a negative way.
Now I’ll decrease the release until just before a pumping effect starts to occur. This way I can tell that the compressor is enhancing the drummer’s rhythmic playing, not detracting from it.
Example: I’ve matched the output level of the compressor with the dry signal, so by bypassing the effect we can make an informed comparison about whether what we’ve done is contributing positively to the sound.
In this case, we’ve done well. With the compressor engaged, the drummer’s playing is enhanced by the compression and the body of the drums is coming out nicely.
It’s important to level match and bypass to check your work. Compression is a powerful tool, and you can easily do more harm than good.
---
Read the full Compression 101 Guide on the LANDR Blog:
https://blog.landr.com/how-to-use-a-compressor/
Try LANDR for free and master your mix: https://www.landr.com/
Subscribe to LANDR on YouTube: https://bit.ly/2BcY9US
Follow the LANDR blog to get the best tips, tools and tutorials: https://blog.landr.com/
Instagram: https://www.instagram.com/landrmusic/
Facebook: https://www.facebook.com/LANDRmusic/
Twitter: https://twitter.com/LANDR_music
Spotify: https://open.spotify.com/user/landr_music
Видео What is Audio Compression? How to Use a Compressor | LANDR Mix Tips #8 канала LANDR
Показать
Комментарии отсутствуют
Информация о видео
Другие видео канала
 How To Use Compression - Detailed Tutorial
 How To Use A Compressor: Compression 101 - Beginner (Part 1)
 How to EQ Kick and Bass for Better Low End | LANDR Mix Tips #9
 10 Powerful Chord Progressions Every Songwriter Should Know
 Compressors Explained – Sound Basics with Stella Episode 3
 Audio Compressors explained #1 - functions
 EQ Explained – Sound Basics with Stella Episode 2
 How to Use a Compressor: 10 Top Tips to Try TODAY | musicianonamission.com - Mix School #1
 15 Dave Pensado Mix Tips Every Producer Should Know | LANDR
 Reverb and Delay Explained – Sound Basics with Stella Episode 4
 How to Master Your Music in 5 Simple Steps
 How The Pros Use Compression - Audio Compression Instruments and Mixes
 How to Use a Compressor (Properly!)
 Audio Theory - Compressor
 Limiter vs Compressor: What You Need to Know (Easy) | musicianonamission.com - Mix School #34
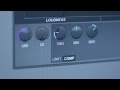 Compression Tutorial: The Basics of How to Compress Properly
 Gain Staging: The 3 Rules You Need To Know - BehindTheSpeakers.com
![11 EQ Mistakes That Are Hurting Your Mixes [Free Plugin]](https://i.ytimg.com/vi/e04158euMA8/default.jpg) 11 EQ Mistakes That Are Hurting Your Mixes [Free Plugin]
11 EQ Mistakes That Are Hurting Your Mixes [Free Plugin] EQ Tutorial: The Basics of How to EQ Properly