How to use a 4 wire resistive touchscreen with an Arduino
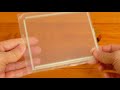
A resistive touchscreen consists of two flexible and resistive sheets with an air gap between them. Then the screen is touched, the two sheets are pressed together.
By applying a voltage over one of the sheets it is possible to calculate the position in one direction by measuring the voltage on the other sheet.
To get the position in the other direction the voltage is applied over the other sheet (the one you previously measured the position from) and measure the position from the first sheet (the one you previously apply a voltage over).
In this video it is shown how to do this with an Arduino.
Видео How to use a 4 wire resistive touchscreen with an Arduino канала Marcus Waerme
Показать
Комментарии отсутствуют
Информация о видео
Другие видео канала
 4 wire resistive touchscreen - Test and Measurement
 How Do Touchscreens Work?
 Arduino Touchscreen Display - Using a Resistive Touchscreen
 Building a USB-C touchscreen monitor (new for 2021)
 HX711 with a Four Wire Load Cell and Arduino | Step by Step Guide.
 Capacitive Vs Resistive Touchscreen | Teguar Tech Talk
 HMI Repair by JC-Electronics
 Ball Balancing Table with Resistive Touch Screen Functionality video
 How Do Touchscreens Work?
 How Touchscreen Works In Simple Words
 Arduino Resistive Touchscreen Panel
 ShiftBrite with an Arduino and touchscreen
 5 things to know about wall mounted home automation tablets
 How Capacitive Touch Screens Work
 Arduino Fan Control // 2-Wire, 3-Wire, and 4-Wire CPU Fan Speed Control and Measurement
 Building a 3D Printed RC Jet Boat
 Learn Oscilloscope Basics with an Arduino Uno and RTM3004 | AddOhms #28
 Touchable Switch Board | How to Make touch Switch Board
 How a Character LCD works Part 1
 3d Printed Jet Pump for 2204 motors