Kashmir Sapphire Cutting Process
Kashmir (India) sapphire, unheated, finished at 2ct from rough of 4.5ct.
Extraordinary claims require extraordinary proof, which is why large fine Kashmir sapphires often require up to 4 reports from different labs before a deal can be closed. This rough was identified as India Kashmir by Lotus Gemology before it changed hands.
The history, romance, rarity and beauty of this material is well-publicised and will not be repeated here. But I will mention an issue seldom discussed, which is the presence of severe colour zones that this material is notorious for. While this piece’s colour zoning is by no means severe (e.g. ‘Ottu’ sapphire), the orientation of it relative to the shape of rough and relative to the C-axis presented a formidable challenge in terms of yield and tilt performance that doesn’t ‘green-out’ or ‘pale-out’. Cut designs that achieve brilliance are common knowledge. Increasing scintillation by using more facets is well-known. But techniques to tease out the best possible colour in pleochroic and zoned material are well-guarded secrets of the old masters. Without the decades of experience that many say is needed to cut such material, my only tools are logic and the science of optics.
Understanding of pleochroism turns out to be insufficient in dealing with colour zones. From the fact that looking through a colour zone from the A/B-axis shows teal rather than blue, this shows that simply creating a light path that traverses the zone in the A/B-axis direction will not pick up the desired colour. Given the typical light-returning 3-section light path looks like a U-shape within the stone, the direction and relative lengths of these 3 sections determine the final colour of the light ray. Small differences of these paths in pleochroic and zoned material can produce a big difference in the resultant colour, which is the greatest challenge in this piece of Kashmir sapphire rough. In the game of fine sapphires, every bit of saturation and colour-flaw is scrutinised by the hypersensitive eyes of both dealers and collectors -- there is no room for error.
After locating the C-axis with a dichroscope and marking the position and orientation of the colour zones, I cut and polished a temporary table and two small opposing pavilion facets with freehand. This creates the U-shaped light path that lets me make an initial assessment of colour. To my dismay, the best orientation of the table will cause the yield to drop dramatically due to the rough’s large concave surface where one side of the pavilion will be. If the table is rotated more to the opposite direction to avoid the concave surface for better yield, a wide colourless band (sandwiched between 2 colour zones) shows up under the table and runs across the entire stone vertically (as seen in video at 57s). Both are not acceptable and in that moment, I realised I haven’t felt so helpless for a long time. After orientating the table to middleground, I dopped the stone and did a test pavilion cut with another set of angles. When I undopped it to check the colour, just to realise it is still not ideal, with the colourless band still showing up, an idea came to me. With some mental calculations, I found that angles that typically cause head shadows would reduce the zoning problem. It was a quick decision and an easy compromise to make. But I’d have to wait till the entire stone is completed to know if it worked..
The use of optics can also help with apparent clarity. Due to refraction and a much lower critical angle than diamond, some parts of the pavilion are not visible when viewed facing up over typical tilt angles. This allows one to leave behind some natural surfaces to achieve a larger stone. It does not necessarily mean yield; for material that needs saturation, longer light paths in a larger stone means better colour. As part of cutting the pavilion corner facets to avoid their face-up extinction (due to excessive MIR) that is typical in emerald cuts, I left two natural surfaces on the pavilion, knowing that they won’t be seen when facing up, and the video of the finished stone proves it.
Dealing with the colour zone issue reduced yield but hiding the naturals with refraction increased yield. The combination of both and blessed with a small miracle, gave a finished stone of exactly 2 carats, for a 44% yield. It was a happy day and there was no more colourless band.
Видео Kashmir Sapphire Cutting Process канала Sutra Gems
Показать
Комментарии отсутствуют
Информация о видео
Другие видео канала
 Gem Cutting, Faceting & Polishing - Blue Sapphire
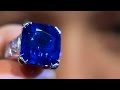 Interesting Facts About Sapphire
 Highlights from the Collection of Mrs. Lily Safra | Christie's
 रंक से राजा बना देता है नीलम - प्रो.धरमेन्द्र शर्मा जी
 850 gms blue sapphire Jammu and Kashmir
 Top 10 | Most Beautiful and Biggest Diamond Ever Found in History
 How To Facet Gemstones - Sapphire Flame Fusion
 handmade gold ring with blue sapphire and diamonds
 Kashmir Sapphire Stone Value 5 Crore in Auction | Most Valuable Stone in the World
 The sapphires of Kashmir documentary of Patrick Voillot
 Untreated Kashmir Sapphire Ring 18.5 Carats | M.S. Rau
 Ceylon Natural Gems | Faceting and Polishing | Gem Cutting
 BIGGEST And MOST EXPENSIVE Gemstones Ever Discovered!
 Gem Cutting, Faceting & Polishing - Emerald
 World's Largest Sapphire Found in Sri Lanka
 HOW TO TELL IF SAPPHIRE IS FAKE?
 Gem Cutting Tutorial: Unheated Montana Sapphire
 BLUE SAPPHIRE - the original stone of the 10 Commandments - Dr Tim Jennings 1/9
 कच्चे पत्थर से रत्न कैसे तराशा जाता है | Rough stone to Gemstone | rough | Gemstone cutting polish
 Learn About Blue Diamonds and Sapphires with Jewelry Specialist