ASTROPHOTOGRAPHY 101: How to shoot astrophotos in light-polluted areas?
Welcome to this new tutorial of Astrophotography 101 - VLOG. Today, I’m putting myself through a decent hike/climb to the top of Mont Jura to shoot some astrophotos. The point of this video is to show you that taking great astro pictures in a light polluted area is possible if you follow these easy tips to minimize the effect of light pollution in the field and back home through post-process. In the first half of the video, I’m giving recommendations to shun light pollution in the field as much as possible. During your planning phase, you might want to check out this light pollution map to decide on a darker location and avoid completely bright areas: https://www.lightpollutionmap.info/#zoom=4&lat=5759860&lon=1619364&layers=B0FFFTFFFF
In the field, don’t shoot directly towards light pollution and plan your shot according the position of light pollution. I also recommend that you buy some extra pieces of equipment that are game-changer in the matter: for starters a light pollution filter (preferably external and square). You can find some good ones here:
Pure Night LP filter: https://www.lightpollutionmap.info/#zoom=4&lat=5759860&lon=1619364&layers=B0FFFTFFFF
NISI natural light filter: https://nisifilters.com.au/product/nisi-100x100mm-natural-night-filter/
Optolong Clear Skies Filter: https://nisifilters.com.au/product/nisi-100x100mm-natural-night-filter/
Go for the external and not the clip-in filter as they usually bring distortion, coma, vignetting, color misbalance and noise. Plus they are made for long focal lengths, not wide ones.
The second piece of equipment you can add to your shelf is a portable star tracker like the Vixen Polarie (https://www.vixenoptics.com/Vixen-Polarie-Star-Tracker-Mount-with-Tripod-p/35517.htm) or the Star Adventurer Mini (http://www.skywatcherusa.com/star-adventurer-mini/) to track the motion of the background sky in order for you to reduce the ISO and expose for a longer time. About the settings, you should reduce your ISO because light pollution introduces more shot noise, and increase your exposure time (using the 500 rule or longer if you have a tracker). Aperture should remain the same as usual, watch my other astrophoto basics tutorials to know more.
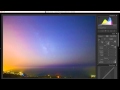
Back at home, you can also reduce the effect of light pollution in your final picture by tweaking some editing tool inside Adobe Lightroom.
Light pollution has become a ubiquitous problem that we should take seriously to allow future generations to enjoy dark skies and not a constant orange glow. In the meantime, this tutorial shows you that it is possible to limit the effects of light pollution near cities and come closer to a photo that has been taken in a dark spot. I hope you enjoyed this video. If you did, don’t hesitate to give it a thumbs up, share it, comment on it, ask your questions and of course subscribe. For more information, you can also find me at:
Website: www.adphotography-online.com
Facebook: https://www.facebook.com/AdrienMaudui...
Twitter: www.twitter.com/ADphotography24
Instagram: www.instagram.com/adphotography2410/
Youtube: www.youtube.com/user/amadrien21
Видео ASTROPHOTOGRAPHY 101: How to shoot astrophotos in light-polluted areas? канала Night Lights Films - Adrien Mauduit
In the field, don’t shoot directly towards light pollution and plan your shot according the position of light pollution. I also recommend that you buy some extra pieces of equipment that are game-changer in the matter: for starters a light pollution filter (preferably external and square). You can find some good ones here:
Pure Night LP filter: https://www.lightpollutionmap.info/#zoom=4&lat=5759860&lon=1619364&layers=B0FFFTFFFF
NISI natural light filter: https://nisifilters.com.au/product/nisi-100x100mm-natural-night-filter/
Optolong Clear Skies Filter: https://nisifilters.com.au/product/nisi-100x100mm-natural-night-filter/
Go for the external and not the clip-in filter as they usually bring distortion, coma, vignetting, color misbalance and noise. Plus they are made for long focal lengths, not wide ones.
The second piece of equipment you can add to your shelf is a portable star tracker like the Vixen Polarie (https://www.vixenoptics.com/Vixen-Polarie-Star-Tracker-Mount-with-Tripod-p/35517.htm) or the Star Adventurer Mini (http://www.skywatcherusa.com/star-adventurer-mini/) to track the motion of the background sky in order for you to reduce the ISO and expose for a longer time. About the settings, you should reduce your ISO because light pollution introduces more shot noise, and increase your exposure time (using the 500 rule or longer if you have a tracker). Aperture should remain the same as usual, watch my other astrophoto basics tutorials to know more.
Back at home, you can also reduce the effect of light pollution in your final picture by tweaking some editing tool inside Adobe Lightroom.
Light pollution has become a ubiquitous problem that we should take seriously to allow future generations to enjoy dark skies and not a constant orange glow. In the meantime, this tutorial shows you that it is possible to limit the effects of light pollution near cities and come closer to a photo that has been taken in a dark spot. I hope you enjoyed this video. If you did, don’t hesitate to give it a thumbs up, share it, comment on it, ask your questions and of course subscribe. For more information, you can also find me at:
Website: www.adphotography-online.com
Facebook: https://www.facebook.com/AdrienMaudui...
Twitter: www.twitter.com/ADphotography24
Instagram: www.instagram.com/adphotography2410/
Youtube: www.youtube.com/user/amadrien21
Видео ASTROPHOTOGRAPHY 101: How to shoot astrophotos in light-polluted areas? канала Night Lights Films - Adrien Mauduit
Показать
Комментарии отсутствуют
Информация о видео
27 декабря 2017 г. 17:46:04
00:19:24
Другие видео канала
 How to Photograph the Milky Way in Really Heavy Light Pollution Using ETTR (Expose to the Right)
 Simple Milky Way Panoramas
 Making beautiful astro images from heavy light pollution
 Milky Way Panoramas in La Palma, Spain
 Astrophotography from a light polluted city?
 light pollution filters for astrophotography | Are they worth it?
 7 Astrophotography Tips for Complete Beginners
 10 Light Pollution Filters for Astrophotography in the City
 Astrophotography tutorial. How to photograph the milky way
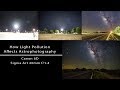 How Does Light Pollution Affect Astrophotography?
 Do you NEED a filter for Night Photography? - Nisi Natural Night Filter Review
 METEOR BOREALIS - 4K real-time meteors shooting through the aurora borealis - Norway
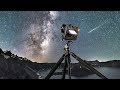 HOW TO SHOOT THE STARS (Easy beginner guide)
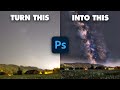 How to Edit the Milky Way in STRONG Light Pollution (Complete Tutorial)
 Milky Way Photography Tutorial - The COMPLETE Guide for Beginners
 Astrophotography from the CITY: 7 Tips to Image Under EXTREME Light Pollution!
 Light Pollution Filters in Cappadocia, Turkey (Kase Neutral Night)
 Orion Nebula WITHOUT a Star Tracker or Telescope, Start to Finish, DSLR Astrophotography
 How to Photograph the Milky Way in Under 5 Minutes