etrailer | Dexter E-Z Flex Triple Suspension System Kit Installation
Click for more info and reviews of this Dexter Axle Trailer Leaf Spring Suspension:
https://www.etrailer.com/Trailer-Leaf-Spring-Suspension/Dexter-Axle/K71-656-00.html
Check out some similar Trailer Leaf Spring Suspension options:
https://www.etrailer.com/dept-pg-Trailer_Leaf_Spring_Suspension-pt-Equalizer_Upgrade_Kit.aspx
https://www.etrailer.com
Don’t forget to subscribe!
https://www.youtube.com/user/etrailertv
Full transcript: https://www.etrailer.com/tv-review-dexter-e-z-flex-triple-suspension-system-kit-k71-656-00.aspx
Today on our fifth wheel trailer, we'll be installing the Dexter Axel EZ Flex Triple Suspension System Kit, with five and five-eighths inch equalizers, part number K71-656-00. Now, the reason you want a set-up like this is on our case we're replacing something that's damaged, so we're replacing with a better quality component, which will provide is with a much smoother ride when we're going down the road, provide us with 100% equalization, and will take out a lot of the roughness while we're going down the road. Here's what our kit consists of. We have our front equalizers here, which would go between our front and our middle axle. Then we have our rear equalizer here, which goes between our rear and middle axle. We have your bolts and brackets here, which will connect our leaf springs to our equalizers. As you notice, they all have zerk fittings in here, so we can grease them to extend the life of our bushings inside.
Same with the bolts that attach our leaf springs directly to the frame on our trailer. Obviously we have the back side here, which connects everything like so. Also included are new bushings to go inside our release springs and new bolts and nuts to hang our equalizers onto the frame of our trailer. You may notice that these are greasable here too, as well, so it will extend the life of the bushing inside here. This resilient rubber core that we have here in the middle of the equalizer is unaffected by harsh weather conditions such as salt water, and it will give us that smooth ride that we're looking for. It will take up some of that shock and abuse that otherwise would be transferred directly from our suspension of our trailer to the contents of our trailer.
This will take up some of that and provide us an added sense of protection, so whatever we're hauling in our trailer won't be damaged or affected as much by the harsh roads we're driving on. Now this kit has a very simple installation with robust components. Now that we've gone over the features of our Dexter kit, we'll show you how to install it. As you can see here, the harsh roads that this trailer was subjected to actually caused the leaf spring to rip out of the hanger here on the factory equalizer. We'll start by removing this bolt here on our leaf spring. Same up here.
We'll do this one in the back, as well. Now we can knock this bolt out. Now we'll drive out the original factory bushings that are in our leaf springs. Okay. Now we'll take our new bushing and get it started.
I'm going to use an old bolt here with a nut on it to help drive it in. We'll do the same for the back. Now that we have the rear axle taken care of on our passenger side of our trailer, we'll do the same on our driver's side of our trailer, and repeat the same process for the other two axles. Now that we have all of our bushings replaced in our leaf springs, we'll start with the forward part of the front axle. We'll slide it up into our hanger and we'll install it with our bolt here that has a zerk fitting. The zerks will go on the outside edge. Now it's a good idea before we drive our bolts in all the way to put a thin layer of grease on it. Now we can drive it in all the way with our socket; you don't want to beat on this bolt directly, because the zerk fitting will get damaged and you can't use it. Let's go stick the socket over it. Drive it in. We'll talk our nut, stick on the back side of the bolt, start it loosely for right now. We'll just snug it up a little bit. I'll torque it once everything's been installed. Now we'll remove our equalizer here from the factory that's in the front. Stick our wrench on there in the back. Drive the bolt out and remove the equalizer. Now take our equalizer that's for our front axle. There's an arrow that points toward the front, so you want to make sure that this facing the front of our trailer. We'll go like this, stick it into place, take our bolt, slide it through. We'll thread the gold nut on the inside of the bolt. Get this started a little bit. Take our hammer and knock the bolt in the rest of the way. We have our bolt all the way in now, we'll tighten the nut up on the back side. Now that we have this snugged up just enough, we can carry on with the installation. We'll torque everything once we're done, again. Now we'll take off our rear equalizer. This has no special arrow to warrant it. You can go in either way. It's exactly the same, both sides. Slide it up, put the
Видео etrailer | Dexter E-Z Flex Triple Suspension System Kit Installation канала etrailer.com
Показать
Комментарии отсутствуют
Информация о видео
Другие видео канала
 Dexter E-Z Flex Suspension
 Fifth Wheel Suspension MorRyde SRE 4000 install and Lifted with SafeJack
 SumoSprings vs. Timbren
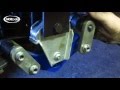 MORryde CRE3000 Suspension Installation
 CRE3000 & Wet Bolt Kit Installation Instructions
 etrailer | Dexter E-Z Flex Heavy Duty Rubber Suspension System Installation
 etrailer | Dexter E-Z Flex Suspension Kit Review and Installation
 How To Replace A Suspension Equalizer. Triple Axle Trailer.
 Carreta balança tandem
 Trailer Axle Flipping....What's the BIG Deal?
 Everlast Trailer Project Build Pt 4: Axle Install
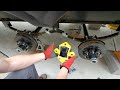 Suspension Upgrade
 MORryde CRE3000 suspension and Wet Bolt Kit Installation #ouRVisionnomadicliving
 Lippert Equa Flex in action on 2014 Redwood RV
 Flipping Shackle on Triple Axle 5th Wheel
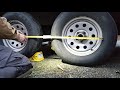 How To Align Your Trailer Axles with Lippert Correct Track
 MORryde Independent Suspension and Disc Brakes
 Trailer suspension repair: How to
 Lippert Components Equa-Flex and Correct Track in Action!