How to Draw - Mountains in the Mist w/ Commentary
If you would like to see a real time version of this drawing, I have an 8 part series of how to draw this exact drawing step by step! Follow this link to watch!
http://www.youtube.com/watch?v=VG1Mqvtw1VM&list=SPQ2Zh_NCUBvQI0K0zk8HeYbdXFnulJmsn
In this video, I will show you the tools and tell you the steps that I took to complete a realistic mountains in the mist landscape scene done in graphite pencils.
Follow me!
Facebook: http://www.facebook.com/tylersartshack
Twitter: https://twitter.com/#!/TylersArtShack
Google+: https://plus.google.com/115405344518849808905/posts
Music is from "The Spark that Thought" and the song is called "A Driving Rain" You can find this song as well as many other songs on http://dig.ccmixter.org/
Supplies and general information about video.
Time to draw: About 3 and a half hours.
Paper: Canson 90Ib Drawing sketch book
Pencils: Mostly HB. Also used 4H, 2H for highlights and 2B 4B for shadows.
Erasers: Tuff Stuff Eraser Stick (mechanical eraser) Kneaded eraser
Welcome back everybody to another drawing tutorial. This time I decided to draw one of my favorite subjects which is a mountain landscape. I have done many mountains in the past but I do not believe to this amount of detail.
I start off every mountain sketch in the same way. I will usually sketch the general placement of the mountains and will usually divide them up as to where the highlights and shadows will be placed. I then will usually jump right into the sky.
When I draw the sky in, I picture where I want the clouds and will leave those areas white. I will first shade the sky in with a 2H or HB pencil in a single hatching motion. Try not to vary the angle too much because it will put too much texture into the sky. I will then go over that area with a 2B pencil and make the sky rather dark. After the shading is completed, I will go back into the sky with a blending stump and will blend the bottoms of the clouds with the sky to make them fade. Then using the kneaded eraser, place it on the tops of the mountains and give it a small twisting motion. This will give the clouds a wispy look to them. It helps to convey movement. Then using the dirty blending stump, start to shade the clouds in a bit. Then using any eraser, erase out parts of the clouds again to create volume. I wanted puffy clouds in this picture so I did this several times over to give me the desired effect.
After the sky is finished up. I then go in to the mountains. I will usually divide them up between which side will have highlights and which side will be shaded. I will save the H pencils for the highlight side and use B pencils for the darker side. I start off light then progressively go darker when I am more confident about how I want the mountains to look.
Moving down the drawing. I decided to add in a layer of clouds or mist. I prepared for this by blending out the bottoms of the mountains and carrying that blend line quite a ways down the page. I then did the same procedure for the clouds and started to erase out clouds. Then going back in and adding more shadows again to enhance them and bring them out more.
Going down the page further I drew in a river with some trees lining the shoreline. I wanted to make this tree line interact with the layer of mist. I achieved this by using very light 4H pencils and making very simple verticle lines. With them being so light, it looks like the mist is interacting with them. I also made more lines using darker pencils to make a layering effect. I also put in some details for individual trees to add visual interest.
The next step was the stream. That was rather simple. Just used a darker pencil for the reflections and used an H pencil for the rest of the water. Blending it with a blending stump. The erasing here and there for some white water.
The final piece of the drawing was shoreline closest to the picture plane. I added in some larger trees. I used a total of 3 different pencils for those. 2H for the first layer then an HB and 2B for the shadows to give them depth and volume. The last stages was the shoreline and adding details to the rocks. I also added in some detailed grass at the end.
Hope you all enjoyed this one and I will see you all again soon with another tutorial!
Leave comments for future suggestions!
Видео How to Draw - Mountains in the Mist w/ Commentary канала TylersArtShack
Показать
Комментарии отсутствуют
Информация о видео
Другие видео канала
 How To Draw Mountains, Bob Ross Style
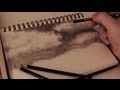 How to Draw Realistic Clouds - Full length tutorial w/ commentary
 Acrylic Landscape Painting Lesson - Morning in Lake by JmLisondra
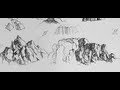 Pen & Ink Drawing Tutorials | How to draw mountains
 How to Draw a Tree
 How to Draw a Landscape with Trees & Mist for Beginners using Graphite Powder
 How to Draw Trees
 The Basics of Clutch Drawing Pencils
 Drawing Scenery of Mountains and Trees with Pencil | Time Lapse
 The Sketch - How to Draw the Mountains in the Mist Series Part One
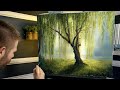 Willow Tree Sunlight Landscape Painting
 Getting GREAT At Sketching - Try This One Thing
 The Basics of Using Blending Stumps
 Sketching with Watercolour Pencils with Jonathan Newey
 How To Draw Landscapes, Rocks, Mountains, Trees, Graphite Tips and Techniques, Grid Method
 Unbelievable Artist Shows How to Draw Faces Step by Step
 Drawing a BARN, Rural Scene - How I use GRAPHITE!
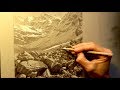 Drawing a Rocky Mountain Landscape - SKETCHENDEAVOUR #4
 How to Draw Cliffs and Crevasses