Taranis Q X7 OpenTX Current Sensor (FrSKY FAS40S) (Aloft Hobbies)
Adding An FrSKY Current Sensor In OpenTX
http://rcdiy.ca/current-frsky-40a-current-sensor-fas-40/
Aloft Hobbies
http://alofthobbies.com/frsky-fas-40-40-amp-sensor.html
RCdiy
http://rcdiy.ca/
OpentTx Lua Scripts Telemetry
Getting started http://rcdiy.ca/telemetry-scripts-getting-started/
Repository https://github.com/RCdiy/OpenTxLua
Help pay the bills :)
https://www.patreon.com/RCdiy
http://rcdiy.ca/patronage/
Use my affiliate links (It won't cost you anything.)
Amazon
http://amzn.to/2iDRfgb
Banggood
https://www.banggood.com/Wholesale-Toys-And-Hobbies-c-133.html?p=HJ0521658959201407VF
# ---------------------------------
# Taranis Q X7 OpenTX Current Sensor (FrSKY FAS40S) (Aloft Hobbies)
Welcome to another video from RCdiy.ca
This video is about adding a current sensor to OpenTX
Please read the documentation for details on what I will be showing you.
A link to the documentation will be placed in the description below this video.
Connect the current sensor to the receiver using the S port. Turn on the transmitter followed by supplying power to the receiver and sensor.
From the transmitter's main view press menu.
Long press page repeatedly till the telemetry screen is displayed.
Scroll down to discover new sensors.
Press enter.
New sensors will appear on the screen including the current and voltage sensor V F A S.
(pause)
Select stop discovery and press enter.
No we will add a calculated sensor that tracks the milliampere hours used.
Select add a new sensor and press enter.
Scroll down to the type field.
Press enter and it changes to calculated.
Scroll down and select the formula field.
Press enter and then scroll to select consumption.
Press enter.
Scroll down and select the sensor field.
Press enter and then scroll to select the current sensor.
Press enter.
Scroll up and select the name field.
Press enter and enter a name for the field.
Scrolling changes the characters.
Long press enter changes the case of the character between upper and lower case and advances to the next character.
Press Enter briefly to advance to the next character without changing the case.
Press exit when done.
This brings us to the end of this video.
Please like, subscribe and follow the links below.
Stay Safe & Have Fun.
Видео Taranis Q X7 OpenTX Current Sensor (FrSKY FAS40S) (Aloft Hobbies) канала RCdiy
Показать
Комментарии отсутствуют
Информация о видео
Другие видео канала
 OpenTX FrSKY Redundancy Connecting Two Receivers G-RX8 XM Plus
 OpenTX FrSKY SxR - Setup (S6R) (S8R)
 Taranis Q X7 OpenTX Bind Options
 OpenTX 2.2.1 What's New & Different
 Taranis Q X7 OpenTX Quad Race Start Sequence – GoRace Lua Script
 Taranis Q X7 OpenTX Getting Started With Lua Function Scripts
 Taranis FrSKY Telemetry Display On An iPad & iPhone (iMSB.ch)
 Taranis Q X7 OpenTX GPS Setup, Distance, Altitude, Logs, Google Earth (FrSKY GPS)(Aloft Hobbies)
 Taranis Q X7 OpenTX Power On Splash Screen Image Change
 Taranis Q X7 OpenTX Heli Head Speed Lua Script
 Taranis Q X7 OpenTX Head Speed Using A Brushless Motor RPM Sensor
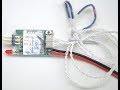 Taranis Q X7 OpenTX FrSKY RPM Sensor
 Flite Fest 2017 Giant Tiny Whoop (Technically flew further than TJ)
 Flite Fest 2017 Fun - TJ & The Giant Mini Quad Crash (AGAIN!)
 Taranis Q X7 OpenTX Tutorial Sounds And Announcements Global & Special Functions
 Taranis Q X7 OpenTX Tutorial Sounds And Announcements Volume Control
 Taranis Q X7 OpenTX Tutorial Sounds And Announcements Model Folders
 Taranis Q X7 OpenTX Tutorial Sounds And Announcements Mapped To Audio Files, File Format & Language
 Taranis Q X7 OpenTX Tutorial Sounds And Announcements microSD Card And Sound Packs
 Taranis Q X7 OpenTX Tutorial Sounds And Announcements Introduction How & When