Wood Photo Transfer| Transferring Pictures to Wood Using Mod Podge
How to transfer images to wood surfaces
Materials needed:
*Wood Surface
*Mod Podge - Gloss Finish
*Sanding block
*Foam or paint brush
*Pictures - Mirror Print images with words. Print with a laser printer on thin printer paper
(normal or thick will work too but will take more time to get off at the end and it already takes a long time)
STEPS:
Part 1: Prep Wood Surface
A) Sand
B) Clean
Part 2: Adhere Pictures via Mod Podge
A) Apply Generous Amount of Glue
B) Attach to Surface (glue side down)
C) Scrape back with card until surface is smooth
-LET DRY 24-48 hours-
Part 2: Clean Pictures
A) Get a warm wet cloth and gently - very gently - scrape/ pull away extra paper
B) This might need 2 Rounds - let dry completely in between A & B - a wet surface might rip your picture.
C) Take fine tip blade and clean edges/ remove extra paper
D) Ta Da! Gift it 🎉
Видео Wood Photo Transfer| Transferring Pictures to Wood Using Mod Podge канала Your Creative Friend Party Planning & Crafts
Показать
Комментарии отсутствуют
Информация о видео
8 января 2021 г. 23:27:01
00:02:57
Другие видео канала
 How to Photo Transfer with Mod Podge and INK JET printer / EASY DIY
 Mod Podge photo ornament!
 How To Sublimate Wood Using Polycrylic
 HOW TO Transfer A Picture To Wood Slices | NO RUBBING NECESSARY!
 PHOTO TRANSFER USING A INK JET PRINTER / NO SMEARING / NO RUBBING / AMAZING RESULTS
 How To Transfer Photo To Wood
 5 MINUTES INKJET TRANSFER technique for BEGINNERS // Any surface! // no rubbing paper
 PHOTO ORNAMENT DIY | Easy Holiday Decor idea
 How To Transfer A Picture To Wood
 How to Transfer a Photo to Wood with Mod Podge ⭐
 ABSOLUTE BEST Way to Transfer Any Photo to Wood Quickly!
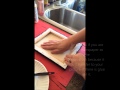 How to Mod Podge a Picture on to Canvas
 PHOTO TRANSFER / PHOTO TO WOOD / MOD PODGE / LASER JET IMAGE TRANSFER
 3 Ways To Decorate Christmas Wood Slices
 DIY: Learn how to Easily Transfer your Photos onto Wood, with Mod Podge!
 5 Ways to Print on Wood | DIY Image Transfer
 Mod Podge Graphic and Photo transfer method / ink jet vs. laser jet printer ~Will both work??~
 Best INKJET TRANSFER technique | Fastest way to image transfer your photos!
 Mod Podge VS Polyacrylic GRAPHIC TRANSFER / Which works best? / ATTENTION SIGNMAKERS
 DIY transfer a photo onto glass | Easy to do! image transfer