Building the TotalBoat Sport Dory: Episode 8 - The Electric Plane
In Episode 8 of Building the TotalBoat Sport Dory, Lou continues with the building of the all-important jig that the Sport Dory itself will be built upon. Last week, Lou showed us how to size and cut the pieces of the three layer "false bottom" and this week we're going to glue them all together.
We're going to use TotalBoat 5:1 Epoxy to glue the sheets of plywood together, using the slow hardener so the glue does not set up and harden too quickly, while we are putting the scarfs and the layers together.
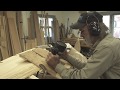
Once the glue has dried over night Lou attacks the false bottom with a Ryobi electric plane. This is the perfect tool for the job allowing Lou to remove large amounts of material quickly while still obtaining a
progressively beveled shape. A couple strokes of touch up with a hand plane and the mold is complete and we're ready to start putting our TotalBoat Sport Dory together.
Subscribe to Tips from a Shipwright and TotalBoat so you don't miss an episode of the Building the TotalBoat Sport Dory!
And also subscribe to the Tips from a Shipwright newsletter to follow upcoming appearances from Lou around New England.
http://www.tipsfromashipwright.com/email https://www.jamestowndistributors.com
http://www.totalboat.com
https://www.ryobitools.com/nation
http://www.tipsfromashipwright.com
http://www.facebook.com/tipsfromashipwright.com
http://www.twitter.com/louissauzedde
http://www.instagram.com/tipsfromashipwright.com
Видео Building the TotalBoat Sport Dory: Episode 8 - The Electric Plane канала Tips from a Shipwright
We're going to use TotalBoat 5:1 Epoxy to glue the sheets of plywood together, using the slow hardener so the glue does not set up and harden too quickly, while we are putting the scarfs and the layers together.
Once the glue has dried over night Lou attacks the false bottom with a Ryobi electric plane. This is the perfect tool for the job allowing Lou to remove large amounts of material quickly while still obtaining a
progressively beveled shape. A couple strokes of touch up with a hand plane and the mold is complete and we're ready to start putting our TotalBoat Sport Dory together.
Subscribe to Tips from a Shipwright and TotalBoat so you don't miss an episode of the Building the TotalBoat Sport Dory!
And also subscribe to the Tips from a Shipwright newsletter to follow upcoming appearances from Lou around New England.
http://www.tipsfromashipwright.com/email https://www.jamestowndistributors.com
http://www.totalboat.com
https://www.ryobitools.com/nation
http://www.tipsfromashipwright.com
http://www.facebook.com/tipsfromashipwright.com
http://www.twitter.com/louissauzedde
http://www.instagram.com/tipsfromashipwright.com
Видео Building the TotalBoat Sport Dory: Episode 8 - The Electric Plane канала Tips from a Shipwright
Показать
Комментарии отсутствуют
Информация о видео
Другие видео канала
 Building The TotalBoat Sport Dory: Episode 9 - Routing Frames
 Building the TotalBoat Sport Dory: Episode 10 - Compression Steam Bending
 Building the TotalBoat Sport Dory: Episode 11 - Garboard Pattern and Plank
 Part 2 - A quick and easy method to remove screws - Wooden boat repair on a Herreshoff 12 1/2
 Steam Bending Wood, 1" Thick Kiln Dried Ash | Stagecoach Tops
 12 yr Old Builds a Row Boat!!
 TotalBoat Gleam Varnishing Tips
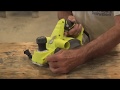 How to tune up your electric planer for best results!
 Building the TotalBoat work skiff - I love it when a skiff comes together (Episode 37)
 Lou shows us his next project REMORA (1928), Herreshoff 12 1/2 that washed up on the rocks (Part 1)
 Plastic Frames for Wooden Boats—Part 1
 TIPS Season 3: The V-Bottom Skiff - Laying down the sole
 Building the TotalBoat Sport Dory: Episode 27 - Dory at the WoodenBoat Show Part 2
 How to Cut Chines to Fit Flush with the Stem on a Wooden Boat
 Boat Building! 2 years in 22 minutes plus bilge stringer prep.
 New method of planking using progressive bevel planing
 Woodturning - The Plywood and Perspex Vase #RocklerPlywoodChallenge
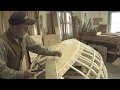 Building the TotalBoat Sport Dory: Episode 15 - Port Garboard
 TIPS Season 3: The V-Bottom Skiff - Installing the keelson