Split Cedar LED Wall Lamp
Split Cedar LED Wall Lamp
In the making of this artistic wall lamp, I used:
- Cedar Planks (5/4 radius edge decking). One plank will be enough for a project of this size.
- Acrylic Sheet 3/16”
- Titebond 3 wood glue
- LED strip lighting - I think I said 4’ in my video, but it was an 8’ length of multi-color LEDs.
- TV Mount - there are many different ways to mount the lamp to the wall and I would do it differently if I did it again.
- Hammer
- Chisel
- Drill
As described in the video, I shaved the radius edges off the cedar planks. Because these were waste cuts, from a decking project I helped my brother with, their overall lengths were varied.
I then ripped the boards into 2 1/2” strips and from there I cut the strips to lengths of 6, 7 and 8 ½” blocks. These lengths were my preference, but there was nothing calculated about it. I pretty much set the fence on my miter saw and cut away.
It was then onto splitting the blocks. I tried to split them just off center – meaning I purposely avoided placing my chisel equidistant from each side. I also twisted my chisel right or left to get varying degrees of splits. This was important to me because I was looking for topography in this piece – which is also why I call this a work of art.
All told I probably used 16’ of wood. After ripping it in half, cutting them into blocks and then splitting those in two – I made over 100 split blocks. I still have several left over after making my lamp 40” wide and 20” tall.
Gluing all the pieces together took patience. I wanted the lamp to be random, but trying to be random is a lot harder than following a pattern. I want to vary the length, thickness, angle and color of each piece. Truly, this might look like the easiest part of this project, but I found it difficult to be so random with so many variables.
I would glue up 5 courses of lengths and then clamp it together. ***As an after thought, I should have run the finished edge through a joiner, because later, as I glued the acrylic strips to the lengths of cedar, any varying height between the wood pieces and the acrylic made for a poor bond. This project is extremely light, but especially if I were to make it out of oak or another hard wood, I can see were this could become a large issue.
After all was glued up and cured (I gave it a little over 24 hours). I installed the TV mount and the LED lights. This was probably the easiest part of the project – however, you’ll note in the video that I changed one of the mounting locations. I noticed - and I will CAUTION you to do the same – because my cedar splits were so varied, had I screwed down the TV mount in that location, my wood screw would have erupted out the front of my work – ruining it (in my mind). Be aware of how deep you can go when drilling/screwing into the back of the lamp. This was also primarily why I used simple thumbtacks to mount the LED light strip.
The LED light strip could have been mounted several different ways. I chose to place the light directly on top of the acrylic strips so that it diffused out through it and into the room. Admittedly, while I call this project a “lamp”, the light is not ideal to read a book under, but you could easily add more acrylic strips and LEDs behind them to illuminate a room better.
As pointed out in the video, install the bracket portion of the TV mount to a wall stud. Do not risk letting your work of art fall off the wall due to improper mounting.
I hope you enjoyed this video and if you would like to see my inspiration for this project, please check out this link –
https://www.youtube.com/watch?v=gAK8BEsslhs
be aware that the video is in German, but can still be easily followed.
Please like this video and subscribe to my channel. Also don’t forget to check out on http://www.5MinuteLearn.com. If you sign up for my newsletter I will do my best to alert you to every new video I produce.
Music:
Breakdown - Take the Lead by Kevin MacLeod is licensed under a Creative Commons Attribution license (https://creativecommons.org/licenses/by/4.0/)
Source: http://incompetech.com/music/royalty-free/index.html?isrc=USUAN1100796
Artist: http://incompetech.com/
Ecstasy X by Audionautix is licensed under a Creative Commons Attribution license (https://creativecommons.org/licenses/by/4.0/)
Artist: http://audionautix.com/
Видео Split Cedar LED Wall Lamp канала 5 Minute Learn
Показать
Комментарии отсутствуют
Информация о видео
Другие видео канала
 DIY Accent Wall with Lights | Quarantine Project | Feature Wall
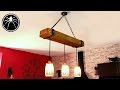 ► Création d'un lustre vintage en bois de palette
 Epoxy Resin Wall Lamp - Resin Art
 Making an LED Backlit Wall Art from Pallet wood
 Making the "Impossible Joint" 四方鎌継
 Exploding Sun LED Lamp | Simple DIY Project
 Amazing Plywood Manufacturing Process ! Extremely Fastest Large Woodworking Machinery
 How to make a wooden Batman wall lamp
![How to Embed LED Strip Lights in Epoxy Resin [New Technique]](https://i.ytimg.com/vi/qUspvsCluvQ/default.jpg) How to Embed LED Strip Lights in Epoxy Resin [New Technique]
How to Embed LED Strip Lights in Epoxy Resin [New Technique] How I Built Wifi Controlled LED Wall Lamps
 Make Led Pallet Wall - How to build a Pallet Wall with led ligths
 Mixed wood LED Pendant Lights
 Ingenious Woodworking Workers At Another Level // Amazing Woodworking Skills Of Young Carpenters
 DIY creative wall lamp with led strip out of plywood
 DIY Reclaimed Pallet Wood Wall
 I made a DIY Reclaimed Wood Shiplap Wall from my old FENCE
 Amazing Water Fountain with Plastic Bottle and Led (DIY)
 How to build a portable WALL (COOL IDEA) | DIY Creators
 8x8x8 LED CUBE WITH ARDUINO UNO
 Making a Tall Storage Cabinet