How to Scan and Cut with a Brother Scan and Cut SDX125E - Step by Step
The Brother Scan and Cut SDX125E is an AMAZING machine. Unfortunately, it's not very intuitive, and the instructions suck. So after several hours of trial and error, we figured it out. Here's a step-by-step tutorial on how you can scan virtually any image on Earth, crop it, resize it, and then cut it out on vinyl to place it on a cup, window, t-shirt, wall, or anywhere you can imagine. Enjoy!
Print image on white cardstock on any printer (do NOT use plain laser paper with the super sticky mat that comes with the SDX125E. It will stick to the mat permanently!)
Use a black Sharpie to fill in any spots that didn’t come through completely
Place cardstock on mat
Place mat on machine between marks
Press load button
From home screen, select scan
Scroll right and select Transfer to Canvas Workspace
Select start, scan starts
When scan is done, touchscreen says “finished transferring.” Press ok. Press unload button to unload mat
Open Canvas Workspace
Select File 🡪 Import from Cutting Machine 🡪Scanned Image
Image appears in workspace
From the left tools menu, select “Image Tracing”
From the pop-up, select “An Image Scanned by Your Machine”
From the Image Tracing screen, use the blue boxes to drag around the parts of the image you want to use
Uncheck “Past the Image on the Drawing Area”
From Tracing Options, select “Trace Outer Edge Only”
Select Preview
Select ok
Move the scanned image to the reveal the traced image
From the right tools menu, select layers
Turn off the scanned image by clicking on the eyeball
Click and drag to select all pieces and in the layers menu, right click on one of the selected layers and select Group
Add some text by selecting the text tool from the left tools menu
Click in the workspace area and type the text you want
Click anywhere in the workspace
A new menu appears at the top as along as the text is selected.
Change the color, font, weight, etc. if you want
Position the words under your image and size down using the blue boxes
Select both the image and the words by clicking and dragging
From the right tools menu, select Edit. From the Edit menu, align the objects center.
With both the words and image still selected, go to layers, right click on one of the selected layers and select Group
Turn the ruler on by selecting the Display menu at the top, select Show Ruler
Size image using blue boxes.
To cut the image on vinyl, select File 🡪 Export Transfer FCM File. A message appears letting you know that hidden objects won’t be exported. Select Ok.
From the Export/Transfer FCM File, select “Transfer FCM File via the Internet”
A message appears say “The registered machine is ready to download the transferred file from the internet. Select Ok.
Back on the Brother Scan and Cut machine, select the Home button to get back to the main screen then select “Retrieve Data” from the touchscreen
Select computer with Wi-Fi
Drag the image to the upper right corner
Select ok
Select “please select”
Select cut
Select the wrench
Scroll down to make sure ***Half Cut*** is on which is needed when cutting vinyl
Click ok
Add vinyl to cutting mat
Load mat into machine using the load button
Select Start
Display shows time to complete cutting
When cutting is complete, select Ok then select the unload button
Weed image then use transfer tape and apply image where wanted
That's it! Get to work!
Видео How to Scan and Cut with a Brother Scan and Cut SDX125E - Step by Step канала Family Unit
Показать
Комментарии отсутствуют
Информация о видео
Другие видео канала
 Scanning and cutting images with the Brother ScanNCut DX tutorial
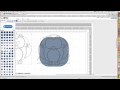 How to Transform a JPeg into a Cutting File - ScanNCut
 🖨️ STOP BUYING DIES & CUTTING MATS | Scan and Cut how to stick images | SDX85 Tutorial 2021
 Vinyl Cutting for Beginners - Brother Scan N Cut - How to make a custom T-shirt!
 ScanNCut: Scan a Design & Cut it from Fabric
 ScanNCut DX - Cutting Fabric Step by Step
 print then cut - Cricut tutorial tips and tricks - System dialog - How to print without lines
 Brother ScanNCut Tutorial - Cutting Vinyl with your Brother Scan and Cut - Personalize your SDX125
 Cut Airbrush Stencils With A Cricut Cutting Machine
 Scanning your own designs with the Scan 'n' Cut
 SDX125e Key Features
 Brother Scan'N'Cut Rotary Blade ~Test and Review!
 Brother ScanNCut Tips & Tricks - Direct Cut vs Scan to Cut Data - Sending Hearts Paper Pumpkin Kit
 Why you NEED a Brother Scan N Cut!
 Tattered Lace | ScanNCut Tips and Techniques with Mel Heaton
 ScanNCut DX: Tips for Cutting HTV (Heat Transfer Vinyl)
 Brother ScanNCut SDX125E - Unboxing & Getting Started Guide - Brother Scan and Cut Basics
 Make Custom Stickers with the ScanNCut DX
 DIY T-Shirt with Heat Transfer Paper and ScanNCut DX
 Brother ScanNCut Tips & Tricks - Drawing with the Pen Tool & Universal Pen Holder - Use your Pens!