- Популярные видео
- Авто
- Видео-блоги
- ДТП, аварии
- Для маленьких
- Еда, напитки
- Животные
- Закон и право
- Знаменитости
- Игры
- Искусство
- Комедии
- Красота, мода
- Кулинария, рецепты
- Люди
- Мото
- Музыка
- Мультфильмы
- Наука, технологии
- Новости
- Образование
- Политика
- Праздники
- Приколы
- Природа
- Происшествия
- Путешествия
- Развлечения
- Ржач
- Семья
- Сериалы
- Спорт
- Стиль жизни
- ТВ передачи
- Танцы
- Технологии
- Товары
- Ужасы
- Фильмы
- Шоу-бизнес
- Юмор
How to Create a 3D Faux Embroidery Effect on a Garment?
How to Create a 3D Faux Embroidery Effect on Garments – Step-by-Step Guide
Follow these easy steps to achieve a professional-looking 3D faux embroidery effect on your t-shirts using the Otter system:
Step 01: Design your pattern using Otter RIP software. Customize your artwork exactly how you want it to appear.
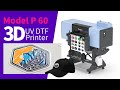
Step 02: Print your design using Model P 30 or Model P 60. Make sure the settings match your garment type for optimal results.
Step 03: Carefully cut your design with a slice cutter. Precision here ensures a clean, detailed final print.
Step 04: Peel off Film B from your printed design. This prepares it for layering and heat transfer.
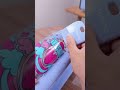
Step 05: Place the printed design onto your t-shirt. Use a wiper to smooth out any air bubbles, ensuring the design lies flat. Then remove Film A.
Step 06: Cut a piece of Film B and carefully place it over the design.
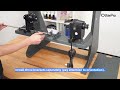
Step 07: Use a top & bottom heat press to transfer the design onto the garment.
Please check website for more info:
https://www.otterdtf.com/heat-press/top-bottom-heat-press.html
Видео How to Create a 3D Faux Embroidery Effect on a Garment? канала Otter DTF
Follow these easy steps to achieve a professional-looking 3D faux embroidery effect on your t-shirts using the Otter system:
Step 01: Design your pattern using Otter RIP software. Customize your artwork exactly how you want it to appear.
Step 02: Print your design using Model P 30 or Model P 60. Make sure the settings match your garment type for optimal results.
Step 03: Carefully cut your design with a slice cutter. Precision here ensures a clean, detailed final print.
Step 04: Peel off Film B from your printed design. This prepares it for layering and heat transfer.
Step 05: Place the printed design onto your t-shirt. Use a wiper to smooth out any air bubbles, ensuring the design lies flat. Then remove Film A.
Step 06: Cut a piece of Film B and carefully place it over the design.
Step 07: Use a top & bottom heat press to transfer the design onto the garment.
Please check website for more info:
https://www.otterdtf.com/heat-press/top-bottom-heat-press.html
Видео How to Create a 3D Faux Embroidery Effect on a Garment? канала Otter DTF
Комментарии отсутствуют
Информация о видео
8 мая 2026 г. 15:39:50
00:05:26
Другие видео канала