BABY HEADWRAP TUTORIAL | DIY HEADWRAPS | DIY BABY TURBAN
Hello Welcome to part 3 of the headband hair bow series. Today i am showing you how to make 2 headwraps or turbans as some people like to call them. I am showing you how to make a tied headwrap and one with a regular bow. Just like the photos in the thumbnail. If you missed part 1 or 2 of the series you can watch them here:
DIY HAIRBOW TUTORIAL: https://youtu.be/UkXeoxbC4kg
DIY HAIRBOW TUTORIAL PART 2: https://youtu.be/bXuZHKIU6Zk
This is where you can find my sewing machine and all my favorite sewing supplies:
https://www.amazon.com/shop/eatcraftclean
WHERE I BUY MY FABRIC: https://youtu.be/MM-2uxj6XBw
MEASUREMENTS FOR THE HEADWRAP WITH REGULAR BOW:
I cut mine at 6 inches wide by 16 inches long for the band. For the bow i always cut mine at 6 inches wide by 9 inches long and the center piece is 6 inches wide by 2 inches long. I always cut mine 6 inches wide no matter what. I thing that is the perfect width for the headwraps.
MEASUREMENTS FOR THE TIED HEADWRAP:
Measure your childs head then add 8 inches to that. So my daughters head is 16 inches plus 8 inches so that is 24 inches. So I cut it at 6 inches wide by 24 long.
Thank you so much for watching!! If you liked this video and would like to see more headband hair bow tutorials please comment below!
-Dawn
eatcraftclean@gmail.com
FOLLOW ME ON INSTAGRAM! @EATCRAFTCLEAN
Видео BABY HEADWRAP TUTORIAL | DIY HEADWRAPS | DIY BABY TURBAN канала Eat Craft Clean
Показать
Комментарии отсутствуют
Информация о видео
Другие видео канала
 Headbands for babies and toddlers from old clothes Tutorial: 4 cute styles
 How To Tie A Baby Headwrap (bow)
 DIY TURBAN HEADWRAP | BOHO HEADBAND | BABY HEADBANDS
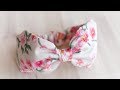 Cotton Bow Headbands for Babies – Fabric Headband Tutorial
 No flap bow (head wrap)
 Bun Headband for Babies - Donut Turban - Donut Headband DIY
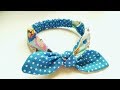 Baby & Kids Head Wrap Tutorial | DIY by Elysia Handmade
 Bloom head band tutorial
 How to Make Tie Knot Headbands
 DIY// turbantes para niña// sin máquina de cocer
 3 DIY Headbands | Babies and Toddlers | From Old Clothes
 DIY Baby Turban Headband with Bow
 Baby Headband Ideas : Simple Bow Headband | DIY by Elysia Handmade
 FAIXA COM LAÇO PARA BEBÊ
 How to Sew a Pair of Leggings, two ways---for any age!
 How To Tie a Headband Bow - La Romi
 How to Make Turban Headband for Baby
 HOW TO TIE A BABY HEADWRAP | BIG BOW TUTORIAL | GIRL HAIRSTYLES | MAMA REID
 Bow Turban Headband Tutorial - DIY Baby Headwrap Bow Tutorial - Hairbow Supplies, Etc.
 HOW TO MAKE A TURBAN WITH A BOW