Transmission Lines | Conductor Sagging | Stringing
#Stringing #ACSR #Sagging #SagTension #SagBridge #Compression #TransmissionLine#SagCalculation#Conductor
Earlier I uploaded the construction video on Foundation, Erection and Paying out of Conductor. I got several request from viewers to upload video on Conductor Sagging, this time the video is all about that explained in details.
Once the conductor paying out is over its time to meet the clearance criteria of line which is between the line and ground and between conductors, under maximum load condition. The process of attaining this is called sagging. Let us look in to procedure step by step.
Procedure
1. Let us look into a side view of a tower. We divide it into two a sagging zone and a non-sagging zone. Our first step is holding the conductor in non-sagging zone. 18/20mm wire rope slings is attached to the cross arms. Other end of the sling will be attached to the automatic clamps fixed on conductor. This is done to maintain required rough sag tension in back span during sagging.
2. Let us now move into sagging zone which starts with hoisting of tension Insulator sets with power winch machine. The universal joint of the Insulator string is properly fixed with the tension plate of cross arm.
3. 20 to 25 meter apart from Insulator an automatic clamp is fixed on one conductor coupled with pulley. Steel wire rope one end fixed to yoke plate of Insulator will be passing through pulley coupled with automatic clamp, tower body and tower leg to winch machine.
This arrangement of Pulleys are done to reduce the force given to get the work done
4. Tension on the conductor is applied using power winch machine. Sag Man need to check the dip of the conductor till it coincides with the hairline of Sag scope and sag board.
The span which is nearer to the equivalent span shall be identified as sag span to measure the sag. Atmospheric Temperature reading is noted from a thermometer kept in shade. The sag is checked w.r.t the noted atmospheric temperature from approved sag chart. Sag board are properly installed before taking final sag. Sagging should not be carried out in abnormal climatic conditions.
5. For conductor sagging initial sag and tension chart is referred. It is the sag and tensions at the time the line is built. Final Sag and tension are calculated if the conductor has experienced 10 years of creep elongation at a conductor temperature of 60 degree F.
Overhead conductor elongates with time, temperature and tension thereby changing their original positions after installation. Despite the weather condition and loading on line the conductor must remain at safe distance from any object.
6. Once the Sag is over 6 Ton Pull lift will be attached to the Insulator string with the help of 18/20mm wire rope slings. Other end of the pull lifts will be attached to the automatic clamps fixed on conductor. Once again verify the sag by matching the nodal point of the strung conductor with sag board.
7. Mark the conductor after attaining desired sag level and cut the excess conductor length.
8. Same procedure as said earlier is adopted for the other conductor to attain the desired sag.
9. Before deadening the bundling of conductor need to be checked with total station. This is to ensure that the all sub conductor are on same levels. Any adjustment requires can be done by adjusting the pull lift.
10. Sagging platform is lifted where preparation for conductor will be done.
11. In case steel reinforced conductor upper layer of aluminium need to be removed as per approved drawing dimension. Then the steel deaden is inserted and compressed followed by aluminium.
12. Recording of pre and post press dimension in dead end joint details report is mandatory to detect any flaws.
13. Once the deadening is over connect the dead end joint with tension insulator string and release the load slowly by releasing the load of the pull lift. This brings an end to conductor sagging work.
Now a day’s sag bridge can also be used for more safe operation.
Tips
Sometimes it happens that the conductor is in sag at one check point and it may not be in sag at other sag check point. Then, in that case
a. Check the Sag Calculation
b. Check the temperature
c. Check the heights of Sag Board & Sag Scope
d. Check the Conductor rollers for any friction or malfunctioning
e. Check the span length of each section
Hope you enjoyed watching this video. Please like, share and comment in the comment section below and please do subscribe my channel to get more informative video. This is end for today.
Adieu!!!
More on:
Foundation- https://youtu.be/W5G2TwDWSnU
Pile Load Test- https://youtu.be/trnrUBUCXGo
Erection- https://youtu.be/vrDC-Dfnnhw
Erection- https://youtu.be/C-QhkGbxryQ
Stringing- https://youtu.be/4Lje07848bE
Scaffolding- https://youtu.be/5wLxlq6JE40
OPGW- https://youtu.be/armLWFEi8tk
Under Ground Cable- https://youtu.be/armLWFEi8tk
Tower Testing- https://youtu.be/m0LtgEh5JIc
Subscribe:
https://www.youtube.com/c/PritamSingharoy
Видео Transmission Lines | Conductor Sagging | Stringing канала Pritam Singha Roy
Показать
Комментарии отсутствуют
Информация о видео
Другие видео канала
 33kV Live Tension Insulator Replacement
 PLP Compression Dead-end & Jumper Terminal for ACSR & ACSS Conductors
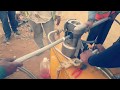 Transmission Lines | Stringing
 Installing ACCC® Conductor
 How do Electric Transmission Lines Work?
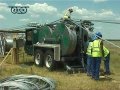 Six-bundle transmission line stringing in South Africa by VISCAS with ZECK B 1500/8x2 + SPW 18
 Stringing and Sagging a High-Voltage Transmission Line (1950)
 Line Sag with Dynamometer
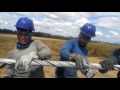 Lt 230kv Mascarenhas×Linhares
 Powerline Alaska
 Transmission Line | Insulator | ACSR | Sub station | Corona Discharge High Tension Line | SAG | RCC
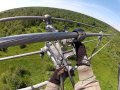 Spacer Installation on 765,000 volt line
 Conductors used in transmission line
 Cart Launch and spacer changeout
 Monopole Erection | Tension #Monopole #Erection #TransmissionLine #HighVoltage #Structure
 161kv clipping
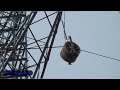 Five wheels bundled conductor pulley for 500KV overhead transmission line
 UNDERGROUND CABLE
 Transmission Lines | Tower Erection
 How to identify the KV of transmission line