How Do You Tie Two Roofs Together? | Roof Framing
Have you ever wondered how roofs tie together? Trusses don't fill from one section to the next... So how is it done? Here's how!
0:00 - 2:45 Sleepers installed.
Sleepers are where your rafters will land, these are installed nailed down into trusses or rafters below to ensure a solid connection.
2:46 - 4:09 Ridge Board installed.
The Ridge is where your rafters will but into up at the top, your ridge board creates the 'peak' of the roof. 2x8" ridge board was spec'd here, but many have been done with 2x6".
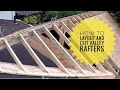
4:10 - 5:20 Laying out for fill rafters, 24" O.C. from the existing trusses.
You want to continue the roof layout from an existing location to ensure the roof sheathing goes down without conflict. Hooking trusses or rafters that are already in location on a 24" layout, makes sure you don't end up with problems when sheathing.
5:21 - 6:15 Pulling numbers for rafter numbers.
All of my numbers were pulled from long-point of the 63* on a 45* to long-point of the 6/12 head cut at the top of the ridge. Make sure to always pull the same way for every rafter or you'll confuse yourself.
6:16 - 7:59 Cutting rafters.
With numbers pulled up top, everything can be done down below. Cutting all rafters on the ground makes sure we aren't slipping on sawdust up above.
8:00 - 15:40 Installing rafters.
Nailing the rafters on the layouts done earlier on, and down at the sleeper. Make sure to hold your rafter fill flush to top of ridge.
15:41 - 18:50 Bracing / Support for over-framed roof.
This varies structural engineer to structural engineer. For this project he wanted uprights under the longer rafters, seen done here.
18:51 - 20:09 Explaining the roof system.
This should be self-explanatory.
20:10 - 21:27 Roof sheathing installation.
4'x8'x5/8" ZIP System Sheathing from Huberwood: www.huberwood.com/ for more information.
21:28 - 22:34 Project Recap.
_________________
𝑻𝑶𝑶𝑳 𝑳𝑰𝑺𝑻: https://www.amazon.com/shop/mattbangswood?listId=3E3RY20WI7A06&ref=idea_share_inf
𝑪𝑶𝑵𝑵𝑬𝑪𝑻 𝑾𝑰𝑻𝑯 𝑴𝑬:
_________________
𝑰𝑵𝑺𝑻𝑨: https://www.instagram.com/MattBangsWood
2𝑵𝑫 𝑪𝑯𝑨𝑵𝑵𝑬𝑳: https://www.youtube.com/MattPanella
𝑭𝑨𝑪𝑬𝑩𝑶𝑶𝑲: https://www.facebook.com/MattBangsWood
𝑯𝑨𝑴𝑴𝑹: https://www.hammr.com/matt
𝑺𝑷𝑶𝑵𝑺𝑶𝑹𝑺:
__________
𝑨𝑹𝑰𝑨𝑻 10%: https://ariat.dkkdet.net/c/2029241/696794/10644
𝑫𝑰𝑨𝑴𝑶𝑵𝑫𝑩𝑨𝑪𝑲 𝑻𝑶𝑶𝑳𝑩𝑬𝑳𝑻𝑺: https://www.toolbelts.com/
𝑩𝑨𝑫 𝑾𝑶𝑹𝑲𝑾𝑬𝑨𝑹: https://www.badworkwear.com/
(CODE: "𝕄𝔹𝕎𝟙𝟘")
#construction #building #carpentry
Видео How Do You Tie Two Roofs Together? | Roof Framing канала MattBangsWood
0:00 - 2:45 Sleepers installed.
Sleepers are where your rafters will land, these are installed nailed down into trusses or rafters below to ensure a solid connection.
2:46 - 4:09 Ridge Board installed.
The Ridge is where your rafters will but into up at the top, your ridge board creates the 'peak' of the roof. 2x8" ridge board was spec'd here, but many have been done with 2x6".
4:10 - 5:20 Laying out for fill rafters, 24" O.C. from the existing trusses.
You want to continue the roof layout from an existing location to ensure the roof sheathing goes down without conflict. Hooking trusses or rafters that are already in location on a 24" layout, makes sure you don't end up with problems when sheathing.
5:21 - 6:15 Pulling numbers for rafter numbers.
All of my numbers were pulled from long-point of the 63* on a 45* to long-point of the 6/12 head cut at the top of the ridge. Make sure to always pull the same way for every rafter or you'll confuse yourself.
6:16 - 7:59 Cutting rafters.
With numbers pulled up top, everything can be done down below. Cutting all rafters on the ground makes sure we aren't slipping on sawdust up above.
8:00 - 15:40 Installing rafters.
Nailing the rafters on the layouts done earlier on, and down at the sleeper. Make sure to hold your rafter fill flush to top of ridge.
15:41 - 18:50 Bracing / Support for over-framed roof.
This varies structural engineer to structural engineer. For this project he wanted uprights under the longer rafters, seen done here.
18:51 - 20:09 Explaining the roof system.
This should be self-explanatory.
20:10 - 21:27 Roof sheathing installation.
4'x8'x5/8" ZIP System Sheathing from Huberwood: www.huberwood.com/ for more information.
21:28 - 22:34 Project Recap.
_________________
𝑻𝑶𝑶𝑳 𝑳𝑰𝑺𝑻: https://www.amazon.com/shop/mattbangswood?listId=3E3RY20WI7A06&ref=idea_share_inf
𝑪𝑶𝑵𝑵𝑬𝑪𝑻 𝑾𝑰𝑻𝑯 𝑴𝑬:
_________________
𝑰𝑵𝑺𝑻𝑨: https://www.instagram.com/MattBangsWood
2𝑵𝑫 𝑪𝑯𝑨𝑵𝑵𝑬𝑳: https://www.youtube.com/MattPanella
𝑭𝑨𝑪𝑬𝑩𝑶𝑶𝑲: https://www.facebook.com/MattBangsWood
𝑯𝑨𝑴𝑴𝑹: https://www.hammr.com/matt
𝑺𝑷𝑶𝑵𝑺𝑶𝑹𝑺:
__________
𝑨𝑹𝑰𝑨𝑻 10%: https://ariat.dkkdet.net/c/2029241/696794/10644
𝑫𝑰𝑨𝑴𝑶𝑵𝑫𝑩𝑨𝑪𝑲 𝑻𝑶𝑶𝑳𝑩𝑬𝑳𝑻𝑺: https://www.toolbelts.com/
𝑩𝑨𝑫 𝑾𝑶𝑹𝑲𝑾𝑬𝑨𝑹: https://www.badworkwear.com/
(CODE: "𝕄𝔹𝕎𝟙𝟘")
#construction #building #carpentry
Видео How Do You Tie Two Roofs Together? | Roof Framing канала MattBangsWood
Показать
Комментарии отсутствуют
Информация о видео
Другие видео канала
 Tying an Addition Roof to an Existing House | MY DIY
 Roof Framing 101 Scotch Valleys & Snub Hips
 HOW TO | Roofing Basics (Part 3 of 3)
 Framing The Roof Alone! ||14x14 Home Addition||
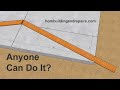 EASIEST Method Ever For Making Gable Roof Rafters Without Complicated Math Formulas
 Stair Building Timelapse + New Favorite Tool #14
 How To Cut and Install Sheathing OSB In A Valley
 Tying New Buildings Into Existing + Roof Inspection | Pass or Fail?
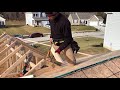 Setting valley trusses
 Installing Jack Rafters/Valley Rafters Alone | How To | MY DIY
 Roof Framing Project 171 part 6
 Building A Custom Home in 40 Minutes: A Construction Time-Lapse
 How To Build A Small Roof - Valley Roof Framing
 How to Measure and Cut Rafters
![The Ridge: Back Cut Tips, Roof Sheathing and 20 Episodes Down!!! [#20]](https://i.ytimg.com/vi/cNgoaXQKapw/default.jpg) The Ridge: Back Cut Tips, Roof Sheathing and 20 Episodes Down!!! [#20]
The Ridge: Back Cut Tips, Roof Sheathing and 20 Episodes Down!!! [#20] Framing The Valley + Dummy Tails! (How-To: Cut Valley Blocks)
 Roof Framing- Cutting and Stacking the Lakeshore Project
 Wall framing beast mode. The only way I know how.