- Популярные видео
- Авто
- Видео-блоги
- ДТП, аварии
- Для маленьких
- Еда, напитки
- Животные
- Закон и право
- Знаменитости
- Игры
- Искусство
- Комедии
- Красота, мода
- Кулинария, рецепты
- Люди
- Мото
- Музыка
- Мультфильмы
- Наука, технологии
- Новости
- Образование
- Политика
- Праздники
- Приколы
- Природа
- Происшествия
- Путешествия
- Развлечения
- Ржач
- Семья
- Сериалы
- Спорт
- Стиль жизни
- ТВ передачи
- Танцы
- Технологии
- Товары
- Ужасы
- Фильмы
- Шоу-бизнес
- Юмор
Yarn Tape Bag with Scalloped Edge Crochet Tutorial
What's up hookers! In this video, I will show you how to make a yarn tape bag with a scalloped edge. I will include the pattern below but it will also be available throughout the video!
Pattern
YARN TAPE BAG with SCALLOP EDGE (I used a size 4 hook, although this can easily be made on a 4mm-6mm hook)
Make 2 PANELS my panels were approx. 8 inches wide and 7.25 inches long ( the dimensions of your bag may vary due to size hook and tension)
Row 1 Ch 27 (any odd number will work)
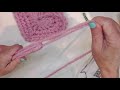
Row 2 Dc into the 5th chain from the hook, chain 1, (skip a chain dc -chain 1) to the end, your last stitch will be a dc with NO chain 1, at the end chain 4 and turn
Row 3 dc-chain 1 on top of the dc from the row below, continue to the end. The last double crochet is made under the space from the previous row (more advanced can make the dc into the 3rd chain from the chain 4 turning chain), at the end of the row chain 4 and turn
Repeat row 3 as many times as desired for height of the bag (my bag is 11 rows, 12 windows in each row)
Weave in the ends, on the ‘wrong’ side of the panel
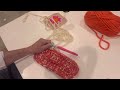
Once the panels are complete, set aside and make a GUSSET for the bag approximately 6-7 stitches (2-21/2 inches wide)
Row 1 chain 7 (chain 6 if you want a more narrow gusset)
Row 2 sc in each stitch across , ( you will have a total of 6 sc, one less than the number you chained) chain 1 turn and repeat until desired length (length of gusset is determined by adding the measurements of 2 sides and one bottom)
Seam the gusset on to the panels using either a slip stitch or whip stitch with a tapestry needle.
Fasten off. Weave in ends.
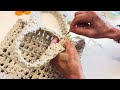
After the bag is assembled add the SCALLOP BORDER
Slip your yarn tape under any stitch, best to start on one side of the bag, chain 1 and turn, sc into every stitch and under each space. This foundation row is optional, you can make the scallops and slip stitches directly into the window stitches (see video)
Chain 1, skip the first stitch. In every other stitch place a sc, hdc, sc (all 3 stitches into one stitch) make a slip stitch in between each cluster. Fasten off and weave in any ends.
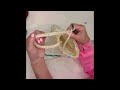
Final step! Make 2 STRAPS that will be whip stitched on to the bag (each strap is approximately 15 inches long, length is whatever you desire) Highly recommend using stitch markers to guide you on strap location.
Row 1 chain the number of chains to reach your desired length
Row 2 make sc’s around the chain (see video)
Enjoy and adapt!
Chapters
0:00 - introduction
1:18 - getting started
6:01 - how to finish the front panel
7:45 - starting the gusset
11:50 - how to attach the gusset
16:29 - starting the straps
21:14 - scalloping the top of the bag
23:56 - attaching the straps
Видео Yarn Tape Bag with Scalloped Edge Crochet Tutorial канала DOUBLETAPCROCHET
Pattern
YARN TAPE BAG with SCALLOP EDGE (I used a size 4 hook, although this can easily be made on a 4mm-6mm hook)
Make 2 PANELS my panels were approx. 8 inches wide and 7.25 inches long ( the dimensions of your bag may vary due to size hook and tension)
Row 1 Ch 27 (any odd number will work)
Row 2 Dc into the 5th chain from the hook, chain 1, (skip a chain dc -chain 1) to the end, your last stitch will be a dc with NO chain 1, at the end chain 4 and turn
Row 3 dc-chain 1 on top of the dc from the row below, continue to the end. The last double crochet is made under the space from the previous row (more advanced can make the dc into the 3rd chain from the chain 4 turning chain), at the end of the row chain 4 and turn
Repeat row 3 as many times as desired for height of the bag (my bag is 11 rows, 12 windows in each row)
Weave in the ends, on the ‘wrong’ side of the panel
Once the panels are complete, set aside and make a GUSSET for the bag approximately 6-7 stitches (2-21/2 inches wide)
Row 1 chain 7 (chain 6 if you want a more narrow gusset)
Row 2 sc in each stitch across , ( you will have a total of 6 sc, one less than the number you chained) chain 1 turn and repeat until desired length (length of gusset is determined by adding the measurements of 2 sides and one bottom)
Seam the gusset on to the panels using either a slip stitch or whip stitch with a tapestry needle.
Fasten off. Weave in ends.
After the bag is assembled add the SCALLOP BORDER
Slip your yarn tape under any stitch, best to start on one side of the bag, chain 1 and turn, sc into every stitch and under each space. This foundation row is optional, you can make the scallops and slip stitches directly into the window stitches (see video)
Chain 1, skip the first stitch. In every other stitch place a sc, hdc, sc (all 3 stitches into one stitch) make a slip stitch in between each cluster. Fasten off and weave in any ends.
Final step! Make 2 STRAPS that will be whip stitched on to the bag (each strap is approximately 15 inches long, length is whatever you desire) Highly recommend using stitch markers to guide you on strap location.
Row 1 chain the number of chains to reach your desired length
Row 2 make sc’s around the chain (see video)
Enjoy and adapt!
Chapters
0:00 - introduction
1:18 - getting started
6:01 - how to finish the front panel
7:45 - starting the gusset
11:50 - how to attach the gusset
16:29 - starting the straps
21:14 - scalloping the top of the bag
23:56 - attaching the straps
Видео Yarn Tape Bag with Scalloped Edge Crochet Tutorial канала DOUBLETAPCROCHET
Комментарии отсутствуют
Информация о видео
12 марта 2026 г. 21:15:14
00:26:31
Другие видео канала