Spare Parts #5 - Making A Bump Style Knurling Tool Holder
Making A Bump Style Knurling Tool Holder, by Clickspring
In this video I make a simple "bump" style knurling wheel holder, to hold the rope knurling wheels that I made in another video. It can be held in a standard mini-lathe tool post, and is a nice easy design requiring a bit of lathe and mill work, as well as a quick heat treat of the axle.
This is the second video in a series of at least 3, that will relate to the subject of creating these beautiful rope knurl patterns. Be sure to check out the other videos when you get a chance.
The main project video that this video is related to is "Machining A Set Of 'Vintage Style' Rope Knurls ": https://www.youtube.com/watch?v=i9pD5vIHJ8M
Free plans for the double angled cutter, and form tool:
http://www.clickspringprojects.com/uploads/3/8/2/2/38221101/double_angled_cutter.pdf
http://www.clickspringprojects.com/uploads/3/8/2/2/38221101/form_tool_profile.pdf
If you would like to help support the creation of these videos, then head on over to the Clickspring Patreon page: https://www.patreon.com/clickspring
You can also help me make these videos by purchasing via the following Amazon Affiliate links:
Cameras used in this video:
Panasonic GH5 - https://amzn.to/2rEzhh2
Panasonic X920 - https://amzn.to/2wzxxdT
Tools & Shop Products:
"Solidworks 2013 Bible": http://amzn.to/2FObS1D
"Lathework: A Complete Course (Workshop Practice Series)" - https://amzn.to/2yBv4Rb
"Milling: A Complete Course (Workshop Practice Series)" - https://amzn.to/2K2QZ97
"Hardening, Tempering and Heat Treatment (Workshop Practice Series)" - https://amzn.to/2KbZo6l
Dykem 80300 Steel Blue Layout Fluid, Brush-in-Cap (4oz): http://amzn.to/2HGPaJJ
Digital Calipers: https://amzn.to/2IkFh4O
Blue Matador Abrasive Paper - https://amzn.to/2IAFiBT
Dormer A190202 Jobber Drill Set, 1.0 mm - 6.0 mm x 0.1 mm Size: https://amzn.to/2DR5fdb
Dormer A190203 Jobber Drill Set, 6.0 mm - 10.0 mm x 0.1 mm Size: https://amzn.to/2ITfeTa
YG1 NC Spotting Drill 8% Cobalt HSS 1/8 to 1/2" 120 Degree 5 Pc Set CNC Machine: https://amzn.to/2G7ylv6
Abbreviated Transcript:
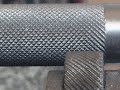
00:06 I'm in the process of making this set of rope knurls for some future Clickspring projects, and to use them I need a holder like this.
00:13 It's a basic bump style knurling tool that can be mounted onto the lathe toolpost, and then pushed into the work to form the pattern.
00:25 The main body section doesn't really need to be hardened, but I'd like it to last well, so I'm going to make it from O1 tool steel. The axle will definitely benefit from being hardened, so I'm making that from En8 carbon steel, so I can quench harden it later. So let's get started.
00:44 I loaded the rod stock into the lathe, and turned the basic profile of the axle. A quick check of the axle diameter confirms that the knurl will be a close fit, and that it will also run freely.
01:34 This thread is quite short, and I've designed it to end flush with the outside of the tool body. I'd like to be able to get the knurling tool in as close as possible to the chuck when its in use, to minimise any flex in the part that's being knurled.
01:58 After parting off, the axle was rechucked the other way, given a light facing cut and then taken over to the mill to form a screwdriver slot. At this point all of the main features of the axle are in place, it just needs to be quench hardened, and then tempered.
02:56 I've tempered it to a medium straw color, which means that it remains quite hard but its also quite tough too and so should last well. A quick touch with emery paper to pretty it up a little, and its done.
03:12 So now it's on to the main tool body, and for the most part, these features are best formed on the mill, so the first step was to get it set up and located in the vise.
03:44 I drilled the work all the way through with the tapping drill size, and then half way through with a drill that was just a little than the clearance drill size. That way can follow that part of the hole with a reamer, and make sure that the axle will be a close fit in the tool body.
04:10 To make that cut, I need the work standing upright in the mill vise, but of course if I just stood it up without any support it'd be way to flexible. So I've strapped it into the vise with some 1,2,3 blocks to give it some more rigidity.
04:23 Once confirmed vertical, I used some toolmaker clamps to further lock that top section in place. One side was tapped to accept the thread of the axle, and at this point most of the hard work has been done.
05:33 The knurls have a little bit of end shake, and run nice and free on the axle. And best of all the holder has a clean edge on the side that will be closest to the chuck.
References:
Frank Ford (Luthier/Machinist)
http://www.frets.com/HomeShopTech/Projects/RopeKnurl/ropeknurl.html
Making A Bump Style Knurling Tool Holder, by Clickspring
Видео Spare Parts #5 - Making A Bump Style Knurling Tool Holder канала Clickspring
In this video I make a simple "bump" style knurling wheel holder, to hold the rope knurling wheels that I made in another video. It can be held in a standard mini-lathe tool post, and is a nice easy design requiring a bit of lathe and mill work, as well as a quick heat treat of the axle.
This is the second video in a series of at least 3, that will relate to the subject of creating these beautiful rope knurl patterns. Be sure to check out the other videos when you get a chance.
The main project video that this video is related to is "Machining A Set Of 'Vintage Style' Rope Knurls ": https://www.youtube.com/watch?v=i9pD5vIHJ8M
Free plans for the double angled cutter, and form tool:
http://www.clickspringprojects.com/uploads/3/8/2/2/38221101/double_angled_cutter.pdf
http://www.clickspringprojects.com/uploads/3/8/2/2/38221101/form_tool_profile.pdf
If you would like to help support the creation of these videos, then head on over to the Clickspring Patreon page: https://www.patreon.com/clickspring
You can also help me make these videos by purchasing via the following Amazon Affiliate links:
Cameras used in this video:
Panasonic GH5 - https://amzn.to/2rEzhh2
Panasonic X920 - https://amzn.to/2wzxxdT
Tools & Shop Products:
"Solidworks 2013 Bible": http://amzn.to/2FObS1D
"Lathework: A Complete Course (Workshop Practice Series)" - https://amzn.to/2yBv4Rb
"Milling: A Complete Course (Workshop Practice Series)" - https://amzn.to/2K2QZ97
"Hardening, Tempering and Heat Treatment (Workshop Practice Series)" - https://amzn.to/2KbZo6l
Dykem 80300 Steel Blue Layout Fluid, Brush-in-Cap (4oz): http://amzn.to/2HGPaJJ
Digital Calipers: https://amzn.to/2IkFh4O
Blue Matador Abrasive Paper - https://amzn.to/2IAFiBT
Dormer A190202 Jobber Drill Set, 1.0 mm - 6.0 mm x 0.1 mm Size: https://amzn.to/2DR5fdb
Dormer A190203 Jobber Drill Set, 6.0 mm - 10.0 mm x 0.1 mm Size: https://amzn.to/2ITfeTa
YG1 NC Spotting Drill 8% Cobalt HSS 1/8 to 1/2" 120 Degree 5 Pc Set CNC Machine: https://amzn.to/2G7ylv6
Abbreviated Transcript:
00:06 I'm in the process of making this set of rope knurls for some future Clickspring projects, and to use them I need a holder like this.
00:13 It's a basic bump style knurling tool that can be mounted onto the lathe toolpost, and then pushed into the work to form the pattern.
00:25 The main body section doesn't really need to be hardened, but I'd like it to last well, so I'm going to make it from O1 tool steel. The axle will definitely benefit from being hardened, so I'm making that from En8 carbon steel, so I can quench harden it later. So let's get started.
00:44 I loaded the rod stock into the lathe, and turned the basic profile of the axle. A quick check of the axle diameter confirms that the knurl will be a close fit, and that it will also run freely.
01:34 This thread is quite short, and I've designed it to end flush with the outside of the tool body. I'd like to be able to get the knurling tool in as close as possible to the chuck when its in use, to minimise any flex in the part that's being knurled.
01:58 After parting off, the axle was rechucked the other way, given a light facing cut and then taken over to the mill to form a screwdriver slot. At this point all of the main features of the axle are in place, it just needs to be quench hardened, and then tempered.
02:56 I've tempered it to a medium straw color, which means that it remains quite hard but its also quite tough too and so should last well. A quick touch with emery paper to pretty it up a little, and its done.
03:12 So now it's on to the main tool body, and for the most part, these features are best formed on the mill, so the first step was to get it set up and located in the vise.
03:44 I drilled the work all the way through with the tapping drill size, and then half way through with a drill that was just a little than the clearance drill size. That way can follow that part of the hole with a reamer, and make sure that the axle will be a close fit in the tool body.
04:10 To make that cut, I need the work standing upright in the mill vise, but of course if I just stood it up without any support it'd be way to flexible. So I've strapped it into the vise with some 1,2,3 blocks to give it some more rigidity.
04:23 Once confirmed vertical, I used some toolmaker clamps to further lock that top section in place. One side was tapped to accept the thread of the axle, and at this point most of the hard work has been done.
05:33 The knurls have a little bit of end shake, and run nice and free on the axle. And best of all the holder has a clean edge on the side that will be closest to the chuck.
References:
Frank Ford (Luthier/Machinist)
http://www.frets.com/HomeShopTech/Projects/RopeKnurl/ropeknurl.html
Making A Bump Style Knurling Tool Holder, by Clickspring
Видео Spare Parts #5 - Making A Bump Style Knurling Tool Holder канала Clickspring
Показать
Комментарии отсутствуют
Информация о видео
Другие видео канала
 Home Machine Shop Tool Making - Machining A Set Of Vintage Style Rope Knurls
 Universal cut knurling tool
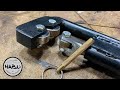 HABU \\ Building A Hand Knurling Tool
 Spare Parts #13 - Making A Square Broach
 Knurling
 Making a Custom Fuel Tank Cap
 Spare Parts #4 - Making, Hardening And Tempering A Form Tool For The Lathe
 DIY knurling device!
 Sherline Knurling Video
 Pt 1. Shoemaking...Making Wooden Shoe Lasts, Shoe Forms, By Hand.
 Antikythera Fragment #3 - Ancient Tool Technology - Hand Cut Precision Files
 Simple Quick Knurling Trick
 Solid Tool Post Mount, Best Lathe Upgrade, South Bend Lathe
 Spare Parts #8 - Making A D Bit Single Flute Milling Cutter
 Home made fly cutter
 Making a Simple Tailstock Die Holder
 Boeni Marking and Knurling Tools
 Spare parts #6 - Making A Right Angled Screwdriver