How to Work with 3D Effects | Adobe Illustrator
Full Playlist: https://www.youtube.com/playlist?list=PLLALQuK1NDrgj2MPms5i6gMsQl9NlXXSR
-
-
Watch more How to Use Adobe Illustrator videos: http://www.howcast.com/videos/513810-How-to-Work-with-3D-Effects-Adobe-Illustrator
This is how to work with 3D in Adobe Illustrator. Now, Adobe Illustrator has a lot of geometric shapes, a lot of flat objects. But sometimes you might want something 3-Dimensional. So the easiest way to do that is, and I don't want to say easiest because it takes some getting used to, but it is simple to get used to. You select your Pen tool, and let's just free form draw a shape.
We're going to click one point here, here, here and here. Now, if we want to make this into a 3D shape, all we have to do is go to Effect in our menu, 3D, and we can go to Extrude and Bevel. Now when we do this, right now it looks flat, there's not much you can see. But we're going to turn our previews on so we can take a look at everything. And when we click that, you'll notice we get a 3D effect on the shape.
And that 3D effect is actually governed by the square you see in the window. And you can change the orientation of the shape, and the direction that it's facing, by rotating this square. And you can rotate it vertically, horizontally, or just in all three planes - X, Y and Z planes. And when you let go, it renders your shape as such. You can also manually enter them, in terms of the angles. But you also have an option called Perspective. And when you click this, and you drag it, you'll notice that it puts it in extreme perspective. Of course that's a little too much, so we're not going to do that. But the more we drag, the more extreme the perspective becomes. And then you can change how deep the actual object is once it's in 3D. So we can increase that, make it very-very deep. We can change our perspective so it shows more. We can also change the cap. This shows you whether or not you want it to be hollow. Let me rotate this so you can actually see. Hollow on the inside, or if you want a cap that closes the shape off. Then you have Bevel options. And you can choose if you want it to be beveled a certain way. As you see, it actually changes the beveling on this edge. Let's click OK. Go in just so we can get a closer look at that edge. Then bring it back up. Preview.
And we can change the height of the bevel. Bump it up and you'll notice that the shape will change accordingly. And we can change how the bevel moves, whether it's inward or outward. And then, one of our other options is the type of shading. So we're going to click the More Options tab. And we can change from plastic , wire frame, no shading - which shows the flat object outline - diffuse shading. But plastic shading is the most common. It gives you the most lighting options. And then these little circles that are on this sphere over here, you can change to alter where your light source is. You can use them here. You can actually click this button right underneath to place it behind the object. You can add more light sources. Place them wherever you want and it will change the light accordingly. And all of these are going to tell you how the blending steps are, for where your lighting is serving, the size of the actual light, how strong the light is - Like, I can decrease this light. Let's remove this one just so we can get a better idea. Click this. Change the ambient light, so the light that's spilling off is either lighter or darker.
And then overall light intensity we can change. And then we can click OK. And that's how you do that with a 3D object. And then you have an option of revolving or rotating. Let's create a rectangle, let's go to Effect, 3D, and Evolve. And what happens is, similar to the 3D before, we get another option box, but this one allows us to rotate around an axis. So, as soon as we turn our preview on, you'll see that the actual shape rotates around. And then you can change the direction of how it's rotating. And granted that was a rectangle we started with but because it's rotating about the center axis, it's actually going to make a circle. And then you can change the cap.
And it'll open or close. Let's see. And that'll show you how much it'll actually fill up. It looks like Pac-Man. Then we have our perspective again, which changes the perspective of it. The cap shows that it's open. And you can change all your lighting options like we just did in 3D. And you click OK. And really quick, our next one is the Rotate command, which, in 3D, go into our menu, click Rotate, click Preview and it keeps the shape flat but allows you to rotate it as if it's a 3D object. And that's how you use 3D in Adobe Illustrator.
Видео How to Work with 3D Effects | Adobe Illustrator канала Howcast
-
-
Watch more How to Use Adobe Illustrator videos: http://www.howcast.com/videos/513810-How-to-Work-with-3D-Effects-Adobe-Illustrator
This is how to work with 3D in Adobe Illustrator. Now, Adobe Illustrator has a lot of geometric shapes, a lot of flat objects. But sometimes you might want something 3-Dimensional. So the easiest way to do that is, and I don't want to say easiest because it takes some getting used to, but it is simple to get used to. You select your Pen tool, and let's just free form draw a shape.
We're going to click one point here, here, here and here. Now, if we want to make this into a 3D shape, all we have to do is go to Effect in our menu, 3D, and we can go to Extrude and Bevel. Now when we do this, right now it looks flat, there's not much you can see. But we're going to turn our previews on so we can take a look at everything. And when we click that, you'll notice we get a 3D effect on the shape.
And that 3D effect is actually governed by the square you see in the window. And you can change the orientation of the shape, and the direction that it's facing, by rotating this square. And you can rotate it vertically, horizontally, or just in all three planes - X, Y and Z planes. And when you let go, it renders your shape as such. You can also manually enter them, in terms of the angles. But you also have an option called Perspective. And when you click this, and you drag it, you'll notice that it puts it in extreme perspective. Of course that's a little too much, so we're not going to do that. But the more we drag, the more extreme the perspective becomes. And then you can change how deep the actual object is once it's in 3D. So we can increase that, make it very-very deep. We can change our perspective so it shows more. We can also change the cap. This shows you whether or not you want it to be hollow. Let me rotate this so you can actually see. Hollow on the inside, or if you want a cap that closes the shape off. Then you have Bevel options. And you can choose if you want it to be beveled a certain way. As you see, it actually changes the beveling on this edge. Let's click OK. Go in just so we can get a closer look at that edge. Then bring it back up. Preview.
And we can change the height of the bevel. Bump it up and you'll notice that the shape will change accordingly. And we can change how the bevel moves, whether it's inward or outward. And then, one of our other options is the type of shading. So we're going to click the More Options tab. And we can change from plastic , wire frame, no shading - which shows the flat object outline - diffuse shading. But plastic shading is the most common. It gives you the most lighting options. And then these little circles that are on this sphere over here, you can change to alter where your light source is. You can use them here. You can actually click this button right underneath to place it behind the object. You can add more light sources. Place them wherever you want and it will change the light accordingly. And all of these are going to tell you how the blending steps are, for where your lighting is serving, the size of the actual light, how strong the light is - Like, I can decrease this light. Let's remove this one just so we can get a better idea. Click this. Change the ambient light, so the light that's spilling off is either lighter or darker.
And then overall light intensity we can change. And then we can click OK. And that's how you do that with a 3D object. And then you have an option of revolving or rotating. Let's create a rectangle, let's go to Effect, 3D, and Evolve. And what happens is, similar to the 3D before, we get another option box, but this one allows us to rotate around an axis. So, as soon as we turn our preview on, you'll see that the actual shape rotates around. And then you can change the direction of how it's rotating. And granted that was a rectangle we started with but because it's rotating about the center axis, it's actually going to make a circle. And then you can change the cap.
And it'll open or close. Let's see. And that'll show you how much it'll actually fill up. It looks like Pac-Man. Then we have our perspective again, which changes the perspective of it. The cap shows that it's open. And you can change all your lighting options like we just did in 3D. And you click OK. And really quick, our next one is the Rotate command, which, in 3D, go into our menu, click Rotate, click Preview and it keeps the shape flat but allows you to rotate it as if it's a 3D object. And that's how you use 3D in Adobe Illustrator.
Видео How to Work with 3D Effects | Adobe Illustrator канала Howcast
Показать
Комментарии отсутствуют
Информация о видео
Другие видео канала
 How to Make a 3D Coffee Cup in Adobe Illustrator using Mapping
 How to Create 3D Glossy Logo in Adobe Illustrator | Easy Tutorial
 3D Isometric Cube Design in Adobe Illustrator CC
 How To Use Adobe Illustrator 3D Design: Hyper_Realism
 Learn Skills For QUALITY ISOMETRIC DESIGN - Illustrator Isometric House Tutorial
 Design a 3D Object Effect Illustrator Tutorial
 Adobe Illustrator - 3D in Illustrator Part One - Class 23 - Urdu / Hindi
 Basic 3D Shapes in Adobe Illustrator 6 shapes
 How to Create Realistic 3D Fur Effect in Adobe Illustrator Tutorial
 How To Make A Sewing Pattern for Bags in Adobe Illustrator | SEWING WITH STEVE
 HOW TO MAKE 3D CUP OF TEA IN SECONDS IN ADOBE ILLUSTRATOR
 10 HIDDEN Adobe Illustrator Tips You Must Know! (Easily Master Adobe)
 How to Make a 3D Bottle | Coca Cola | Adobe Illustrator
 3D Shapes in Adobe Illustrator, Tetrahedron and Rectangular Prism
 How To Use The Perspective Grid Tool in Illustrator
 HOW TO MAKE 3D WATERMELON IN SECONDS IN ADOBE ILLUSTRATOR
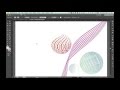 Illustrator cc Grid tools and Mapping art in 3-D
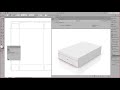 Esko Software Solutions: Studio Toolkit for Boxes
 How to design an ice text effect in adobe illustrator. Cristmas 3d text effect illustrator tutorial