Cushion Cover Design ! Modern Cushion Cover Design Hand Embroidery Tutorial,কুশন কভার ডিজাইন
Title: Cushion Cover Design ! Modern Cushion Cover Design Hand Embroidery Tutorial,কুশন কভার ডিজাইন #ruphandicraft
Stitches:
1) Chain Stitch
2) Fishbone Stitch
3) Outline Stitch
4) Herringbone Stitch
5) Feather Stitch
Materials :
1) Cotton Fabric
2) DMC Thread
3) cross Ball Thread
#ruphandicraft
#cushioncoverdesign
#homedecorationideas
#pillow
#tableclothdesign
#embroiderytutorial
#handembroidery
#bordadofantasia
#crafts
#ideas
Designing an embroidery pattern for a cushion cover involves careful planning, creativity, and attention to detail. Here's a step-by-step description of how to design an embroidery pattern for a cushion cover, along with a description of the TGA (Threaded Graphic Art) file format commonly used for embroidery designs:
Step 1: Inspiration and Concept
Begin by brainstorming ideas for your cushion cover embroidery design. Consider the theme, style, and colors you want to incorporate. Sketch out a rough idea of what you want the final design to look like.
Step 2: Choose the Fabric and Thread
Select the fabric for your cushion cover. Common choices include cotton, linen, or canvas. Make sure it's suitable for embroidery.
Choose the embroidery thread colors that match your design and fabric. Threads are typically made of cotton, polyester, or rayon.
Step 3: Digitize the Design
You'll need embroidery software to create a digital version of your design. Popular software includes Wilcom, Tajima, and Brother PE-Design.
Start by importing or drawing your design in the software.
Convert your design into a digital embroidery file format like TGA (Threaded Graphic Art) or other commonly used formats like DST, PES, or EXP.
Step 4: Define Stitch Types
In the software, specify the types of stitches for different parts of your design. Common stitch types include satin stitches, fill stitches, and running stitches.
Adjust the stitch density, length, and angle to achieve the desired texture and look.
Step 5: Set the Size and Placement
Determine the size of the embroidery design to fit your cushion cover. Ensure it's centered and positioned correctly on the fabric.
Use the software's tools to resize and reposition the design as needed.
Step 6: Test Stitching
Before embroidering on the actual cushion cover, it's advisable to do a test stitch on a piece of scrap fabric. This helps ensure that the design looks as expected and that there are no issues with thread tension or needle breaks.
Step 7: Embroider the Cushion Cover
Hoop the cushion cover fabric securely to prevent wrinkles and movement during embroidery.
Load the digital embroidery file (TGA or your chosen format) into your embroidery machine.
Thread the machine with the selected thread colors and start the embroidery process. Be sure to monitor the machine's progress to catch any issues early.
Step 8: Finishing Touches
After embroidery is complete, remove the cushion cover from the hoop.
Trim any loose threads and inspect the design for any imperfections.
Optionally, you can wash and press the cushion cover to give it a clean finish.
Видео Cushion Cover Design ! Modern Cushion Cover Design Hand Embroidery Tutorial,কুশন কভার ডিজাইন канала Rup Handicraft
Показать
Комментарии отсутствуют
Информация о видео
Другие видео канала
 আধুনিক ডিজাইনে বাংলাদেশী ঐতিহ্যবাহী নকশীকাঁথার সেলাই #475,How to stitch Nakshi Kantha, New Design
 Hand Embroidery Traditional Nokshi Katha Stitch -474 ,Bordado a mano,नोक्षीकथा जाइन
 Hand Embroidery for Beginners : আধুনিক ডিজাইনে বেডসিট/টেবিল ক্লথ/কুশন পিলো কভার হাতের সেলাই
 Hand Embroidery ! Bangladeshi Traditional Nokshi Katha Stitch Tutorial,Embroidery Designs
 HAND EMBROIDERY : Beautiful kettle Design Hand Embroidery Tutorial Easy Idea // Needle Work Hacks
 Hand Embroidery Neck Design #70, Neck Design Embroidery, Neckline Embroidery,গলার ডিজাইন হাতের সেলাই
 Easy Border Design for Dress। Border Design Embroidery by Rup Handicraft
 Hand Embroidery ! Hand Embroidery Tutorial How to Create Perfectly Spaced Borderlines
 Hand Embroidery All over Design,Heart Florist Design Embroidery,Basic Hand Embroidery for Beginner
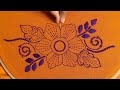 Traditional Nakshi Kantha Stitch by Hand Embroidery-, আধুনিক কাঁথা টিউটোরিয়াল, नक्षी कंध सिलाई
 আধুনিক ডিজাইনে নকশী কাঁথা,নকশী কাঁথা বর্ডার ডিজাইন,How to Draw Nakshi Katha Design,Drawing Tutorial
 Flower Embroidery Tutorial !! Very Easy Fly Stitch Flower Hand Embroidery Tutorial,Flower Stitch Nee
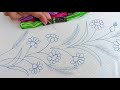 Hand Embroidery ! Embroidery Designs Tutorial,Borderline Design Hand Embroidery,Easy Embroidery Clas
 HAND EMBROIDERY ! Sofa/Pillow/Cushion/Table Cloth Design #79 ,টেবিল ক্লথ/কুশন/সোফা কভার ডিজাইন
 Traditional Nakshi Kantha Stitch Tutorial by Hand -362,আধুনিক কাঁথা টিউটোরিয়াল,Bordado a mano
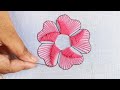 Hand Embroidery Amazing Flower Design Pattern,Needle Point Art,Flower Stitch Embroidery for Beginner
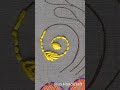 Hand Embroidery Designs !!! Nokshi katha Design Hand Embroidery Tutorial by Rup Handicraft
 Hand Embroidery ! Hand Embroidery Tutorial How to Create Perfectly Spaced Borderlines,Border Design
 নকশী কাঁথা সেলাই ! Nokshi Katha,Hand Embroidery Traditional Bangladeshi Nokshi Katha Stitch Tutorial
 নকশী কাঁথা সেলাই ! Nokshi Katha,Hand Embroidery Traditional Bangladeshi Nokshi Katha Stitch Tutorial
 Basic Stitch Tutorial !! Latest Modern Border line Hand Embroidery Design by Rup Handicraft #shorts