Mozart: Piano Sonata No. 9 in D major, K.311 [Uchida]
I. Allegro con spirito (0:00)
II. Andante con espressione (4:19)
III. Rondo. Allegro (9:13)
Piano: Mitsuko Uchida
Mvt. 1: Allegro con spirito [Sonata-Form]
EXPOSITION
(0:00) Primary Theme (P1). The wavy figure is M1, the four ascending quavers are M2.
(0:17) Transition Section. RH expands the scales of P2. (Also, notice how 0:19 is M1 inverted!).
(0:26) Secondary Theme (S1) in A major. The inversion of M2 appears a lot of times.
(0:39) Counter-Theme 2 (S2).
(0:45) Counter-Theme 3 (S3).
(0:58) Cadential Theme. At 1:01, a galloping figure in descending sixths (M3) brings additional closure to the Exposition.
DEVELOPMENT
(2:10) Episode 1: M3 is developed extensively, modulating across minor tonalities. M3 wants to complete its cadence to A major, but gets deviated all the time. At 2:32, it finally resolves into the relative minor of D (Bm). Then, some hesitant chords lead us to
(2:41) Episode 2: S3 in G major.
(2:54) Episode 3: expansion of that pre-cadential measure at 0:58. We start modulating and getting lost (G, D, Em, D, G, E7)...
(3:08) Episode 4: and suddenly the transitional theme based on the inversion of M1 comes back, leading us to a surprising
INVERTED RECAPITULATION
(3:14) The Secondary Theme appears in the tonic, then shifts to Dm for a moment (Mozart does the same in the Recap of K.309).
(3:28) And then we realize how Mozart is an amazing craftsman: he transforms the secondary Counter-Themes (S2+S3) into a new Transitional Section, as if rearranging the whole Exposition. We hear S2 and S3 in the tonic, conducting us back to the
(3:48) Primary Theme.
(3:58) Now that the Inverted Recapitulation is complete, a new Bridge (resembling the scales of the initial Transition) emerges to prepare us for the Coda.
(4:04) When we finally get back to a familiar pre-cadential theme, the expected dominant7 chord is deviated to the relative minor. We stand still for a moment, until M3 comes back and closes the movement.
Mvt. 2: Andante con espressione
*The structure of this movement is very ambiguous and difficult to categorize accurately, so I'll present some ideas. The first possibility is a "Sonatina-Form", lacking the Development Section (notice that the Secondary Theme appears in the dominant and returns in the tonic). The second idea is a modified Sonata-Rondo, with structure AABA'CAB'A''C'A (the tonic return of sections B and C also fits well with this idea). The third possibility, which is my favorite and the basis for the analysis below, is an Rounded-Binary form in AABA'B'A' structure. The reason why I like this analysis is because I recall other movements by Mozart shaped like that and I was very intrigued by the repeat sign at the beginning.
SECTION A
(4:20) Theme A, consisting of two parts: A1 is the initial 8 bars, then A2 is the melody over semi-quavers. The three descending octaves in m. 3 are M1.
(5:19) Bridge based on M1.
SECTION B
(5:33) Theme B in the dominant.
(5:54) False entry of Theme A in the dominant (wrong key). LH interrupts RH with another fragment of A1; both hands are trying to establish the return of Theme A, but they have to modulate first.
(6:04) Another bridge based on M1.
SECTION A'
(6:32) Theme A in the tonic, with embellishments.
(7:04) The bridge from the beginning returns, but now it prepares us for a tonic Theme B.
SECTION B'
(7:13) Theme B in G major.
(7:35) Once again, a fragmentary False Entry of Theme A, followed by a Transition.
SECTION A''
(8:13) Theme A, more ornamented.
(8:44) Coda, based on an extension of A2.
Mvt. 3: Allegro [Sonata-Rondo form]
SECTION A
(9:14) Theme A. The initial appoggiatura+note is M1 and the descending scale (m.5) is M2. At 9:31, M2 expands.
(9:33) Transition Section.
SECTION B
(9:45) Theme B (B1) in the dominant, based on M1.
(9:54) Counter-Theme 1 (B2) based on M2.
(10:01) Counter-Theme 2 (B3), polyphonic.
(10:20) Counter-Theme 3 (B4).
(10:41) Counter-Theme 4 (B5).
SECTION A
(10:55) Theme A.
(11:16) After we hear the tonic arpeggios unexpectedly ending in D7, a Modulatory Transition to the relative minor begins (G, Em, D, F#m, Bm).
SECTION C
(11:36) Theme C (C1) in B minor (deliciously beethovenian, if I dare say).
(11:59) Counter-Theme 5 (C2) in G major.
(12:17) Return of the Transition. As we approach D major and our ears crave for the Recapitulation, Mozart fools us — a dominant7 chord interrupts the flowing motion of the rondo, and we hear this beautiful written Cadenza.
SECTION A
(13:07) Theme A, second time an octave lower.
SECTION B
(13:26) Mozart transforms B1 in the new Modulatory Transition (same procedure as in mvt 1!).
(13:44) B2 + B3 + B4 + B5 in the tonic.
SECTION A
(14:34) The final statement of Theme A.
(14:44) Once more fooling us, the Transition starts to play. Suddenly, it gets interrupted by an agitated Coda that ends the movement abruptly (Notice how this Coda is a variation of that transitional motive: the four chords).
Видео Mozart: Piano Sonata No. 9 in D major, K.311 [Uchida] канала Miguel Fontes Meira
Показать
Комментарии отсутствуют
Информация о видео
Другие видео канала
 Scarlatti: Keyboard Sonata in G major, K.305
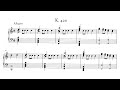 Scarlatti: Keyboard Sonata in C major, K.420
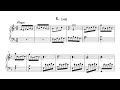 Scarlatti: Keyboard Sonata in F major, K.349
 Scarlatti: Keyboard Sonata in B♭ major, K.310
 Scarlatti: Keyboard Sonata in B♭ major, K.442
 Leo Brouwer: "Un día de Noviembre"
 Scarlatti: Keyboard Sonata in E minor, K.263
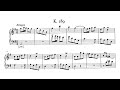 Scarlatti: Keyboard Sonata in G major, K.289
 Scarlatti: Keyboard Sonata in B♭ major, K.229
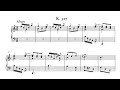 Scarlatti: Keyboard Sonata in C major, K.327
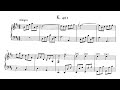 Scarlatti: Keyboard Sonata in D major, K.401
 Scarlatti: Keyboard Sonata in C major, K.398
 Scarlatti: Keyboard Sonata in A major, K.368
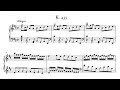 Scarlatti: Keyboard Sonata in D major, K.435
 Scarlatti: Keyboard Sonata in G minor 'Cat Fugue' , K.30
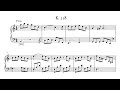 Scarlatti: Keyboard Sonata in A minor, K.218
 Scarlatti: Keyboard Sonata in G minor, K.373
 Scarlatti: Keyboard Sonata in C major, K.251
 Scarlatti: Keyboard Sonata in F major, K.354
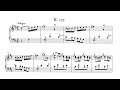 Scarlatti: Keyboard Sonata in B minor, K.173
![Bach: The Well-Tempered Clavier, Book II, BWV 870-893 [Barenboim]](https://i.ytimg.com/vi/-gI41zjKBV8/default.jpg) Bach: The Well-Tempered Clavier, Book II, BWV 870-893 [Barenboim]
Bach: The Well-Tempered Clavier, Book II, BWV 870-893 [Barenboim]