- Популярные видео
- Авто
- Видео-блоги
- ДТП, аварии
- Для маленьких
- Еда, напитки
- Животные
- Закон и право
- Знаменитости
- Игры
- Искусство
- Комедии
- Красота, мода
- Кулинария, рецепты
- Люди
- Мото
- Музыка
- Мультфильмы
- Наука, технологии
- Новости
- Образование
- Политика
- Праздники
- Приколы
- Природа
- Происшествия
- Путешествия
- Развлечения
- Ржач
- Семья
- Сериалы
- Спорт
- Стиль жизни
- ТВ передачи
- Танцы
- Технологии
- Товары
- Ужасы
- Фильмы
- Шоу-бизнес
- Юмор
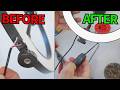
Change Ear-Pads ANY Beats Studio Headphones
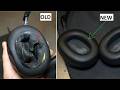
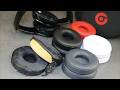
How to remove and change old, damaged Ear Pads cushions for any beats studio headphones. This tutorial can be used for all beats studio headphones - Beats Studio 1, Studio 2 and the newest Beats studio 3 headphone model. Order new replacement ear pads cushion for Beats studio headphones.
- Beats Studio ear pads on Aliexpress:
https://s.click.aliexpress.com/e/_DCaQmlH
- Beats Studio ear pads on Amazon:
US https://amzn.to/2XDXjZb
UK https://amzn.to/357IhNs
DE https://amzn.to/36mzffM
Beats headphones on aliexpress:
- https://bit.ly/3fwKHLS
Beats headphones on Amazon:
- US: https://amzn.to/3bPkR4K
- UK: https://amzn.to/3yvzQuy
- DE: https://amzn.to/3fJENaG
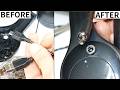
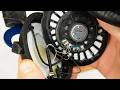
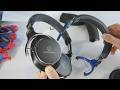
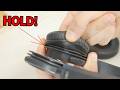
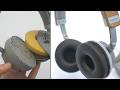
Removing old ear pads is very easy, take a butter knife or flat screwdriver and put it between the base of the ear pad and the body of the headphones, and slowly try open the ear pad, they are glued. But be careful not to stick the sharp end of the knife or screwdriver in the speaker, because then the speaker will be dead. Once you've got a bigger gap, you can use your fingers to pull the ear pad all the way off. Remove all the old glue, as the surface must be smooth and clean to glue the new ear pad cushion. Then take the new ear pad, the one with the flat base, this ear pad is made for the 3.5mm socket side. The ear pads are centred with these two plastic pins. The seam of the ear pads cushion should be on the bottom of the headphones, remove the adhesive protective paper and put the ear pad on top, try to place it on the two pins, when you have successfully done this, press ear pad down to make it glued. Now do the same for the other side, remove the old ear pad, just don't damage the speaker. Clean the base, remove the adhesive paper from the new ear pad, and put the ear pad on top, try to put it on both pins, once you have done that, press it down firmly so it sticks.
✅ Checked out our sub-channels:
- Techscrew https://www.youtube.com/c/Techscrews/
- Techscrew Home https://www.youtube.com/c/TechscrewHome
Hазвание видео: Как заменить амбушюр для Beats Studio Беспроводные наушники
🇩🇪 Video Titel: Auswechseln der Ohrpolster für den drahtlosen Kopfhörer Beats Studio
SOCIAL
✔️ https://www.facebook.com/techlv/
✔️ https://www.instagram.com/techscrews/ .
DISCLAIMER: This video description and comment section contains affiliate links, which means that if you click on one of the product links and later buy the product, I’ll receive a small commission. This NEVER affects the price you pay, and it’s an easy way to support the channel and the work that I do. This helps support the channel and allows me to continue to make videos like this.
Thank you for the support!
Видео Change Ear-Pads ANY Beats Studio Headphones канала Techscrew DIY
- Beats Studio ear pads on Aliexpress:
https://s.click.aliexpress.com/e/_DCaQmlH
- Beats Studio ear pads on Amazon:
US https://amzn.to/2XDXjZb
UK https://amzn.to/357IhNs
DE https://amzn.to/36mzffM
Beats headphones on aliexpress:
- https://bit.ly/3fwKHLS
Beats headphones on Amazon:
- US: https://amzn.to/3bPkR4K
- UK: https://amzn.to/3yvzQuy
- DE: https://amzn.to/3fJENaG
Removing old ear pads is very easy, take a butter knife or flat screwdriver and put it between the base of the ear pad and the body of the headphones, and slowly try open the ear pad, they are glued. But be careful not to stick the sharp end of the knife or screwdriver in the speaker, because then the speaker will be dead. Once you've got a bigger gap, you can use your fingers to pull the ear pad all the way off. Remove all the old glue, as the surface must be smooth and clean to glue the new ear pad cushion. Then take the new ear pad, the one with the flat base, this ear pad is made for the 3.5mm socket side. The ear pads are centred with these two plastic pins. The seam of the ear pads cushion should be on the bottom of the headphones, remove the adhesive protective paper and put the ear pad on top, try to place it on the two pins, when you have successfully done this, press ear pad down to make it glued. Now do the same for the other side, remove the old ear pad, just don't damage the speaker. Clean the base, remove the adhesive paper from the new ear pad, and put the ear pad on top, try to put it on both pins, once you have done that, press it down firmly so it sticks.
✅ Checked out our sub-channels:
- Techscrew https://www.youtube.com/c/Techscrews/
- Techscrew Home https://www.youtube.com/c/TechscrewHome
Hазвание видео: Как заменить амбушюр для Beats Studio Беспроводные наушники
🇩🇪 Video Titel: Auswechseln der Ohrpolster für den drahtlosen Kopfhörer Beats Studio
SOCIAL
✔️ https://www.facebook.com/techlv/
✔️ https://www.instagram.com/techscrews/ .
DISCLAIMER: This video description and comment section contains affiliate links, which means that if you click on one of the product links and later buy the product, I’ll receive a small commission. This NEVER affects the price you pay, and it’s an easy way to support the channel and the work that I do. This helps support the channel and allows me to continue to make videos like this.
Thank you for the support!
Видео Change Ear-Pads ANY Beats Studio Headphones канала Techscrew DIY
Replace Ear Pads ANY Beats Studio Headphones beats studio 3 Replace Ear Pads Beats Studio Headphones beats studio 3 headphones beats studio 3 replace ear pads beats studio white beats studio ear pad replacement beats studio ear pads beats studio beast studio 2 Как заменить амбушюр для Beats Studio Auswechseln der Ohrpolster für den drahtlosen Kopfhörer Beats Studio
Комментарии отсутствуют
Информация о видео
2 февраля 2024 г. 18:15:03
00:01:31
Другие видео канала