Circuit to safely control a Solenoid with an Arduino ⚙️📱🔌⚡🔋💡
🔔 SUBSCRIBE for upcoming projects ▷ https://www.youtube.com/user/jomirife?sub_confirmation=1
Circuit to safely control a Solenoid with an Arduino
https://jomirife.blogspot.com/2020/04/arduino-circuit-safely-control-solenoid.html
The danger of controlling a solenoid or a motor with an Arduino, is that the energy sent to the solenoid can be received back and burn the Arduino. To avoid this danger, in this project I will demonstrate how to create a circuit with a transistor and a diode to act as a kickback, so that electricity is prevented from returning to the Arduino on pins other than the ground.
In this project I demonstrate how to assemble the entire circuit so that you can control a solenoid with an Arduino. For this you need: 1 Arduino, 1 Breadboard, 1 Solenoid (or 1 motor), 6 cables, 1 transistor IRF520, 1 diode 1N4007, 1 resistor of 330 ohm, 1 resistor of 2.2k ohm.
🌎 More Arduino and Electronics projects
https://jomirife.blogspot.com/2019/02/arduino.html
📹 More videos in the playlist Arduino and Electronics projects
https://www.youtube.com/playlist?list=PLrVG_M2CS5WAqdRLFaa3cBM_lzPHi0ZEn
Facebook https://facebook.com/JomirifeMedia
Twitter https://twitter.com/jomirife
Youtube https://youtube.com/jomirife
Instagram https://instagram.com/jomirife
Tech Blog https://jomirife.blogspot.com
Видео Circuit to safely control a Solenoid with an Arduino ⚙️📱🔌⚡🔋💡 канала jomirife • Technology Design
Показать
Комментарии отсутствуют
Информация о видео
5 декабря 2019 г. 18:10:30
00:09:06
Другие видео канала
 Arduino Lesson 4 - Solenoid control using a Transistor
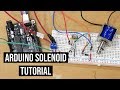 Control a Solenoid with an Arduino (Tutorial)
 How to make a Solenoid with commercial quality from scratch! Mini size!
 How to Make a Remote Hose Pipe Controller
 How Solenoid Valves Work - Basics actuator control valve working principle
 MOSFETs and How to Use Them | AddOhms #11
 How to make a Solenoid Engine
 Linear Actuator Solenoid
 PWM VS Potentiometer! When to use which technique?
 Electronic Basics #23: Transistor (MOSFET) as a Switch
 Arduino Uno to ATmega328 - Shrinking your Arduino Projects
 MOSFETs and Transistors with Arduino
 #321 7 Sensors tested: Measuring Current with Microcontrollers (Arduino, ESP32, ESP8266)
 Control Pneumatic Cylinder with Arduino
 Arduino Tutorial ITA #1: IDE e primo programma
 Electronic Basics #28: IGBT and when to use them
 Solenoid hookup to Arduino
 Micro Solenoid Switch
 Using Servo Motors with Arduino
 You can learn Arduino in 15 minutes.