How to Install a Natural Stone Patio - Do It Yourself
Here are the steps to installing your own stone patio.
If you are going to tackle this project as a do it yourself job, be prepared, this is a very labor intensive project that, depending upon your skill level, will take at least a couple of days to complete.
Having put out that caveat, here’s how you do it.
Clear and add road rock, which is a mixture of gravel and dirt that is used as a bedding surface for roads and highways.
Spread out the road rock over the area where the patio is dug out and using a garden hose, slightly wet it down.
Take a vibrating plate compactor (you can get one from a tool rental outlet for about 65 dollars a day) and tamp down the road rock while it’s still wet. This will give you a good firm base to put your stone on and it will help reduce the possibility of shifting soil cracking your new stone patio.
Grade of the patio. What this means is that you want the stone patio to slope away from the house so that when it rains or you water your yard, that water doesn’t slope towards the house and cause foundation problems or flooding. To set the grade, measure out from the rear of the house to the outside edge of the patio on both ends and set stakes. Then, run a string from one stake to the other, this is called a string line.
Put your first stone up against the back of the house, then take a long straight board that will span the width of your patio, and extend it out from the house and first stone to the stake.
Allow for grade or slope, use a level on top of the board, and level the board on the stake.
Take a pencil and mark where the bottom of the board sits on the stake. Then come down the stake an additional ½” and mark that. Do that on both stakes.
Take the string line and run it from one stake to the other tieing it around the new marks on the stakes. This will mark where the top of the stone will sit and ensure that you have proper slope so that water runs away from the house.
Next dry fit with the stones. Lay out the borders first and then you can work inward from there. Try and use stones with mostly straight edges on the outer edge so your patio border looks good.
It’s kind of like working a jigsaw puzzle because no two stones are the same. This allows you to create your own pattern and depending on your spacing, your own grout line.
Once you’ve got your dry layout, it’s time to start setting the stones.
Work in a small area. Since you’re working with cement you don’t want to put too much down and have it dry before you can get to it.
Laying the stones is a tedious process. Use a trowel to spread out some dry Portland cement into a small area.
Sprinkle water on the cement just to make it damp.
Now you’re ready to add the setting bed. The setting bed is a mixture of two parts sand and one part Portland cement. You want to add water to this mixture so it is the consistency of a snowball where it just holds together but it’s not too wet. This goes on top of the Portland cement you’ve already put down.
Sprinkle some water on top of the setting bed.
Now you’re ready to lay the first stone. Use multi-purpose thin set mortar and a mason’s trowel. Use the trowel to butter the back of the stone, the mortar doesn’t have to be thick.
Again check them to make sure the slope of the patio goes away from the house. Take the long board and lay it on the stones you’ve set against the house, and extend the board out to the string line where you’ve laid the first area of stones.
Set the board on top of the stones. And remember, if the bottom of the board doesn’t just sit on the top of the string line, your slope is too high. If that’s the case, take the handle of your trowel and tamp the stones down until they settle down into the setting bed to make sure you’ve got the right slope.
After you’ve set your stones, you need to let them dry overnight before you grout them in.
To grout in the stones, use the same mixture as for the setting bed, two parts sand to one part Portland cement.
Use a float to work in the grout between the joints in the stones. Fill the joints completely using the float to force the grout into the joints.
After you’ve done one area, wait about 5 minutes for the grout to start to set up and then go back with a sponge and wipe excess grout off the stones, being careful not to sponge on the grout lines and mess them up. If you let the grout dry before you wipe off the surface of the stone, they are much harder to clean.
More Great DIY Projects from Your New House:
https://www.youtube.com/playlist?list=PLjTMbsoHW2ejNSy9ywo1mKiGaSXuTsEgE
Видео How to Install a Natural Stone Patio - Do It Yourself канала Your New House
Показать
Комментарии отсутствуют
Информация о видео
Другие видео канала
 How to Install a Vinyl Floor - Do It Yourself
 Remove Lawn for Flagstone Patio |Mark Morrow |Central Texas Gardener
 HOW TO LAY A FLAGSTONE PATIO: Using Gator Base Instead of Gravel
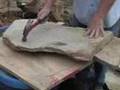 Hardscape Materials Inc. Cutting And Trimming Flagstone
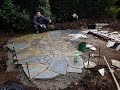 Natursteinplatten verlegen
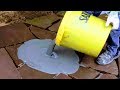 HOW TO LAY+GROUT FLAGSTONE SLABS | PRO GROUTING NATURAL STONE SAND JOINTS |MASONRY PATIO PAVERS WORK
 How to Make a Concrete Sidewalk - Do It Yourself
 How to Install a Rustic Stone Walkway | Ask This Old House
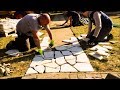 Building a STONE Patio in One Day / Natural Stone / DIY Patio Project
 Flagstone Patio with Accent Boulders - TIMELAPSE
 How to Install Concrete Flag/Block Paving Flexibly | Commercial Paving | Marshalls
 How To Install A Flagstone Patio (Step-by-Step)
 Don't attempt BASE PREP until you see this video! Base Prep basics to make your project last.
![My 4-Day Fire Pit Patio Build [Full DIY Project]](https://i.ytimg.com/vi/gIxzP8TnMeM/default.jpg) My 4-Day Fire Pit Patio Build [Full DIY Project]
My 4-Day Fire Pit Patio Build [Full DIY Project] STONE SIDEWALK INSTALLATION (part 3) Mike Haduck
 Installing Brick pavers -start to finish day2
 Concrete natural stone driveway
 How to Install Concrete Pavers | Ask This Old House
 How to cut flagstone using a hammer
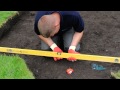 DIY How to Lay a Patio