How to Make a Rotator | Pop-Up Cards
Full Playlist: https://www.youtube.com/playlist?list=PL70E27F3163493CCA
-
-
Watch more How to Make Pop-Up Cards & Crafts videos: http://www.howcast.com/videos/499156-How-to-Make-a-Rotator-PopUp-Cards
And, now I'm going to teach you how to make a rotator. Take your piece of card stock and make a base page. Fold it in half. Match the edges. Crease down the middle and set it aside.
Now we're going to take another sheet of card stock and cut out a large rectangle. Fold it down the middle. Match the edges as close as possible. And trim them if they're a little uneven.
So, now we have a layer. And for a rotator, we need a V-fold at the top. So what we're going to do is we're going to fold it back again down the center. And we're going to fold the top at an angle. Preferably 45 degrees. Crease it down. Unfold it.
Now we've got a V-fold within the layer. And to fold it back you're going to take your thumb and you're going to push that V-fold back as you fold the layer. And, crease it down well. And that's the first step of a rotator.
Now we're going to take the base page. We're going to line up the center lines. We're going to tape down the edges. And now we've got our V-fold and layer.
And, now what we're going to do, we're actually going to cut a circle out of cardstock. Make them roughly an inch and a half.
So, now what we're going to do is, we're going to make a cut in the center to the top. And then, what we're going to do is we're going to make a fold, roughly at about four o'clock. If you imagine the circle as the clock face, we've got noon, three, four and five. So, we're going to make a fold in between four and five.
So, let's cut the top half to the center. We're going to fold this back. And there we have the second piece of our rotator.
So, take your base page with the V fold and layer. And, we're going to take a bit of double stick tape. And, we're going to take the double stick tape and put it on one half of the V-fold. Make sure it stays within the v.
Now we're going to take our circular piece. So, the smaller tab that we just folded, we're going line up the edge and the center with the center point and edge of the v on the layer.
So, let's line that up. Push it down and close it. And now you have a rotator.
Mine sticks out a little bit. So, if it does, you can just untape it. You can just trim down the edges, really quickly. That way your popups stay within the base page. And your viewer gets the full element of surprise. That's all pop ups are. You're surprising people with movement, with something that literally jumps off the page. So, there's your rotator. And that's how we make rotators.
Видео How to Make a Rotator | Pop-Up Cards канала Howcast
-
-
Watch more How to Make Pop-Up Cards & Crafts videos: http://www.howcast.com/videos/499156-How-to-Make-a-Rotator-PopUp-Cards
And, now I'm going to teach you how to make a rotator. Take your piece of card stock and make a base page. Fold it in half. Match the edges. Crease down the middle and set it aside.
Now we're going to take another sheet of card stock and cut out a large rectangle. Fold it down the middle. Match the edges as close as possible. And trim them if they're a little uneven.
So, now we have a layer. And for a rotator, we need a V-fold at the top. So what we're going to do is we're going to fold it back again down the center. And we're going to fold the top at an angle. Preferably 45 degrees. Crease it down. Unfold it.
Now we've got a V-fold within the layer. And to fold it back you're going to take your thumb and you're going to push that V-fold back as you fold the layer. And, crease it down well. And that's the first step of a rotator.
Now we're going to take the base page. We're going to line up the center lines. We're going to tape down the edges. And now we've got our V-fold and layer.
And, now what we're going to do, we're actually going to cut a circle out of cardstock. Make them roughly an inch and a half.
So, now what we're going to do is, we're going to make a cut in the center to the top. And then, what we're going to do is we're going to make a fold, roughly at about four o'clock. If you imagine the circle as the clock face, we've got noon, three, four and five. So, we're going to make a fold in between four and five.
So, let's cut the top half to the center. We're going to fold this back. And there we have the second piece of our rotator.
So, take your base page with the V fold and layer. And, we're going to take a bit of double stick tape. And, we're going to take the double stick tape and put it on one half of the V-fold. Make sure it stays within the v.
Now we're going to take our circular piece. So, the smaller tab that we just folded, we're going line up the edge and the center with the center point and edge of the v on the layer.
So, let's line that up. Push it down and close it. And now you have a rotator.
Mine sticks out a little bit. So, if it does, you can just untape it. You can just trim down the edges, really quickly. That way your popups stay within the base page. And your viewer gets the full element of surprise. That's all pop ups are. You're surprising people with movement, with something that literally jumps off the page. So, there's your rotator. And that's how we make rotators.
Видео How to Make a Rotator | Pop-Up Cards канала Howcast
Показать
Комментарии отсутствуют
Информация о видео
Другие видео канала
 How to Make a V-Fold Lifter | Pop-Up Cards
 how to make an interactive spinning card
 Pop-Up Tutorial 42 - Pull-tabs Part 5 - Flap Appears and Flips Over
 PU2 Spring Loaded Double Fold Pop-up Card
 POP-UP Master Class with Matthew Reinhart: Reverse Layer
 Pop-Up Tutorial 24 - Moving Arms - Part 2 - Circular Motion
 How to Make a Box Pop-Up Card | Pop-Up Cards
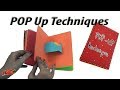 23 Pop ups card Techniques | DIY Popup Scrapbook | JK Arts 1389 #MothersDayCraft
 Pop it Ups 1207 Twist Circle Pop up Die Set
 How to Make a Butterfly Pop-Up Card | Pop-Up Cards
 How to Make a Pop-up Card - Moving Arm - Circular Motion Part 1 of 2
 Pop-Up Tutorial 16 - Automatic Pull-strips
 Pop-Up Tutorial 27 - Pull-strips - Part 3 - Hubs and Pivots
 How to Make a Spinner Pop Up Card with Stampin' Up! Products
 How to Make a Kitten Head Pop-Up Card | Pop-Up Cards
 pedestal pop up card
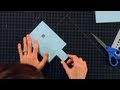 How to Make a Pull Tab | Pop-Up Cards
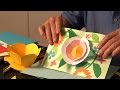 Pop-Up Tutorial 18 - Open-topped Shapes
 Pop-Up Tutorial 30 - V-fold action - Building a Tower