Mixer Showers: "How to use Triton's bar mixer fixing bracket" video from Triton Showers
Triton Showers - http://www.tritonshowers.com
A short video explaining how to use Triton's bar mixer fixing bracket for bar mixer showers and wall mounted bath shower mixers.
If you've ever struggled to fit a bar mixer shower or a wall mounted bath shower mixer using standard fittings, you'll appreciate the alternative fittings that Triton offer to make installation easier.
There are two solutions for built-in pipework -- one is using our easy-fit fixing bracket, the other is using our push on fittings.
Alternatively, we offer fittings for exposed pipework.
Here, we'll cover how to use the Triton easy-fit fixing bracket.
It's quick to assemble, adds strength to the pipework and fixes the pipe centres so they're bang on when you come to connect the mixer.
And this bracket only needs 30mm building-in depth from the plasterboard face.
Here's how to put one together and install it in a studded wall.
Just fit the elbows to the bracket using the screws provided.
First of all determine the building-in depth required, taking into consideration the length of elbow that has to show beyond the tiles.
Decide on the shower position and determine whether the hot and cold supplies will enter the bracket from the top or bottom. Secure a batten to the depth required in the stud wall.
As the bracket guarantees 150mm centres. All you need do is place a spirit level on the bracket when you screw it to the batten.
The length of the chrome elbows make the building-in depth of the bracket more flexible. That can be really important if you don't know the tile thickness at this stage.
Complete the pipework to the bracket and tighten the compression fittings on the elbows.
Flush the pipework to clear the system of debris and check for leaks before making good the walls.
After tiling, seal around the fittings to keep them fully watertight. Push-on the chrome trims for a professional finish.
The filters supplied in the box must be fitted. The flow restrictors that are also supplied only need to be fitted on high-pressure systems.
Push fit the sealing washers into the outlets.
Now fit any of Triton's bar mixers by simply tightening the flat face unions on the valve to the bar bracket chrome pipes.
If this bracket isn't right for you then why not take a look at our other videos showing our push on fittings or fittings for exposed pipe work.
Triton Showers - http://www.tritonshowers.com
Видео Mixer Showers: "How to use Triton's bar mixer fixing bracket" video from Triton Showers канала TritonShowers
Показать
Комментарии отсутствуют
Информация о видео
Другие видео канала
 How to install a bar shower mixer valve using a shower plate (1st & 2nd fix)
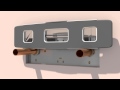 Introducing Shower PL8 - the shower fixing kit by Marflow
 Leaking Shower Horror Show - Cowboy Plumbing
 DO NOT Fit a Shower Tray Until You've Watched This
 Screwfix - Bristan Bar Valve Wall Mount 11 Fixing Kit Chrome-Plated
 Aqualisa Shower Fast Fit Mounting Kit
 Dene Cool Touch Bar Mixer Shower - Step-by-Step Installation Guide
 ANQUIER STARFIX ENGLISH
 Mira Showers - Step-by-Step Guide to Using Mira Bar Valve Fixings Kit
 How to install shower wall boards Bathroom panels fitting splashback
 HOW TO CHANGE SHOWER VALVE - THERMOSTATIC - Plumbing Tips
 Mixer Showers: "How to use Triton's bar mixer fixings for built in pipework" video from Triton
 HOW TO FIT A SHOWER PUMP - Stuart Turner Showermate Review
 How to fit a shower tray with shower tray riser. Shower tray and shower tray riser kit installation.
 HOW TO INSTALL A SHOWER TRAY - Plumbing Tips
 Bath mixer installation
 Wall mixer leg
 SHOWER VALVE INSTALL - Plumbing Tips
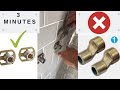 shower mixer install in 3 minutes
 Marflow Fast Fixing Kit PL4