How to make a leather waist bag with pattern and tutorial
In this video we present you the making of our leather biker hip bag sprinkled with a pinch of personality in resembling a grumpy face. It has two compartments, one for stuff like big phones and wallets and another one for keys and such. The design is very versatile in the way it can be worn such that you may hang it on your own belt or use the the belts included in the pattern. The use of carabiners is not mandatory and the belts may fit through the back loops that also hold the D-rings. For more information and the pattern please visit our shop at https://leatherhubpatterns.com or https://etsy.com/shop/leatherhubpatterns
Required materials
For this project we used 2 mm ( 6 oz ) vegetable tanned leather but you may use anything else.
On the accessories side we used 6 carabiners with an inner size of 25 mm, 5 D-rings with an inner dimension of 25 mm, 2 buckles with the inner size of 30 mm and 20 screw-in rivets that can be replaced with whatever type of rivets you happen to have at hand.
We used Fiebing’s pro dye for staining the leather and in this case it was ‘Walnut’ and ‘Saddle tan’ in case you wish to get as close as you can to the reference model’s color.
Optional tools
You may use whatever tool you have at hand for punching out the stitching holes but should you happen to have access to a Craftool no3 punching chisel set, it would considerably lower the amount of work as the straight holes are spaced to suit using such tools. You may google ‘Tandy Craftool 88045-6’ for more information.
Printing guidelines
Print the pattern in the US Letter format and make sure you check the ‘Fit to paper’ button or depending on your printing medium, ‘Disable page margins’. If you’re not from the US you may print this pattern on A4 paper without any issues, just make sure that you select the proper format ( US Letter ) when printing. The idea is to print the pattern on the whole page and not fit it to the printable area. This way we ensure that every part will be printed at a 1:1 scale. If you haven’t ever used these settings when printing then be sure to print a test page before printing the whole pattern. Also keep in mind that names for the printing settings may vary between the many different types of software out there even though they all lead to the same results.
Preparing the pattern
The way I proceed when cutting the paper parts is to loosely cut around their contours and use them afterwards to mark the leather parts that need to be cut from the larger leather sheets. Make sure to join the parts that display half of a puzzle piece as mentioned in the first page and don’t forget to measure the 2 inch reference ruler situated on every pattern page just to make sure you printed the pages using the right settings.
Preparing the leather parts
After loosley cutting the paper and leather parts I then strap them on top of each other using adhesive tape to tightly fit the paper parts on top of the leather ones. This helps a lot when punching out the stitching holes and cutting out the parts. Make sure to firstly punch out every hole that needs to be punched before proceeding to cutting out the actual parts as doing it the other way around will make things harder. Also make sure you use a sharp blade as cutting through paper and leather at the same time tends to rip the paper a bit, especially the low quality type. If you wish to dye and condition your leather and alternatively prepare the edges in case you used thicker leather, then this is the right moment.
Find us at any of the following links:
https://youtube.com/c/Leatherhub - Our Youtube channel - where all of our video tutorials can be found
https://etsy.com/shop/leatherhubpatterns - Our Etsy shop - to be added to favorites for offers and new stuff
https://leatherhubpatterns.com - Our webpage - same as the above
https://facebook.com/groups/Leatherhub - Our Facebook group - our ever growing and eagerly supportive community
https://facebook.com/Leatherhub - Our Facebook page - where you can be as kind so as to leave us a like
https://instagram/leatherhubpatterns - Our Instagram account - where we’d love to follow you back
Copyright © 2019 LeatherHub All rights reserved
Видео How to make a leather waist bag with pattern and tutorial канала LeatherHub
Показать
Комментарии отсутствуют
Информация о видео
Другие видео канала
 How to make a leather hip bag with pattern and tutorial
 Make a Gusseted Leather Phone Wallet (PATTERN + DIY)
 (leather craft)Free pattern
 How to make leather skulls with pattern and tutorial
![[Leather Craft] Vertical bifold wallet / leather working](https://i.ytimg.com/vi/1wKkthFi-rw/default.jpg) [Leather Craft] Vertical bifold wallet / leather working
[Leather Craft] Vertical bifold wallet / leather working![48 [Leather Craft] Making Leather Mini Boston Bag / [가죽공예] 미니 보스턴백 만들기 / Free Pattern](https://i.ytimg.com/vi/Rs4M4j7qIVA/default.jpg) 48 [Leather Craft] Making Leather Mini Boston Bag / [가죽공예] 미니 보스턴백 만들기 / Free Pattern
48 [Leather Craft] Making Leather Mini Boston Bag / [가죽공예] 미니 보스턴백 만들기 / Free Pattern How to make LEATHER TRAVEL BAG
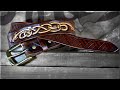 How to Make a Leather Belt
![[Leather Craft] Multi-layers card holder / Leathercraft DIY / Free PDF Pattern](https://i.ytimg.com/vi/35u6tPEw5Mk/default.jpg) [Leather Craft] Multi-layers card holder / Leathercraft DIY / Free PDF Pattern
[Leather Craft] Multi-layers card holder / Leathercraft DIY / Free PDF Pattern Designer Leather Hip Bag Tutorial by Fischer Workshops (Full HD)
![【レザークラフト】お札&カードも入るミニ財布の作り方 無料型紙[Leather craft] Free patternHow to make a mini wallet bills & cards](https://i.ytimg.com/vi/dN8mapIQCvs/default.jpg) 【レザークラフト】お札&カードも入るミニ財布の作り方 無料型紙[Leather craft] Free patternHow to make a mini wallet bills & cards
【レザークラフト】お札&カードも入るミニ財布の作り方 無料型紙[Leather craft] Free patternHow to make a mini wallet bills & cards Making a Leather Bag with No Stitching - Jimmy DiResta
 How to Make a Leather Satchel - Part 1
 IT'S FINISHED!! Making a Leather Tote Bag with FREE PATTERN (Pt. 2)
 Restoring a leather work bag / restoration
![[Leather Craft] Making a handmade circle bag / free PDF Pattern](https://i.ytimg.com/vi/QgZOrFVeEwY/default.jpg) [Leather Craft] Making a handmade circle bag / free PDF Pattern
[Leather Craft] Making a handmade circle bag / free PDF Pattern Making a Leather Mouse Pad! BONUS: Leather Roughers Now Available!
 How to Make a Leather Satchel - Part 2
 How to make leather briefcase
 We Made a "Vintage" RFID Blocking Leather Wallet