- Популярные видео
- Авто
- Видео-блоги
- ДТП, аварии
- Для маленьких
- Еда, напитки
- Животные
- Закон и право
- Знаменитости
- Игры
- Искусство
- Комедии
- Красота, мода
- Кулинария, рецепты
- Люди
- Мото
- Музыка
- Мультфильмы
- Наука, технологии
- Новости
- Образование
- Политика
- Праздники
- Приколы
- Природа
- Происшествия
- Путешествия
- Развлечения
- Ржач
- Семья
- Сериалы
- Спорт
- Стиль жизни
- ТВ передачи
- Танцы
- Технологии
- Товары
- Ужасы
- Фильмы
- Шоу-бизнес
- Юмор
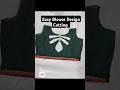
Front neck blouse design cutting idea #trending #blousedesign #cuttingtips #shorts
Front Neck Blouse Design Cutting – Easy Step-by-Step Description
✂️ Step 1: Prepare the Fabric
Fold the fabric double with the right sides facing each other.
Place the folded edge on your left side.
Keep the length and width according to the blouse measurement plus margin.
---
✏️ Step 2: Mark the Basic Measurements
1. Shoulder
From the top folded corner, mark ½ shoulder (usually 7–7.5 inches).
Drop 1 inch from the shoulder line to form the shoulder slant.
2. Armhole Depth
From the top, mark armhole depth (usually 7.5–8 inches).
Draw a straight line horizontally.
3. Bust / Chest
On the armhole depth line, mark ¼ bust + 1 inch for ease.
---
👗 Step 3: Marking the Front Neck Design
Neck Width
From the folded edge, mark 3.5–4 inches (as per style/design).
Neck Depth
For a front neck, mark 7, 8, 9, or 10 inches depending on how deep you want.
(Common depth: 8 inches)
Neck Shape
Choose your shape and draw it:
Round – smooth curve
V-neck – straight lines meeting at a point
Square – straight downward and straight across
U-shape – deeper and broader curve
Use French curve or freehand for neatness.
---
🧵 Step 4: Mark the Armhole
From the bust line, draw the armhole curve.
For front armhole, draw a slightly deeper curve than the back.
---
📌 Step 5: Mark Waist
On the waistline, mark ¼ waist + 1 inch seam allowance.
Connect bust to waist with a smooth side curve.
---
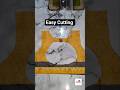
✂️ Step 6: Cutting the Front Piece
Cut the neck shape first.
Cut the armhole.
Cut along the side shape.
Cut the shoulder last.
#blouse #cuttingtips #ussewtips
Видео Front neck blouse design cutting idea #trending #blousedesign #cuttingtips #shorts канала Deepa Sewing Point
✂️ Step 1: Prepare the Fabric
Fold the fabric double with the right sides facing each other.
Place the folded edge on your left side.
Keep the length and width according to the blouse measurement plus margin.
---
✏️ Step 2: Mark the Basic Measurements
1. Shoulder
From the top folded corner, mark ½ shoulder (usually 7–7.5 inches).
Drop 1 inch from the shoulder line to form the shoulder slant.
2. Armhole Depth
From the top, mark armhole depth (usually 7.5–8 inches).
Draw a straight line horizontally.
3. Bust / Chest
On the armhole depth line, mark ¼ bust + 1 inch for ease.
---
👗 Step 3: Marking the Front Neck Design
Neck Width
From the folded edge, mark 3.5–4 inches (as per style/design).
Neck Depth
For a front neck, mark 7, 8, 9, or 10 inches depending on how deep you want.
(Common depth: 8 inches)
Neck Shape
Choose your shape and draw it:
Round – smooth curve
V-neck – straight lines meeting at a point
Square – straight downward and straight across
U-shape – deeper and broader curve
Use French curve or freehand for neatness.
---
🧵 Step 4: Mark the Armhole
From the bust line, draw the armhole curve.
For front armhole, draw a slightly deeper curve than the back.
---
📌 Step 5: Mark Waist
On the waistline, mark ¼ waist + 1 inch seam allowance.
Connect bust to waist with a smooth side curve.
---
✂️ Step 6: Cutting the Front Piece
Cut the neck shape first.
Cut the armhole.
Cut along the side shape.
Cut the shoulder last.
#blouse #cuttingtips #ussewtips
Видео Front neck blouse design cutting idea #trending #blousedesign #cuttingtips #shorts канала Deepa Sewing Point
Комментарии отсутствуют
Информация о видео
30 ноября 2025 г. 14:03:03
00:00:32
Другие видео канала