Yamaha YZF R6 Engine Teardown | Partzilla.com
Watch the complete process for a Yamaha YZF R6 engine teardown. In the video, John will remove the head, check the cylinders, and then split the crankcase halves to complete the teardown of the R6 engine. This is the first part in a series where we will perform a complete R6 engine rebuild.
Now that it’s torn down, let’s build it back up. See the R6 engine rebuild here: https://youtu.be/A_xjCpcPrvU
VIDEO HIGHLIGHTS:
Removing valve cover - 3:00
Finding top dead center - 4:50
Removing cams - 5:35
Disassembling the clutch - 9:00
Removing the oil pan- 10:50
Splitting the crankcases - 15:00
Removing the pistons - 16:09
To buy OEM Yamaha motorcycle parts, click here: http://www.partzilla.com/parts/search/Yamaha/Motorcycle/parts.html?utm_source=youtube&utm_medium=video&utm_campaign=description_btf
Talk to us:
Twitter: https://twitter.com/partzilla
Facebook: https://www.facebook.com/Partzilla
Instagram: https://www.instagram.com/partzilla/
In the video we’re working with a 2008 Yamaha YZF R6, but you may have similar steps for your machine. If you’re not sure whether these steps apply to your motorcycle, leave a comment and we’ll get back to you.
RELATED CONTENT:
More engine teardowns:
2012 Polaris RZR 900 XP:
https://youtu.be/oAzJwiExXVE
Kawasaki KLX 250:
https://youtu.be/4IIR5N_mZUw
Setting the valve lash on the Yamaha R6:
https://youtu.be/kRwQbq6I8EY
Видео Yamaha YZF R6 Engine Teardown | Partzilla.com канала Partzilla
Показать
Комментарии отсутствуют
Информация о видео
Другие видео канала
 Yamaha R6 Engine Rebuild Part 1: Bottom End to Piston Install | Partzilla.com
 Yamaha R7 vs R6 | Head-to-head on track
 Sizing the Bearings on a Yamaha R6 | Partzilla.com
 Yamaha R6 Engine Rebuild Part 3: Head Install & Final Steps | Partzilla.com
 How to Adjust the Valves on a Yamaha R6 | Partzilla.com
 CBR600rr Wrecked Bike Rebuild (PT 2 Block swap/Motor rebuild)
 GMT94 Yamaha: Building a race engine
 2004-2006 R1 Transmission Repair Part 1
 Cylinder Head 105 - Valve Job Basics
 Yamaha R6 pt.2 CAMSHAFT CRANKSHAFT TIMING
 The R1 engine is TOAST!
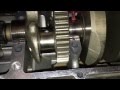 Yamaha R6 crankshaft
 self building R6 engine
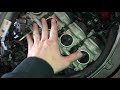 Removing an R6 engine?!
 Starting 2008 Yamaha R6 Motor #322
 YAMAHA R6 Engine Tear Down
 Setting the Cam Timing on a Yamaha R6 | Partzilla.com
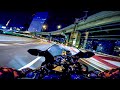 Driving on Tokyo highway at night | YAMAHA YZF-R6 | GoPro HERO8
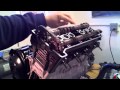 2000 Yamaha YZF-R1 Engine Rebuild - Part 22