How to Calibrate Otto DIY robot servos? using Arduino Processing and simple Otto Blockly
We have made servo calibration simple!
Download the Calibration code and software here https://www.ottodiy.com/academy
You have carefully followed the instructions on how to build Otto and have made sure that all the servos are centralised (set at 90 degrees) before you attach the horns. You are now at the very exciting moment where you check to see how Otto moves and dances and so you upload your first simple Blockly code.
:( What happened? Why did the legs and feet move out of position? Otto doesn’t look right and doesn’t move smoothly.
Do not be disappointed and do not worry! This is completely normal and happens in every Otto build. This is the stage where you need to adjust the central positions of the servos using a simple process called calibration. This will only need to be done once and then the correct positions will be remembered every time you turn on your Otto.
To calibrate Otto, you will first need to upload this code to Otto. Once the uploading is complete, unplug the USB connection to Otto.
Servo Calibration GUI
You will now need to run the Servo Calibration software from ottodiy.com. Make sure that the USB is unplugged. Depending on your Windows platform, you will need to run either the 32- or 64- bit executable file contained in its relevant folder. Please leave the file in its folder - the program will not run if it does not have access to the data files. On start up you should see a red cross by the USB label at the top of the interface. Plug the USB into Otto and the red cross should turn into a green tick when the program has recognised that the USB connection has been made (this might take a second or two). If you forgot to unplug the USB, you will need to close the program, unplug the USB and start the program again. Then plug in the USB. You can now calibrate the servo positions so the the legs and feet are correctly aligned. The slider allows for large changes in the angle and the +/- buttons much finer control on the position of each servo.
When the servos on Otto are correctly aligned, click on 'Walk Test' to see how Otto moves. If further fine adjustments are required, they should be done now and the walk test repeated. Be careful that the USB cable does not interfere with Otto's movement.
When you are happy that everything is aligned, click 'Save'. A tick and properly aligned Otto will appear on the interface. Your Otto will produce a happy sound (if you have connected the buzzer) and dance.
CONGRATULATIONS!! You have successfully calibrated Otto's servos. The positions have been saved to Otto and will not need to be calibrated again unless you change the Nano or any of the servos.
Welcome to join our Otto Builder community!
Видео How to Calibrate Otto DIY robot servos? using Arduino Processing and simple Otto Blockly канала Otto DIY
Показать
Комментарии отсутствуют
Информация о видео
Другие видео канала
 Otto's Farm coding game, learn programming for FREE while having fun with Otto DIY robot
 How to build and assemble Otto Ninja robot DIY tutorial
 Otto DIY Ninja robot early design with Arduino Nano shield, How to build and assemble tutorial
 Otto Viking walker arduino robot
 Otto Baymax biped Arduino voice recognition robot from Big Hero 6
 Expand your Otto DIY Robot to Smart OLED, how to build?
 🔴LIVE Workshop: Learn how to build a ROBOT one session. All levels. No Coding
 8 years old kid explain his Spider Otto robot DIY
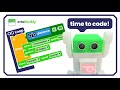 Expand your Otto DIY Robot to Humanoid, how to code with blockly and arduino?
 Expand your Otto DIY Robot to Humanoid, how to build?
 How to proper calibrate Otto DIY robot servos with calibration software and blockly or arduino code
 How to install Otto Blockly and drivers in Mac and Windows computers and code your Arduino robots
 LIVE: La Finca de Otto, el nuevo juego en linea para aprender programación con Otto DIY robot
 Unboxing of the Otto DIY LED matrix eyes, emotive robot kit
 LIVE: Hour of Code with Otto DIY robot new online coding farm game with blockly in the CS week
 Code your own dance! with this unplugged programming STEM activity with Otto robot
 Unboxing and Instructional Building of the Otto DIY Starter robot Kit SparkFun Edition
 Featuring Otto DIY Ninja Starter and Humanoid, Arduino educational robot that can walk & roll
 Sneak Peak at Otto Ninja robot kit
 Otto robot Ninja Starter version; First look at this Arduino programmable STEM kit
 Otto Ninja robot kit Giveaway winner announcement and interview with creator Sebastian Coddington