- Популярные видео
- Авто
- Видео-блоги
- ДТП, аварии
- Для маленьких
- Еда, напитки
- Животные
- Закон и право
- Знаменитости
- Игры
- Искусство
- Комедии
- Красота, мода
- Кулинария, рецепты
- Люди
- Мото
- Музыка
- Мультфильмы
- Наука, технологии
- Новости
- Образование
- Политика
- Праздники
- Приколы
- Природа
- Происшествия
- Путешествия
- Развлечения
- Ржач
- Семья
- Сериалы
- Спорт
- Стиль жизни
- ТВ передачи
- Танцы
- Технологии
- Товары
- Ужасы
- Фильмы
- Шоу-бизнес
- Юмор
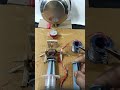
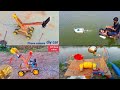
How make rc 4 dc motor speed car for cardboard|| rc car for home|DIY-Toy
How make rc 4 dc motor speed car for cardboard|| rc car for home|DIY-Toy
Welcome to an exciting do-it-yourself (DIY) tutorial on creating a remote-controlled (RC) car powered by 4 DC motors using cardboard. In this step-by-step guide, you'll learn how to construct a simple yet fun-to-drive RC car that you can easily assemble at home. With readily available materials and a bit of creativity, you'll have your own functional toy car that operates wirelessly!
Materials Needed:
To begin this project, gather the following materials:
Cardboard (preferably thick for sturdiness)
4 DC motors
Motor driver module
Remote control transmitter and receiver set
Wheels
Battery pack
Wires, soldering iron, and solder
Hot glue gun
Scissors and utility knife
Ruler and pencil
Decorative materials (paint, stickers, etc.)
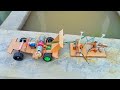
Step 1: Designing the Car Frame
Start by sketching the design of your RC car on the cardboard. Outline the main body, including spaces for the motors, wheels, battery, and other components. Consider the size and dimensions to ensure the components fit appropriately.
Step 2: Cutting and Assembling the Frame
Carefully cut out the cardboard pieces according to your design using scissors and a utility knife. Make sure to include slots for the motors and space for the battery pack. Assemble the cut pieces using hot glue, forming the basic structure of the car.
Step 3: Installing the Motors
Attach the four DC motors to the designated spots on the cardboard frame using hot glue. Ensure they are securely fixed in place and aligned properly to power the wheels.
Step 4: Connecting the Motors to the Motor Driver Module
Use wires to connect the DC motors to the motor driver module. Follow the wiring diagram provided with the module to correctly establish the connections. This module will help control the speed and direction of the motors.
Step 5: Attaching the Wheels
Affix the wheels to the shafts of the DC motors. Ensure they are firmly attached and rotate freely without any obstructions.
Step 6: Wiring the Remote Control System
Connect the receiver from the remote control transmitter and receiver set to the motor driver module. This will allow the remote control to communicate wirelessly with the motors, enabling you to control the car's movement.
Step 7: Connecting the Battery Pack
Connect the battery pack to the motor driver module. Ensure proper polarity and secure connections to power the motors and other electronic components.
Step 8: Testing and Troubleshooting
Before closing the structure, test the RC car by turning on the remote control and checking if the motors respond to the commands. Troubleshoot any issues with connections or functionality at this stage.
Step 9: Finalizing and Decorating
Once everything is working correctly, reinforce any weak joints with additional glue and secure loose wires. You can also decorate your RC car using paint, stickers, or other decorative materials to give it a personalized look.
Conclusion:
Congratulations! You've successfully built your own RC car with 4 DC motors using cardboard and simple electronic components. Experiment with different designs and modifications to enhance its performance or appearance. Have fun driving your homemade RC car around the house and exploring the possibilities of DIY toy-making!
rc car
how to make rc car
how to make a rc car with motor
dc motor rc car
how to make a car
how to make a rc car at home easy
how to make a rc car at home
rc car making
dc motor car
diy rc car
homemade rc car
cardboard rc car
how to make rc car with cardboard
how to make
how to make rc car at home with cardboard
remote control car
car
how to make a rc car remote
how to make rc car at home easy
how to make rc car at home
how to make a rc car
#rc car
#4dc motor
#treding
Видео How make rc 4 dc motor speed car for cardboard|| rc car for home|DIY-Toy канала Tech Sanbi ABS
Welcome to an exciting do-it-yourself (DIY) tutorial on creating a remote-controlled (RC) car powered by 4 DC motors using cardboard. In this step-by-step guide, you'll learn how to construct a simple yet fun-to-drive RC car that you can easily assemble at home. With readily available materials and a bit of creativity, you'll have your own functional toy car that operates wirelessly!
Materials Needed:
To begin this project, gather the following materials:
Cardboard (preferably thick for sturdiness)
4 DC motors
Motor driver module
Remote control transmitter and receiver set
Wheels
Battery pack
Wires, soldering iron, and solder
Hot glue gun
Scissors and utility knife
Ruler and pencil
Decorative materials (paint, stickers, etc.)
Step 1: Designing the Car Frame
Start by sketching the design of your RC car on the cardboard. Outline the main body, including spaces for the motors, wheels, battery, and other components. Consider the size and dimensions to ensure the components fit appropriately.
Step 2: Cutting and Assembling the Frame
Carefully cut out the cardboard pieces according to your design using scissors and a utility knife. Make sure to include slots for the motors and space for the battery pack. Assemble the cut pieces using hot glue, forming the basic structure of the car.
Step 3: Installing the Motors
Attach the four DC motors to the designated spots on the cardboard frame using hot glue. Ensure they are securely fixed in place and aligned properly to power the wheels.
Step 4: Connecting the Motors to the Motor Driver Module
Use wires to connect the DC motors to the motor driver module. Follow the wiring diagram provided with the module to correctly establish the connections. This module will help control the speed and direction of the motors.
Step 5: Attaching the Wheels
Affix the wheels to the shafts of the DC motors. Ensure they are firmly attached and rotate freely without any obstructions.
Step 6: Wiring the Remote Control System
Connect the receiver from the remote control transmitter and receiver set to the motor driver module. This will allow the remote control to communicate wirelessly with the motors, enabling you to control the car's movement.
Step 7: Connecting the Battery Pack
Connect the battery pack to the motor driver module. Ensure proper polarity and secure connections to power the motors and other electronic components.
Step 8: Testing and Troubleshooting
Before closing the structure, test the RC car by turning on the remote control and checking if the motors respond to the commands. Troubleshoot any issues with connections or functionality at this stage.
Step 9: Finalizing and Decorating
Once everything is working correctly, reinforce any weak joints with additional glue and secure loose wires. You can also decorate your RC car using paint, stickers, or other decorative materials to give it a personalized look.
Conclusion:
Congratulations! You've successfully built your own RC car with 4 DC motors using cardboard and simple electronic components. Experiment with different designs and modifications to enhance its performance or appearance. Have fun driving your homemade RC car around the house and exploring the possibilities of DIY toy-making!
rc car
how to make rc car
how to make a rc car with motor
dc motor rc car
how to make a car
how to make a rc car at home easy
how to make a rc car at home
rc car making
dc motor car
diy rc car
homemade rc car
cardboard rc car
how to make rc car with cardboard
how to make
how to make rc car at home with cardboard
remote control car
car
how to make a rc car remote
how to make rc car at home easy
how to make rc car at home
how to make a rc car
#rc car
#4dc motor
#treding
Видео How make rc 4 dc motor speed car for cardboard|| rc car for home|DIY-Toy канала Tech Sanbi ABS
Tech Sanbi ABS tech sanbi abs TECH SANBI ABS TACH SANBI Tech Sanbi New Video rc car how to make rc car dc motor rc car how to make a rc car with motor how to make a rc car at home easy how to make rc car at home how to make a car diy rc car rc car making how to make a rc car dc motor car home homemade rc car Remote control car How make rc 4 dc motor speed car for cardboard|| rc car for home|DIY-Toy
Комментарии отсутствуют
Информация о видео
4 декабря 2023 г. 19:01:23
00:03:51
Другие видео канала