DIY: How to Bleed Brakes Using a Vacuum Pump
Video tutorial on how to bleed your brakes with a vacuum pump. If you’ve replaced a wheel cylinder, caliper, flex lines, brake lines, master cylinder, or any other brake components associated with brake fluid, you will need to bleed the air from the brake system. Other times if your brake pedal feels spongy, air could possibly be present in the lines and will need to be bleed. This applies to both disk and drum brakes. For this example I will be using disk brakes. When working with brake fluid, DO NOT allow it to come in contact with the paint. Either by dripping or even just the residue on your hands. Brake fluid can damage your vehicle’s paint.
Website: http://4diyers.com
Patreon: https://www.patreon.com/4diyers
Facebook: https://www.facebook.com/4diyers
Google Plus: https://plus.google.com/+4DIYers
Twitter: https://twitter.com/4DIYers
Instagram: https://www.instagram.com/4diyers/
Tumblr: http://4diyers.tumblr.com
Pintrest: https://www.pinterest.com/4diyers/
Tools/Supplies Needed:
-vacuum pump
-socket and ratchet
-wrench
-rags
-rubber gloves
-brake fluid
-brake cleaner
Procedure:
-safely elevate the vehicle and remove the wheel
-sometimes you can pull the vehicle onto ramps and depending on the design, you’ll be able to access the bleeder screw from behind the wheel
-when using a vacuum pump, they normally can be purchased in a kit which comes with a variety of accessories such as hoses, bleeder screw fittings, and a reservoir
-the reservoir is intended to catch the fluid when there is vacuum present so the fluid does not come in contact with the pump
-here I will be installing the hose from the vacuum pump directly on the bleeder screw as I find it has a tighter fit
-locate the bleeder screw
-for callipers, they will be on the backside, towards the top
-for drum brakes, the bleeder screw will be on the wheel cylinder exposed through the backing plate
-clean off the area about the bleeder screw so no chance of dirt contaminates the area we’re working with
-be sure you’re able to get the bleeder screw loose as these can seize up over time
-use either the boxed end of a wrench or socket to loosen the bleeder screw, this will reduce the risk of stripped it
-place the wrench onto the bleeder screw and then install the hose from the vacuum pump
-pump up the vacuum to 25 inches of mercury so there is a negative pressure present at the bleeder screw
-this must be done, otherwise we do risk introducing air into the system
-I have done a leak down test between the pump and the bleeder screw and there are no signs of vacuum leakage
-if you find there is some leakage between the hose and the bleeder screw, you can install a zip or cable tie
-do not allow the vacuum pressure to go below 5 inches of mercury as we don’t want to risk air entering the system, always keep negative pressure at the bleeder screw
-if we get to 5 inches of mercury, either close up the bleeder screw, then pump it back up to 25 inches of mercury or keep pumping up the vacuum when the bleeder screw it open
-break the bleeder screw with the wrench and you will see the fluid immediately entering the clear hose
-you may notice bubbling in the clear hose and this can be from air that is present in the system or air leaking from around the bleeder screw threads
-therefore it can be hard to determine if the air is out of the system
-for this I will be removing some fluid from the lines, only just enough to enter the reservoir cup of the vacuum pump, then test the brake pedal afterwards
-what we are looking for here is a hard pedal
-if you find the pedal is soft or spongy, there is most likely still air in the system, then repeat the procedure if the pedal is soft or spongy
-once finished, ensure the bleeder screw is tight, dispose of the access fluid correctly and replenish the master cylinder reservoir
-pump the brakes and inspect for any leaks
-if you have accidentally touch the rotors or any brake fluid gets spilt on the brake system
-we do not want this on the braking surface as this will jeopardize the braking performance, therefore this will need to be cleaned before brake usage
Thank you to all those who watch my videos and support my content. Don't forget to subscribe to my channel for future tutorial videos and like my video if you found it helpful. New videos are always being uploaded every week!
© 4DIYers 2013
All Rights Reserved
No part of this video or any of its contents may be reproduced, copied, modified or adapted, without the prior written consent of the author.
Видео DIY: How to Bleed Brakes Using a Vacuum Pump канала 4DIYers
Показать
Комментарии отсутствуют
Информация о видео
Другие видео канала
 Tips for using the Pittsburgh automotive brake bleeder and vacuum pump kit
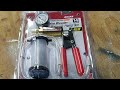 Harbor Freight Pittsburgh brake bleeder vacuum pump demo and review
 How to do a Complete Brake Flush and Bleed
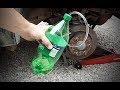 Bleed brakes by yourself - DIY Brake Bleeder tool - Brake flush
 How to Bleed the Brakes Using a Vacuum Pump
 How to bleed brakes—plus extra tips & tricks to make it easier | Hagerty DIY
 Tool Time: Pressure Bleeding Brakes
 How To Replace Brake Fluid by Yourself - EricTheCarGuy
 How To Fix Air Bubbles In Brake Bleeding, SUPER EASY FIX.
 How To Flush and Bleed your Brakes - EASY!
 Tusk Brake Bleeder Vacuum Pump Kit
 How to Bleed your Brakes by Yourself
 How to Bleed Brakes in Your Car (One Person)
 Bleeding Brakes with a Vacuum Pump
 Harbor Freight Pittsburgh brake bleeder vs MityVac : head to head review & demo
 NEVER Bleed Brakes Until Watching This!
 DIY Bleeding The Brake System of a 2002 Ford F-150 by Yourself with just Two Tools #HOWTO #DIY #OEM
 How to bleed Your Brakes (replace brake fluid)
 brakes wont bleed proportional valve reset this guy's garage