Bathroom Shower Mixer Fittings।Shower Mixer Installation Process at Bathroom।How to Fit Shower Mixer
Introduction: Installing a shower mixer is an essential step in creating a functional and enjoyable shower experience. A shower mixer allows you to control the water temperature and flow, providing convenience and comfort. In this comprehensive guide, we will walk you through the process of fitting a shower mixer, covering everything from preparation to installation and offering valuable tips for a successful project.
Pre-Installation Preparation: Before installing a shower mixer, it's important to gather all the necessary tools and materials. This typically includes a shower mixer kit (which usually contains the mixer valve, trim plate, and handle), a pipe wrench or adjustable wrench, plumber's tape, and plumber's putty or silicone sealant. Ensure that you have shut off the water supply to the shower area before beginning any work.
Choosing the Right Location: Selecting the appropriate location for your shower mixer is crucial. It should be within easy reach and at a comfortable height for users. Consider factors such as the height of household members and any accessibility requirements. Additionally, ensure that there is sufficient clearance behind the wall for the mixer valve and that the location aligns with the existing plumbing connections.
Removing the Old Shower System: If you are replacing an existing shower system, start by removing the old fixtures and fittings. This may involve unscrewing the showerhead, handles, trim plate, and any other components. Use a wrench to disconnect the water supply pipes from the old fittings. Inspect the area for any signs of damage or leaks, and address any issues before proceeding.
Installing the Mixer Valve: Begin by attaching the mixer valve to the water supply pipes. Apply plumber's tape to the threaded ends of the pipes to ensure a watertight seal. Connect the pipes to the appropriate inlets on the mixer valve, tightening them securely with a pipe wrench or adjustable wrench. Use a level to ensure that the valve is properly aligned.
Trim Plate and Handle Installation: Once the mixer valve is securely in place, attach the trim plate over it. Align the screw holes on the plate with those on the valve and fasten them together using the provided screws. Apply plumber's putty or silicone sealant around the edges of the trim plate to prevent any water leakage. Finally, attach the handle to the valve, following the manufacturer's instructions.
Testing and Finishing: Before finishing the installation, turn on the water supply and test the shower mixer for any leaks or malfunctions. Adjust the temperature and flow to ensure smooth operation. If any issues arise, double-check the connections and make any necessary adjustments or repairs. Once you are satisfied with the performance, complete the installation by attaching the showerhead and any additional accessories.
Maintenance and Care: To ensure the longevity and optimal performance of your shower mixer, it's important to practice regular maintenance. Clean the trim plate and handle with a mild soap solution and a soft cloth to remove any dirt or residue. Inspect the connections periodically for leaks and tighten them if needed. Additionally, follow the manufacturer's recommendations for any specific maintenance requirements.
Conclusion: Fitting a shower mixer can greatly enhance your showering experience by providing control over water temperature and flow. By following the steps outlined in this guide and paying attention to the details, you can successfully install a shower mixer and enjoy the convenience and comfort it offers. Remember to prioritize safety, take your time during the installation process, and seek professional assistance if needed. With a properly fitted shower mixer, you'll be well on your way to enjoying refreshing and satisfying showers for years to come.
Видео Bathroom Shower Mixer Fittings।Shower Mixer Installation Process at Bathroom।How to Fit Shower Mixer канала Learn Pass Earn Professional
Показать
Комментарии отсутствуют
Информация о видео
26 февраля 2020 г. 14:22:58
00:03:06
Другие видео канала
 6" Exit Fan Installedment & Ele. connection On The Toilet
 Wall Tiles Fittings।Install Kitchen Wall Tiles।Easy Fit Wall Tiles।Fitting Wall Tiles in Kitchen
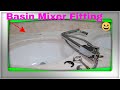 Basin Mixer Fittings|| Basin Mixer Fitting|| Single Lever Basin Mixer Fitting|| Basin Mixer Repair
 How to Tacknick tile cutting for upvc pipe
 Concrete Mixer Dhalai for Car Parking Area।Civil Work of Concrete and Finishing in the middle east
 How To Installed Mixer /Basin /magick pipe on The Glass
 Horsepower Water Pump Fitting|| Horizontal Pump Installation|| Horizontal Centrifugal Pumps
 Sower Mixer Fitting, Fixing by Expert Asian Plumbers/Best and Skilled Plumbers Working By Expert way
 Shower Mixer Set Up & Installation Full Video|| Shower Mixer Fittings|| How to Fix Mixer
 Wall Cutting and Vim Cutting to Installation of PVC Pipe/Pipe Fitting and Fixing at Wall by Experts
 Expensive and Rear Golden Colour Mixer Fitting and Fixing by Asian Experts/Best Plumbing Works
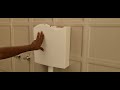 Quality Low Down for Toilet Installation// Toilet Water Flash Tank Installed & Fittings with Skills
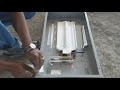 Best of Electric Work by Experts of Asia/A 3 Face DB Board Possessing Before Fitting in the Wall
 Amazing and Expensive Wash Basin and Sower Tap and Unique Items in the Middle East Asia Shop
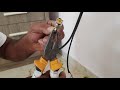 How To connect Bnc & Dc Cable To Cctv Camera
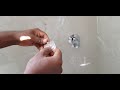 water closed get valve fixing in the bathroom
 A lift fitting and working in asia
 New Hand Shower Setting & Fittings/Push Shower Installation & Fittings//Hand Shower Fitting Process
 Marvel Installation and Fixing at Step Star।How to Fitting Marvel Tiles for Stair in House
 How To 4 Gang Switch Wire Lop connection