- Популярные видео
- Авто
- Видео-блоги
- ДТП, аварии
- Для маленьких
- Еда, напитки
- Животные
- Закон и право
- Знаменитости
- Игры
- Искусство
- Комедии
- Красота, мода
- Кулинария, рецепты
- Люди
- Мото
- Музыка
- Мультфильмы
- Наука, технологии
- Новости
- Образование
- Политика
- Праздники
- Приколы
- Природа
- Происшествия
- Путешествия
- Развлечения
- Ржач
- Семья
- Сериалы
- Спорт
- Стиль жизни
- ТВ передачи
- Танцы
- Технологии
- Товары
- Ужасы
- Фильмы
- Шоу-бизнес
- Юмор
How to replace mounting heatsink push pins
How to Replace a Broken Plastic Mounting Pin on an Intel CPU Cooler
00:00 Repair a broken heatsink cooler
00:07 Twist the push pin
00:15 Dont to break the locking pin
00:35 Remove the inner part
01:20 Replace a broken with a new
It's a common issue: you're working on your computer, and suddenly, a plastic mounting pin on your Intel CPU cooler snaps. These pins, which secure the cooler to the motherboard, can become brittle over time and break without warning. If one is bent, it's often a sign that it could break soon. Fortunately, replacing a broken pin is a simple and inexpensive repair.
Why Do They Break?
Intel's stock CPU coolers use a push-pin design. While convenient, the plastic pins are prone to breaking. The most common reasons for a pin to break include:
Heat cycling: The repeated heating and cooling of the plastic can cause it to become brittle and weak over time.
Physical stress: Bending a pin during installation or removal can cause a hairline fracture that eventually leads to a complete break.
Age: Older plastic is more likely to be fragile and prone to snapping.
Incorrect installation: Applying too much force or using an improper technique can stress the pin beyond its breaking point.
What You'll Need
New mounting pins: You can buy a set of replacement push-pins online or at a computer repair shop. They are often sold in packs of four.
Small flat-head screwdriver: This will help you to gently pry the broken parts out.
Rubbing alcohol and a clean cloth: To clean any thermal paste residue.
New thermal paste: It's crucial to apply a fresh layer after reinstalling the cooler.
Step-by-Step Replacement Guide
Remove the old cooler: Carefully remove the CPU cooler from the motherboard. You'll need to gently twist the remaining pins to unlock them and then lift the cooler away.
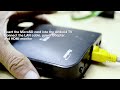
Remove the broken pin: On the back of the cooler's fan assembly, you'll see the broken pin. Use a small flat-head screwdriver to gently push it out. You may need to press on the broken piece from the front of the cooler.
Insert the new pin: Take a new replacement pin and align it with the hole. Gently push it into place until it clicks. Ensure the new pin is correctly oriented.
Apply new thermal paste: Apply a small, pea-sized dot of new thermal paste to the center of the CPU. This is essential for effective cooling.
Reinstall the cooler: Carefully lower the cooler back onto the CPU, aligning the four pins with the holes in the motherboard.
Secure the cooler: Push down on the four pins, one at a time, until you hear a click. This indicates that the pins have locked into place. You can do this in a diagonal pattern (top-left, bottom-right, top-right, bottom-left) to ensure even pressure.
Alternative Solution: Upgrade Your Cooler
If you find the plastic pins to be a recurring problem, it might be a good time to consider an upgrade. Aftermarket CPU coolers often use a more robust mounting system, such as metal brackets and screws, which provide a more secure and reliable fit.
Видео How to replace mounting heatsink push pins канала Obengplus com
00:00 Repair a broken heatsink cooler
00:07 Twist the push pin
00:15 Dont to break the locking pin
00:35 Remove the inner part
01:20 Replace a broken with a new
It's a common issue: you're working on your computer, and suddenly, a plastic mounting pin on your Intel CPU cooler snaps. These pins, which secure the cooler to the motherboard, can become brittle over time and break without warning. If one is bent, it's often a sign that it could break soon. Fortunately, replacing a broken pin is a simple and inexpensive repair.
Why Do They Break?
Intel's stock CPU coolers use a push-pin design. While convenient, the plastic pins are prone to breaking. The most common reasons for a pin to break include:
Heat cycling: The repeated heating and cooling of the plastic can cause it to become brittle and weak over time.
Physical stress: Bending a pin during installation or removal can cause a hairline fracture that eventually leads to a complete break.
Age: Older plastic is more likely to be fragile and prone to snapping.
Incorrect installation: Applying too much force or using an improper technique can stress the pin beyond its breaking point.
What You'll Need
New mounting pins: You can buy a set of replacement push-pins online or at a computer repair shop. They are often sold in packs of four.
Small flat-head screwdriver: This will help you to gently pry the broken parts out.
Rubbing alcohol and a clean cloth: To clean any thermal paste residue.
New thermal paste: It's crucial to apply a fresh layer after reinstalling the cooler.
Step-by-Step Replacement Guide
Remove the old cooler: Carefully remove the CPU cooler from the motherboard. You'll need to gently twist the remaining pins to unlock them and then lift the cooler away.
Remove the broken pin: On the back of the cooler's fan assembly, you'll see the broken pin. Use a small flat-head screwdriver to gently push it out. You may need to press on the broken piece from the front of the cooler.
Insert the new pin: Take a new replacement pin and align it with the hole. Gently push it into place until it clicks. Ensure the new pin is correctly oriented.
Apply new thermal paste: Apply a small, pea-sized dot of new thermal paste to the center of the CPU. This is essential for effective cooling.
Reinstall the cooler: Carefully lower the cooler back onto the CPU, aligning the four pins with the holes in the motherboard.
Secure the cooler: Push down on the four pins, one at a time, until you hear a click. This indicates that the pins have locked into place. You can do this in a diagonal pattern (top-left, bottom-right, top-right, bottom-left) to ensure even pressure.
Alternative Solution: Upgrade Your Cooler
If you find the plastic pins to be a recurring problem, it might be a good time to consider an upgrade. Aftermarket CPU coolers often use a more robust mounting system, such as metal brackets and screws, which provide a more secure and reliable fit.
Видео How to replace mounting heatsink push pins канала Obengplus com
CPU mount repair broken CPU pin how to fix CPU cooler heatsink mounting pin replacement repair CPU mounting bracket Intel push pin replacement broken Intel stock cooler pin CPU cooler push pins part remove Intel push pins replace Intel push pins overheating after cleaning installing Intel stock cooler replace thermal paste CPU Cooler Push Pin Push Pin Replacement CPU Heatsink Push Pin Old Cooler Install cooler heatsink repair broken mounting heatsink
Комментарии отсутствуют
Информация о видео
22 сентября 2025 г. 3:44:38
00:02:01
Другие видео канала