Replay- Bostick & Sullivan January 11th, 2021 2-hr Live Demo Platinum Palladium Printing
Live Demo Pt/Pd 1.11.21
Bostick & Sullivan Darkroom Night
Platinum & Palladium Printing Demo & Discussion
Sponsored by Hahnemuhle- our greatest thanks to them for sponsoring this video!
The raffle has now ended. It was live 1/11/2021.
Use coupon code LIVE15 at checkout for 15% off most items! Sale ends Friday 1/15/21
www.bostick-sullivan.com
Supply list:
Pictorico Premium Inkjet Media
Bostick & Sullivan Platinum & Palladium Kit for Digital Negatives
Tween-20 10% Solution
Synthetic Sable Brush
Puddle Pusher Glass Coating Rod*
Hahnemuhle Platinum Rag Paper
Disposable Salsa Cups or Shot Glass For Mixing Emulsion
Distilled Water For Wetting Brush
Pencil
Equipment list:
Bostick & Sullivan Contact Printing Frame
Edwards Engineering UV Light Box
Nuarc 26-1KS Vacuum Frame & Plate Burner*
Paterson Developing Trays
Negative Preparation:
6x9 inch (15x23 cm) image @360 dpi resolution minimum
Pictorico Premium Inkjet Media 8.5 x 11 inch
Epson P-800 printer with Epson Ultrachrome HD inks
Adobe Photoshop
Bostick & Sullivan correction curve designed by Dave Hyams. See his studio here: www.luminariaslc.com
Our negatives were created using a high quality digital file and printed using an Epson P-800 printer. The image was edited in Photoshop and then resized to fit the output media. A correction curve was applied to calibrate the negative’s density and contrast to match the sensitivity of the Platinum/Palladium emulsion.
Bostick & Sullivan PDF and Video tutorials for making inkjet negatives are available at:
https://www.photo-historica.com/digitalnegatives
Coating Paper:
We are coating Hahnemuhle Platinum Rag 11x15 inch paper with a 2 inch Langnickel synthetic sable hair brush. We mark the paper with a pencil to act as a guide for spreading and concentrating the emulsion in the image area.
Drops Chemical
14 Ferric Oxalate #1
11 Palladium #3
4 Sodium Platinum Na2 5%
1 Tween-20 10%
Spread the emulsion on the paper using the tip of the brush. Using a wet brush will keep the expensive emulsion on the paper instead of soaking into the brush. Allow the coated paper to air dry for 30 minutes before exposing.
Exposing The Image:
Place the negative against the coated paper, emulsion to emulsion, and place it in the split-back contact printing frame. Insert the print frame into the Edwards Engineering UV exposure box and expose for 6-8 minutes.
Developing:
We are using a saturated solution of Potassium Oxalate as our developer.
Potassium Oxalate produces a subtle warm tone Platinum/Palladium print. The developer is undiluted, and does not become exhausted from continued use. Development is almost instantaneous, but we recommend leaving the print in the developer for 2 minutes to allow it to penetrate the fibers of the paper completely.
Clearing Bath:
Once developed, the image is permanent and needs no fixer. However, a clearing bath to remove the yellow stain left in the image highlights is needed. We use a mild solution of Sodium metabisulfite and EDTA to dissolve the stain, and change this solution when it becomes red from dissolved iron. Two successive clearing baths may be needed for some papers.
To make a clearing bath mix:
30 grams EDTA Tetra Sodium
30 grams Sodium Metabisulfite
1 liter tap water
Drain excess developer from the print. Next, soak print in the clearing bath solution for 6 to 8 minutes. Agitate clearing bath once per minute. After this time, the yellow stain should be removed from the paper completely.
Archival wash and drying:
After the clearing bath, wash the print for a minimum of 30 minutes with a constant stream of cold water.
After washing, set the prints on screens to dry. Flatten dried prints in a dry mount press set to 225F for 2 minutes. Mount on archival matt board.
Видео Replay- Bostick & Sullivan January 11th, 2021 2-hr Live Demo Platinum Palladium Printing канала Bostick & Sullivan
Показать
Комментарии отсутствуют
Информация о видео
Другие видео канала
 Make a Platinum (Palladium) Print with Bill Schwab
 YouTube Print Exchange Featuring Platinum/Palladium Printing - Large Format Friday
 Step by Step: How to make a Platinum Palladium Negative the Bostick & Sullivan way
 Darkroom fiber prints flattening with an heat press
 How to Screen Print using Vinyl
 Alternative Photography - VanDyke Brown with UV LED Box
 The Digital Negative - Part 5 - Let's Print!
 Modifying Film Holder for Glass Dry or Wet-plates | Step by Step Tutorial | Large Format Photography
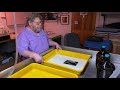 Darrel Roak Platinum and Cyanotype Winter Residency at Cone Editions
 Making a salted paper print: from setting up the shot to finished print
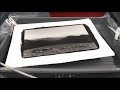 Na2 Platinum Palladium Demo
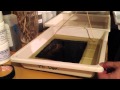 Platinum printing on Tosa Washi Platinum Paper (Japanese Tissue)
 Making a Digital Negative - A Shocking Experience
 Meet the Gang at Bostick & Sullivan
 Mixing Collodion for Wet Plate Photography (Part Two)
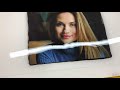 Calibrating Platinum Print over Color Pigment Inkjet
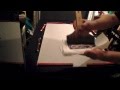 Platinum Palladium Printing on Tosa Platinum Paper for K.K.
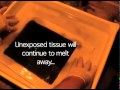 Carbon Transfer Printing Steps With Andrew O'Neill.mov
 Digital Negatives Part 1
 Hahnemühle Leads the World | Made in Germany