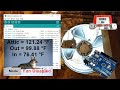
Arduino Attic Fan Control with Nextion Touch Screen GUI // Tutorial Part 1 – Hardware and Wiring
In this two-part tutorial I will show you how to build and install an Arduino controlled attic fan with a Nextion 2.8” touch screen display (GUI) for relatively low cost. I will explain why installing an Arduino controlled A/C fan could actually save you money on your air conditioning bill. I will also explain why an Arduino controlled fan using multiple DS18B20 temperature sensors makes much more sense than simply using a thermostat. To summarize, there will be times when you want your attic fan to be off and the thermostat will keep it running. There will be times when you want your attic fan on and the thermostat will shut it off. By scrapping the thermostat and using an Arduino, you can use your attic fan more efficiently. Also, by installing a Nextion touch screen control in your house, you can easily change settings on the Arduino and shut your fan off during the winter.
Part 1 of this tutorial covers the selection and installation of an A/C fan, how to use a UL listed (safe for home use) home automation relay with the Arduino, the theory behind attic fans and all the wiring for both the A/C and D/C systems. Part 2 of this tutorial will dive into the programming of both the Arduino fan control software and the Nextion touch screen GUI software.
This is my first project using a Nextion touch screen. I have to say that I am already a big fan. The Nextion software is very intuitive. After just a few tutorials I had made a nice looking and very functional GUI. Then Nextion communicates directly with the Arduino via serial communication. I noticed that many people rely on the Nextion libraries. To be honest, the libraries look more complicated. I simply used my own serial commands and things worked out great.
The following are affiliate links for products that I use in this video. Purchases through these links will result in no increase in price for you, but may result in a small commission for me. These commissions will help me continue to make informative and entertaining videos such as this one. Thank you for your support and thanks for watching!
Broan 353 Attic Fan: https://ebay.to/33a16j8
Functional Devices Relay RIBTE01B: https://ebay.to/3jTwfOK
Nextion 2.8” Touch Screen Display: https://ebay.to/2R5sF7S
Arduino Nano Breakout Board: https://ebay.to/2F9k6pP
Arduino Nano: https://ebay.to/2Fb51nU
Other links you may find helpful for this project:
3 Great Arduino Temperature Sensors // LM34, DS18B20, and DS3231 Real Time Clock https://youtu.be/2mne6ZVLhhA
Arduino Fan Control // 2-Wire, 3-Wire, and 4-Wire CPU Fans https://youtu.be/UJK2JF8wOu8
Join Science Fun on Facebook @ https://www.facebook.com/ScienceFun4u
Видео Arduino Attic Fan Control with Nextion Touch Screen GUI // Tutorial Part 1 – Hardware and Wiring канала Science Fun
Показать
Комментарии отсутствуют
Информация о видео
Другие видео канала
 Arduino Attic Fan Control with Nextion Touch Screen GUI // Part 2 – Software
 What is a SHUNT? (Used to measure Current) + How to make a DIY version
 Attic Fan Installation - Hot Attic made Cooler!
 How to make a programmable LED Fan at home "2018"
 Illegal and Unsafe Wiring in Older Homes
 Tasmota #02 | Router Fan Project | Sensor & Switches in Rules
 (#0033) 4-Wire Computer Fan Tutorial
 DIY Arduino based Toroid coil winding Machine | Arduino project
 Arduino Linear Actuator Position Control // Linear Actuator with Position Feedback Return to Center
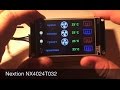 Подключение дисплея Nextion к Arduino
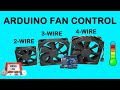 Arduino Fan Control // 2-Wire, 3-Wire, and 4-Wire CPU Fan Speed Control and Measurement
 Engineering an Open Attic with Site Built LVL Trusses
 Controlling fan speed with mosfet and Arduino
 Using The 3.5" LCD With Touchscreen As An Input Device | Arduino Uno
 QuitCool Attic Fan
 Stepper motor direction control (180 degree) using 2 buttons with the Arduino - zonemaker.com
 ESP8266 Thermostat HVAC | Like Google Nest | Part #3 | Tutorial # 42
 Electrical Wiring-Code violations
 Huge Nextion Touchscreen Display Examples | Video | Gauges | RTC
 #98 Nextion Display - Dual State button connected to Arduino - Nextion Tutorial