Getting Started with MPLAB X IDE - Part 4 Microcontroller Basics (PIC10F200)
In this last video before we get into the assembly program and actually program the PIC10F200 microcontroller, we go over the breadboard circuit setup and walk through the steps of setting up a project in MPLAB X IDE. Once we're done with this video, the only thing left will be to write the code and hit the build/upload button to get that program onto the PIC10F200. Next up - lit up LEDs!
We have a written version of this tutorial on our site:
https://www.circuitbread.com/tutorials/circuit-setup-mplab-x-ide-part-4-simple-microcontroller-pic10f200
If you find this interesting, subscribe to CircuitBread for more videos on microcontrollers and other beginner and intermediate electronics!
0:24 Review the breadboard, recognizing the microcontroller, LEDs, switches, and programming interface.
2:06 Introduction to MPLAB X IDE
2:27 Starting a project in MPLAB X IDE
3:48 Creating the main.asm file
4:48 Change MPLAB X settings so you can power your circuit with your PICKit 4
For electronics tools, tutorials, equations and more check out our site: https://www.circuitbread.com
CircuitBread is joining the fight to help people more easily learn about and use electronics. With an ever-growing array of equations, tools, and tutorials, we're striving for the best ways to make electronics and electrical engineering topics more accessible to everyone.
Connect with CircuitBread:
Instagram ➤ http://instagram.com/circuitbread
Facebook ➤ https://www.facebook.com/circuitbread
Twitter ➤ http://twitter.com/circuitbread
Видео Getting Started with MPLAB X IDE - Part 4 Microcontroller Basics (PIC10F200) канала CircuitBread
Показать
Комментарии отсутствуют
Информация о видео
Другие видео канала
 Your First Assembly Program - Part 5 Microcontroller Basics (PIC10F200)
 How to Read a Schematic
 PIC Extras 1 - PICkit4 and Snap programmers
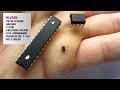 Smallest and cheapest microcontroller - tutorial
 DIY Christmas Lights with a Microcontroller - Charlieplexing LEDs (PIC10F200) | Christmas Special
 Getting Started - MPLAB® X IDE Essentials - 01: Installation and Ecosystem
 Programming the PIC16F84A in C with MPLAB X
 Interfacing 16x2 LCD with PIC16F877A microcontroller
 How to Use a Simple Microcontroller Part 1 - An Introduction (PIC10F200)
 Arduino Hardware Overview | The First Impressions | Microcontroller and Single Board Computer
 7 Homemade Projects - 7 DIY Life Hacks
 Electronic Basics #30: Microcontroller (Arduino) Timers
 Driving a VGA Display?! Getting started with an FPGA! (TinyFPGA)
 Getting Started - MPLAB® X IDE Essentials - 03: Editor and Navigator
 Doing This With WD-40 Will Save You Thousands in Car Repairs
 MPLAB X & XC8 Tutoriel
 Using PICKit3 to load Hex File onto PIC
 PIC32MZ EF Curiosity Development Board - XC32 - MPLAB X - New Project from scratch
 How to Use a Simple Microcontroller (PIC10F200) Part 2 - Equipment Needed