Stamperia 9x9 Mini Album Tutorial Part 4: Creating the Pop Up Mechanisms
This is part 4 of my 9x9 mini album tutorial series made with the Alice collection from Stamperia. This is the final video in this tutorial series. In this video, I will share how to create the pop up mechanisms you see throughout the final walkthrough video of the album.
For the flaps on pages 2, 4, 6, and the smaller flap on the inside back cover, here are your measurements for the pop up mechanisms:
-cut a piece of cardstock to 8" by 4", on the 8" side, score at 4". What you are left with is a card base that measures 4" by 4" when folded
-decide on a closure for your card base - I chose ribbon closures so before I did anything else, I put a strip of scor tape on the front and back of the card base and then adhered my ribbon
-next, decorate three panels of the card, the front, and the two inside panels -- your design paper will measure 3 3/4" by 3 3/4"
-for my covers, I cut three cards out of the card paper from the Stamperia Alice paper pack and glued only the left side to the front of ht ecard base. This leaves the right side open and you can slide a photo mat right under there (my photo measures 3" by 3", and my black photo mat measures 3 1/4" by 3 1/4"
-decorate the inside as well (two pieces of paper 3 3/4" by 3 3/4"
-now it's time to create the pop up mechanism
-cut a strip of cardstock to 1/2" by 3 1/4" and score at 3/4", 1 1/4", 2 1/4", and 2 5/8"
-place scor tape on the first space between the left end of the paper and your first score line
-place scor tape on the second space right next to the first space where you placed scor tape
-place scor tape on the far right of the strip as well, from the last score line to the end of the strip of cardstock
-now it's time to adhere the strip to the inside of the card
-turn the strip of cardstock upside down so the tape is facing the table. Take the tape backing off the first space only; line the score line of the strip with the score line of the inside of the card base and adhere the exposed tape to the top of the inside of the card.
-next remove the tape backing from the second space and adhere it to the bottom of the card
-make sure you fold on all your score lines, it will make a rectangle
-adhere the last piece of tape to the top of the inside of the card, making sure that the mechanism creates a straight rectangle before adhering firmly down
-cut out your character from the cut apart sheet, back on black cardstock, then place glue on the long rectangle that is exposed on the pop up mechanism and adhere your character to the mechanism
-you can also create small photo mats for the inside (the one I have on top measures 2" by 2" with a 2 1/4" by 2 1/4" mat and the bottom one measures 2 1/2" by 2 1/2" with a 2 3/4" by 2 3/4" black photo mat.
-next, to adhere the pop up mechanism to your album, simply place scor tape on the back and then adhere to your flaps
***The pop up mechanism for the flap on page 8 is slightly bigger. It measures 5" by 5" when folded, meaing you start with a piece of cardstock that is 10" by 5", score at 5", then fold. Your design paper would be (cut three pieces) 4 3/4" by 4 3/4". Everything else is done the same way and the pop up mechanism is the same measurement. Your photo mats can be a bit larger, that's up to you.
***The pop up mechanism for the larger flap on the inside back cover also is slightly bigger, it measures 4 1/2" by 4 1/2" when folded, meaning you start with a piece of cardstock that measures 9" by 4 1/2" and score at 4 1/2". Your design paper (cut 3) would be 4 1/4" by 4 1/4". Your photo mats can be a bit larger, that's up to you.
****If you prefer not to do this step and to not create the pop up mechanisms, you can use the flaps in the album like ordinary photo mats, or you can leave the flaps off completely.
Thanks so much for joining me on this Alice in Wonderland journey :) Hope you love the album and the tutorials :)
shop www.scrapncreate.com
Видео Stamperia 9x9 Mini Album Tutorial Part 4: Creating the Pop Up Mechanisms канала Scrap N Create
Показать
Комментарии отсутствуют
Информация о видео
Другие видео канала
 9 x 9 Stamperia Alice Mini Album Tutorial Part 1: Creating the Book, Binding, and Pocket Page
 How To Make My Alice Pop Up
 A 'Rejoice' Waterfall Mini Album Tutorial
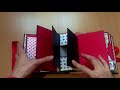 Mini Album Alice in the Wonderland 2
 Requested Tutorial: Midnight Tales Mini Album Final Page Popup Element
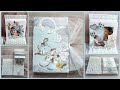 Tutorial mini álbum con tarjetas en cascada efecto pop up.
 Stamperia Alice Mini Album Yearbook Tutorial - Walk Through
 Stamperia Wonderland 7x7 Mini Album Tutorial Part 1: Creating the Book, Binding and Pocket Pages
 Mini Album Zig Zag - DIY tutorial
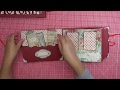 Album con caja Alicia Stamperia
 Tutorial 4 mini album "Spring Market" #cartadazucchero #tutorial #minialbum #scrapbooking
 Stamperia Alice in Wonderland Mini Album Tutorial - Video 4: Decorating Page 1 Front
 Graphic 45 | Come One Come All Mini Album Page 1
 Pop-up album - page 6 tutorial
 ALBUM SUSURROS DE HADA
 One Page Wonder Interactive Mini Album
 One & Done Scrapbooking Kit Tutorial
 EASY MINI ALBUM TUTORIAL PART 1 STAMPERIA AROUND THE WORLD SHELLIE GEIGLE JS HOBBIES
 Alice in Wonderland Interactive Lapbook Tutorial | Part 1