Stop and go, and return.
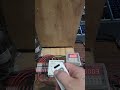
This is just a proof of concept, done for another youtuber. If you want diagrams just ask. Don't let the wiring put you off. It is not hard to do. This was done spare of the moment just to show it working. So very little time and effort was put into the looks or wire management.
This goes from one end to the other. Stop and go. It is a smaller version of the one in this video.
https://youtu.be/ipo8ElzQORQ
The differences is the limit switches. The ones in the other video are magnetic reed switches. You have to use one or two transistors and resistors, otherwise the contacts in the reed switches arc and get stuck.
In this version you don't need that, just a couple of diodes. You can add limit switches in the middle if you need more stops.
You can even add more stops in the middle and have them alternate when reversing.
Like
Left to Right 1 stop & reverse or just reverse, 2 pass, 3 stop, 4 pass, 5 stop & reverse or just reverse.
Right to Left 5 stop & reverse or just reverse, 4 stop, 3 pass, 2 stop, 1 stop & reverse or just reverse.
You can set this out to do at least five different modes.
Stop & Go at every switch and have it loop back to the first one, if on a conveyor belt.
Stop & Go at every switch and stop at end.
Stop & Go at every switch and Reverse at end and then Stop & Go all the way back, and loop.
Stop & Go at every switch and Stop & Reverse at end and then Stop & Go all the way back, and loop.
Stop & Go at every switch and Stop & Reverse at end and then Bypass all the center switches, and loop.
Motor speed control can be added to both directions, one way, or each direction have it's own speed.
Crimper
The one I have. At the time of adding this link it is not available but still wanna add because it was only $23 at the time I purchased.
https://amzn.to/3GA8fOc
https://amzn.to/3RtMS7f
The connectors in video:
I don't know if these come with the little expansion/retaining/retention pin that keeps them from sliding apart. But if you know you will never need them to come apart you can put a drop of super glue in the "hole". Search for Anderson Powerpole expansion/retaining/retention pin.
Black and Red
15 amp
https://amzn.to/3NgUyY2
30 amp
https://amzn.to/3TayqCs
45 amp
https://amzn.to/4acZkPY
Rubber Boots
https://amzn.to/3Ry6d7k
Orange
https://amzn.to/46P3vP2
Yellow
https://amzn.to/3Rce2OO
Blue
https://amzn.to/3GDM3Cs
Green
https://amzn.to/3t7hgeg
Purple
https://amzn.to/4a2Tm4e
White
https://amzn.to/47RLPUr
Not the same as the pins
Powerwerx PCLIP Retention Clips for PP15/30/45 Anderson Power Powerpole Connectors (25 pieces)
https://amzn.to/3NkluGu
Powerwerx RT-1 Powerpole Insertion, Removal & Extraction Tool
Not necessary but makes it so much easier.
https://amzn.to/47LgdzW
Powerwerx PanelPole2, Panel Mount Housing for Two Anderson Powerpole Connectors with a Weather Tight Cover
Single
https://amzn.to/3NhvJv0
Double
https://amzn.to/3RtNoSJ
Chunzehui F-1011 6-Position 45A Power Pole Distribution Block Module, Connector Power Splitter Distributor Source Strip.
https://amzn.to/3GAcUPU
Valley Enterprises Powerwerx Chassis Mount Kit for Four Anderson Powerpole Connectors
https://amzn.to/3uVybks
Good video
https://youtu.be/bZHh3nWXtkw
Wire Ferrules
https://amzn.to/3RzntJe
Видео Stop and go, and return. канала Aztec Warrior
Показать
Комментарии отсутствуют
Информация о видео
Другие видео канала
 Just showing how the MHCOZY can be used as a control for a door-locking system
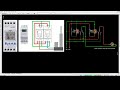 The simplest way to wire a chicken coop door with Linear Actuator( Redone)
 Stop and Go Return Stop and Go
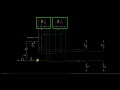 How to Wire Turn Signals AND Brake Lights into a ONE BULB DPDT Switch Two Relays
 Cord Keeper
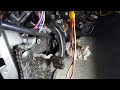 "anti-theft" fuel pump "disableler" switch.
 Stop n Go 4 Demos @mikmaster63 @FENIA3648
 Latching relay board test for Tortoise switch machine. Non TR/IL/SL
 Chicken Tractor Water System Explanation and DEMO
 2023 11 22 19 45 16
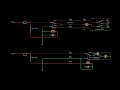 Corvette Power Antenna vs Universal Power Antenna
 Sample Chicken/Brooder Tractor
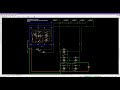 Stop n Go Final @FENIA3648
 Basic Vehicle Automatic Antenna Wiring Diagram
 The simplest way to wire a chicken coop door External Limit Switches.
 Latching relay board test for Tortoise switch machines. Testing off board relays.
 Screen Door Closer NO Arduino
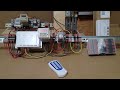 Just another short demo video Chicken Coop Automatic Door w Safety Feature.
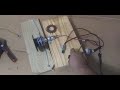 Quick throw together Coop Door Pull - Pull
 Tie down