How To Make A Glitzy Key Pendant
How To Make A Glitzy Key Pendant
Click SHOW MORE for more details on this project!
Thanks for watching! If you like our videos, please click the subscribe link so you won't miss our new videos. We post a new one every week!
Our blog is www.RunningWithSisters.com. It is loaded with DIY crafts, jewelry tutorials, and all kinds of gift crafts to make.
Let’s stay in touch!
Twitter: https://twitter.com/ONeilSisters
Facebook: https://www.facebook.com/TheONeilSisters
Instagram: https://www.instagram.com/oneilsisters/
Pinterest: https://www.pinterest.com/oneilsisters/
How To Make A Glitzy Key Pendant
by Jennifer and Kitty O'Neil
The O'Neil Sisters
Running With Sisters
Transcript (Edited For Length)
To make our glitzy key pendant we've got a bunch of fun things here that we're going to use to build our design. The first thing we have is some vintage keys that we got at the flea market. We've got some metal filigrees here and different metal finishes. These are from the craft store. We've got some vintage brooches and rhinestone clip-on earrings here. The clip-on earrings a lot of them have lost their mates so they're perfect for project like this. We've got a piece of chain, a piece of ribbon, and finally we've got some flat back rhinestones and these are Swarovski crystals.
The first thing we're going to do is I'm going to tie this little piece of organdy ribbon through the little keyhole at the top and you'll see why later.
And the next thing we're going to do is glue one of these gorgeous filigrees right here, over the main part of our key. And you can just pick up the different filigrees and lay them down and see which one you like. the size of. I like that one so I'm going to use E6000. It's especially great for gluing metal to metal. I'm going to take our glue and put some on the back. Some of the glue is going to come through but that's okay because we're gonna glue something to the front of this filigree. I'm going to press that down onto my key and it stays tacky for a little while so you can move it around to get it positioned how you want it. Now we want to add a vintage brooch right here in the front. Some of these are vintage brooches with a little pin back on the back and some of them are earrings and this one's actually a vintage button. If you have one that has a pin back like this, use a pair of wire cutters. You can just snip the pinback off.
I like this turquoise brooch so I'm going to put it right there over our filigree. To do that I'm going to put the glue on the parts that are raised up because I know that that's where they're going to touch that filigree. So add some glue. If you get glue strings you can twist your glue and it'll break the little string. I'm gonna place that right over the center of my filigree.
Now I think I want to embellish this part of the key just to continue this transformation of this key. And to do that I've got a bunch of rhinestones here and I think what I'd like to do is alternate the colors here. When we work with rhinestones we have a little trick for that. We like to use again the E6000. I'm gonna put a dollop of it on my work surface here. I've got a toothpick and tweezers. This is this is the best way I think to apply rhinestones onto a project. I'm going to pick up my rhinestone, flip it over. I'm twirling a little bit of my E6000 onto my toothpick and then I'm going to just apply that glue to the back of my rhinestone. And then I can use my tweezers to set that rhinestone down. I can use the other end of my toothpick to help me position it.
I'm going to alternate the colors of these. A little bit of glue on the toothpick, get it right there on my rhinestone, and then set that down. I'm going to use the other side of my toothpick to get it in position. It's much easier to use a toothpick to apply the glue to the back of these rhinestones than to try and squeeze out the right amount.
The last thing we want to do is attach our pendant to the chain. My pendant is still wet, but you can wait about 15-20 minutes and let your glue setup. What we're going to do is to use the ribbon that we attached to the top of the key and we're going to tie it onto the chain. I just laid the chain on top. I'm going to tie it once and then I'm gonna tie it one more time, so I've got it knotted. So I tied it nice and tight to my chain and now I'm going to just use a pair of scissors to trim. And there we have our beautiful glitzy key pendant!
If you have any questions at all while you’re making your Glitzy Key Pendant, leave us a comment and we’ll reply. We’d love to hear from you!
Come Craft With Us!
Jennifer & Kitty
We have all kinds of jewelry making videos and lessons. If you enjoy this one, you might also like these jewelry making lessons:
How To Make A Pandora Ribbon Choker
https://youtu.be/KOLY0cP8PoU
How To Make Jewelry: How To Make A Beaded Lariat Necklace
https://youtu.be/z7Ywk2DHUH4
Видео How To Make A Glitzy Key Pendant канала The O'Neil Sisters
Показать
Комментарии отсутствуют
Информация о видео
Другие видео канала
 Junk Journal DIY #2: Altered Keys
 Alcohol Ink Pendants Hack - No Inks? No Yupo? No Problem!
 how to wire wrap crystals! | easy tutorial
 How To Quickly Convert Your Pin To A Necklace Pendant With Brooch Converters-Friday Findings
 How to Solder Jewelry Video 1 - Basics
 How To Make A Pearl Spiral Wrap Ring
 DIY~Make Gorgeous & Simple Mixed Media Domino Pendant Necklaces!
 DIY Glue Earrings / How to Make Flower Earrings From Glue By Aloha Crafts
 How to make a magic staff that lights up
 How to Make a Stamped Ring | Jewelry 101
 Watch me Resin #13 - Word/Letter Tutorial - Dino Nugget
 Repurposing Your Own Jewelry Designs Into Work That Sells with B'sue and Donna
 Tips and tricks about Drilling and Sanding Resin (tutorial)
 How To Make COVER BUTTONS from scratch- Detailed description
 Jewelry Tutorial : Wire Wrapped Bail for Pendants
 5 AMAZING EPOXY RESIN PENDANTS | HOW TO MAKE NECKLACE PENDANTS
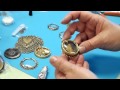 Using Deep Bezels and Magnifying Lenses to Make Customized Pendants, Brooches, Assemblage Jewelry
 How To Make A Pearl Illusion Necklace
 How to Solder Jewelry Video 4 - Stacked Pendant