The triple tray impression technique : A clinical guide
First introduced in the early 1980’s, triple tray impressions have grown to be the most popular technique for taking one and two unit Crown & Bridge impressions. Who wouldn’t want to save time and money and get the prep, the opposing and the bite all in one process? As with any system, technique is important. Here are a few tips for making a great first impression:
Step 1: Start with the right tray:
• Use a rigid and sturdy impression tray. A metal tray is recommended (although if you use hard putty, sturdy plastic trays will do)
• Try the tray in the patient’s mouth to ensure that they can fully close in MIP. (Remember you can’t change occlusal scheme with this technique. You can only make restorations in MIP)
• Check that the most distal tooth clears the posterior bar of the tray.
Step 2: Make a Good Impression:
• Following the manufacturer’s guidelines, fill the tray with impression material..
• During the procedure, ensure that the patient’s tongue is causing no lingual interference.
• Support the passive mesh with index finger from underneath when inserting the tray. This will ensure that the impression material is loaded evenly in both sides of the tray
Step 3: Remove the Tray:
Once the impression material has set completely, remove the tray by breaking the seal around the teeth with your fingers, do not use the handle. Before sending your impression to the lab, inspect it using this Impression Checklist:
• Uniform, homogeneous mix of material.
• Tray is sufficiently filled with impression material.
• No voids or pulls on margin detail.
• Detailed margins with no tears or rough surfaces.
• No tray show-through of the impression material.
• Good blend between heavy body and light body materials.
• Strong bond between impression material and tray.
• No tooth contact with tray
Видео The triple tray impression technique : A clinical guide канала Manav Kalra
Показать
Комментарии отсутствуют
Информация о видео
Другие видео канала
 How to take a Triple Tray Impression
 Impressions technique: The Putty Wash
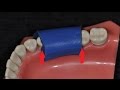 Temporary crown; A simple chair side technique
 Crown Impression Tips Part 3
 Temporary Crowns; Quick and Easy Fabrication - Dental Minute with Steven T. Cutbirth, DDS
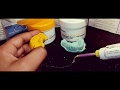 Putty index fabrication
 Boxing a Complete Denture Impression: Plaster and Pumice Technique
 IMPRESSION: TIP AND TRICKS n.1
 Mockups in Aesthetic Dentistry
 How to Make a Fixed Pin Model, Full Process | Step-By-Step
 Basic Rubber Dam Application
 Double Impression technique (President-Coltene)
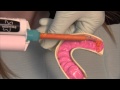 How to take one-step impressions
 How to make impressions for dental implants
 Case of the Week: Double-Arch Impression Trays
 Getting the shade right!!!
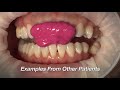 Chairside Live Episode 220: Avoiding Common Bite Registration Errors
 Watch a Demonstration of Taking a Final Dental Impression | Dentsply Sirona
 Crown Impression Tips Part 2
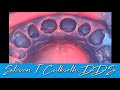 Best Impression Method for Veneers & Crowns - Dental Minute with Steven T. Cutbirth, DDS