Black and White Portrait Edit in Adobe Lightroom - Post Process with Impact
I'm back with a black and white portrait editing tutorial in Adobe Lightroom. In this video, I share some simple tips and thoughts on making the most from your black and white conversions. This post-production technique can be followed for any black and white subject.
Some users create bland washed out black and white imagery that doesn't have the impact they were hoping for. There really is more to creating a powerful black and white than just taking away the colour! With this video walkthrough, I show how I use the tools inside Lightroom to control the viewer's attention and create a more dramatic black and white edit. If you want to get an even more illustrative and artistic black and white I'd recommend Aurora. I used it to import this photo from Lightroom and the results were very impressive! http://macphun.evyy.net/c/1304886/513351/3255. (Be sure you use the code ATSKY10 if you want a discount!).
Below is a break down of the steps involved in this black and white photo edit:
1: Apply a black and white profile that suits the image
2: Analyse your image and determine your objectives. In my example, I wanted to showcase the subjects beloved working environment as well as the 80 years of wisdom contained within his face. I saw that the light distribution wasn't great and that local dodging and burning (lightening and darkening of specific areas) would be necessary.
3: Apply Lens Correction to remove any barrel distortion and straighten the image with the transform panel.
4: Make tonal adjustments in the basic editing panel. AND... don't forget the contrast slider as I did!!! It is your friend in black and white edits!
5: Add details and punch to your black and white photo using Lightroom's "presence" section. Add texture, clarity and even a bit of dehaze to add drama and interest. Just be mindful not to go too far!
6: Adapt the tone curve as necessary.
7: Walk away from the image and come back with fresh eyes. Make any alterations.
I hope you enjoy this tutorial walkthrough. Feedback is always welcome, and if you've got any tips you'd like to add. Please do so in the comments. If you're interested in any particular photo editing or photography tutorials in general, please post your ideas in the comments.
FOLLOW ME:
Photography: https://www.instagram.com/anthonyturn...
Landscapes: https://www.instagram.com/newzealands...
Landscape Prints: https://www.newzealandscapes.co.nz
Wedding Photography: https://www.facebook.com/SnapPhotogra...
Website: https://anthonyturnham.com
My studio set up:
🖥️ Monitor: https://amzn.to/346A64E
🎤 Microphone: https://amzn.to/331DAGw
📷 Camera: https://amzn.to/3j3fQan
📷 Lens: https://amzn.to/2RZzV5M
------------------
🚥 Coloured Lights: https://amzn.to/2RXBuRA
🚥 Hub to control the lights: https://amzn.to/367y0nF
💡 Salt Lamp: https://amzn.to/364xiHQ
My Camera Equipment:
📷 Camera: https://amzn.to/3j3fQan
📷 My Wide Angle Lens: https://amzn.to/3j9I1Vb
📷 Nifty fifty: https://amzn.to/3ifmY2t
📷 Mid-range zoom: https://amzn.to/33Xltkc
📷 Telephoto Lens: https://amzn.to/3cBAyMo
📷 Tripod Head for architecture: https://amzn.to/30cbJBq
These are affiliate links to the equipment I use - they are not sponsored by the manufacturer in any way. If you use these links it costs you no more than normal, but the small commission I get helps me to be able to keep providing free content for you guys. Thank you 🙏
Видео Black and White Portrait Edit in Adobe Lightroom - Post Process with Impact канала Anthony Turnham
Показать
Комментарии отсутствуют
Информация о видео
Другие видео канала
 From Boring to Dramatic black and white in lightroom 2021
 Make Kick-Ass Black and White Conversions Using Calculations in Photoshop
 How I create Dramatic Black and White images for Instagram
 Lightroom Classic Start to Finish B&W Tutorial (using the new B&W Profiles)
 Advanced 7-Step Black and White Portrait Editing in Lightroom | Master Your Craft
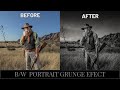 How to make a dramatic black & white portrait in Photoshop
 How to Process Black & White Images in Lightroom
 Luminar AI Edit & Increase Image Resolution Without Losing Quality!!! REMARKABLE
 7 Step Advanced Black & White Editing in Lightroom | Master Your Craft
 What is Luminar NEO? Is It As Good As They Say?
 First Tests of Luminar NEO Tech Demo! Are The 3 New A.I. Photo Editing Tools Any Good?
 PHOTO EDITING FOR BEGINNERS – 9 Simple Steps to Improve Your Photos
 How to Perfect Black & White Landscapes - WITHOUT PRESETS
 FOOLPROOF 4 Step Black and White Photos!
 Black and White Landscape Power Editing Tutorial - Lightroom 2018
 Outdoor Portrait Processing in Lightroom (Photo Editing Workflow)
 BLACK AND WHITE PHOTO EDITING WITH LIGHTROOM - My Process How To Create Great Black and White Edits
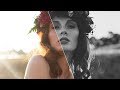 How to Edit Amazing Black & White Portraits in Lightroom!
 EDIT ARCHITECTURE PHOTOS LIKE A PRO - Easy Steps to Powerful Architecture Photo Editing in Lightroom