How to use the FARO Arm Laser for 3D Scans
By: Dana Almasri
TAMPA, Fla. - The FARO Arm and Laser Scan can be used in multiple ways including reverse engineering machine parts to dimensional analysis.
The Arm is used in projects that require a high degree of accuracy, such as analyses of functional morphology in biology and analysis of CAD designs in engineering.
There are three components to using the FARO Arm:
1. The first part is scanning the object.
2. The second part is processing, which is bringing all the scan groups together and puts it into one group to make one 3D scan.
3. The last step is saving the scan and exporting a digital copy.
The FARO Arm is made up of four parts:
1. Tripod
2. Base
3. Arm
4. Scan gun
Depending on how well the object is scanned it takes 30 minutes to an hour to scan an object. The processing workflow is longer. It takes one to three hours to process the object, depending on CPU processing power. All together scanning, and processing takes one to four hours.
Not all objects can be scanned with the FARO Arm Scanner.
Objects that can be scanned:
-Wood
-Stone
-Ceramic
-Bone
-Nontransparent plastic
-Paper
-Semireflective metal
Objects that cannot be scanned:
-Glass
-Transparent materials
-Obsidian rock
-Highly reflective material
-Here are the steps to scanning and processing:
Part One: Scanning
Step One: Plug in the FARO Arm USB cord into a computer. Turn on the power button located on the base of the FARO Arm
Step Two: Open Geomagic. This software is specifically designed to scan objects.
Step Three: Press scan on the menu bar, which will take you to the capture page. From there you can scan objects.
Step Four: When on the capture page, go into advanced options and adjust the setting depending on the object being scanned. This is done by adjusting the point density of the object, which depends on how detailed the object is. For example, if the object is metallic the setting would be changed to HD mode.
Step Five: After adjusting the settings, press scan in the menu bar.
Step Six: Before you begin scanning, the software will show the scan arm and various red circles around the joints. To clear this lift the scan arm and rotate all the joints until all the red circles clear. Now the object is ready to scan.
When scanning the object make sure to go at a steady pace, in one direction and don’t go too fast. This will help avoid getting bad data. When the light on the scanner is green, you are in the correct distance from the object. If the scan gun shows a red light it means the scanner is way too far or too close to the object.
Step Seven: Scan all visible sides of the object.
Step Eight: Create a new scan group by clicking “okay” on the scan page and then flip the object and scan the part that was not seen from the very first group/scans.
Step Nine: Repeat step eight as necessary to capture all sides of the object.
Part Two: Processing
Step 10: Save scanned data as raw scans.
Step 11: Clean out everything that is not the object from the scanned data.
Step 12: Do a global registration on each individual scan group by clicking “global registration” from the menu bar.
Step 13: Manually register all scan groups together by clicking on “manual registration” from the menu bar.
Step 14: Do a global registration of the aligned scan groups at the same time.
Step 15: Break all the scan groups.
Step 16: Take all the individual scans and put them into one group together.
Step 17: Do a global registration of the one scan group by clicking on “global registration” from the menu bar.
Step 18: Save as aligned and globally registered.
Step 19: Clean out bad data.
Step 20: Click on “merge” from the menu bar.
Step 21: Remove holes and spikes from the object.
Step 22: Apply the mesh doctor by clicking on “mesh doctor” from the menu bar.
Step 23: Remesh the object being scanned by clicking on “remesh” from the menu bar.
Step 24: Apply the mesh doctor again.
Part Three: Final
Step 25: Save your scan as final.
The scans can now be used to share online, measure the object that was scanned, 3D printed and used as educational tools.
This project was created by USF student Dana Almasri for Jeanette Abrahamsen's Advanced Reporting class in 2018.
Видео How to use the FARO Arm Laser for 3D Scans канала Zimmerman School Digital Network at USF
Показать
Комментарии отсутствуют
Информация о видео
18 октября 2018 г. 5:01:01
00:02:23
Другие видео канала
 Faro 3D Laser Scanner - Jay Leno's Garage
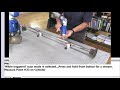 Faro Arm Training Tutorial: Cylindricity (4.0 & X)
 USA HEXAGON Portable Measuring Arm : ROMER Absolute Arm series
 FARO Quantum S FaroArm Product Video: Webcast
 WIND BLADE TURBINE Manufacturing Process You Won’t Believe How Are Made – Shocking Production Method
 FARO Edge ScanArm Demonstration
 FaroArm Precision Gearing Coordinate Measurement Machine (CMM)
 LiDAR Scanning a Fully Furnished Apartment on an iPhone 12 Pro (in Under 7 Minutes)
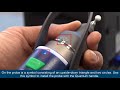 Quantum FaroArm Introduction
 FARO 8-Axis Quantum ScanArm: Faster and Easier Scanning with FARO 8-Axis
 QDP Faro 8 Axis 10 5 18
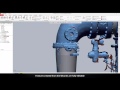 Geomagic Design X 2016 - Creating CAD Models with the FARO Scanner Freestyle3D
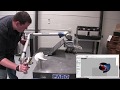 Faro Edge - GeoMagic Design X Scanning Demo
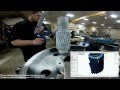 Reverse Engineering a Large Gear with a FARO 3D Laser Scanner
 FARO® Gage Portable Coordinate Measuring Machine CMM
 A look inside Artec Studio 14
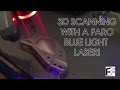 FARO Arm Laser 3D Scanning demo!
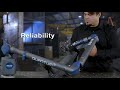 FaroArm Quantum S Overview
 The FARO Gage FaroArm: As accurate as a fixed CMM, faster than hand tools
 FARO Focus S Laser Scanner